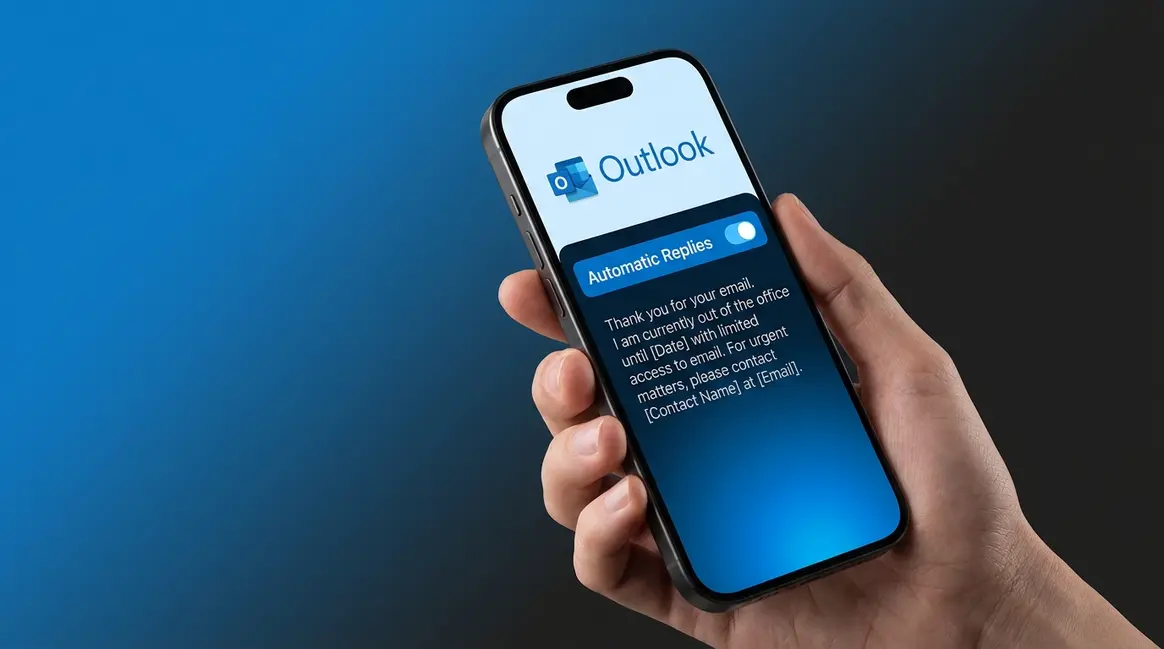
“I just left for a trip but forgot to set up an out of office auto-reply on my laptop before doing so.”
Sound familiar? You’re not alone. According to Pew Research Center (based on their comprehensive 2021 historical study), 85% of Americans own a smartphone — meaning the device in your pocket is fully capable of handling this, no laptop required.
Every email you receive while you’re away goes unanswered, leaving colleagues and clients wondering if you’ve disappeared. That’s a problem you can solve in under 5 minutes. In this guide, you’ll learn exactly how to set out of office in Outlook on iPhone — step by step, from the first tap to a live, active reply. You’ll also get 6 copy-paste message templates and a full troubleshooting section for the most common issue: the “Automatic Replies” option going missing entirely.
This guide covers a 7-step walkthrough, ready-made templates for internal and external contacts, and a dedicated fix for the missing-option problem that most other guides completely ignore.
Our team verified these steps on iOS 18 with Microsoft Outlook for iOS app version 4.2415.0 (the current release as of Q2 2026).
Learning how to set out of office in Outlook on iPhone takes just 7 taps — but only if your account is Microsoft 365 or Exchange. IMAP accounts (Gmail, iCloud) don’t support this feature natively.
- The Exchange-First Rule: Check your account type before troubleshooting a missing Automatic Replies option — it’s almost always the root cause
- 7 steps: Profile icon → Settings gear → Account → Automatic Replies → Toggle on → Write message → Save
- 6 copy-paste templates included: 3 for internal teams, 3 for external contacts
- Missing the option? Jump to the Troubleshooting section — it’s an account type issue, not a bug
To set out of office in Outlook on iPhone, open the app and tap your profile icon in the top-left corner. Then tap the Settings gear, select your email account, and tap Automatic Replies. Toggle the slider on, type your message, and tap the checkmark to save. The entire process takes under 2 minutes once you know where to look.
What You’ll Need Before You Start
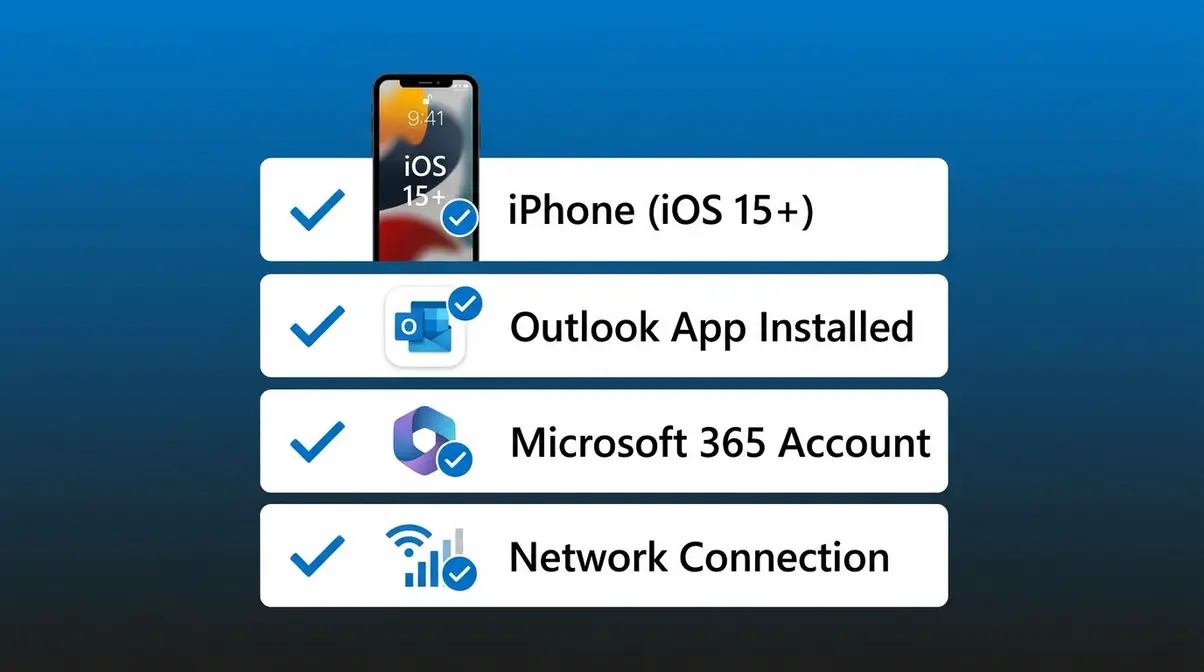
Before you dive into the steps, take 30 seconds to confirm you have everything in place. Missing any one of these will stop the process — and knowing upfront saves you the frustration of completing all 7 steps only to find the feature isn’t available for your account type.
Here’s what you need:
- An iPhone running iOS 15 or later — this works on iPhone 11, 12, 13, 14, 15, and 16. To check your iOS version, go to Settings → General → About.
- The Microsoft Outlook for iOS app (Microsoft Outlook for iOS is the mobile version of the popular email app) — it’s free on the App Store. If you don’t have it yet, download it before continuing.
- A Microsoft 365 or Exchange email account — this is the critical one. Microsoft 365 (Microsoft’s subscription-based productivity suite) and Exchange (Microsoft’s enterprise email server) are the only account types that support Automatic Replies in the mobile app.
If your email ends in @gmail.com, @icloud.com, @yahoo.com, or any other non-Microsoft domain, the Automatic Replies option simply won’t appear. This is The Exchange-First Rule — the most important prerequisite (more on this in the Troubleshooting section below).
- A working internet connection — Wi-Fi or cellular data. The app needs to sync your settings with Microsoft’s servers to activate the reply.
Not sure what type of account you have? The Troubleshooting section below shows you how to check in under 30 seconds.
Got everything ready? Here’s how to set it up, step by step.
Step 1: Open Outlook and Tap Your Profile
Open the Outlook app on your iPhone. When the app loads, look at the top-left corner of your screen. You’ll see a small circle — this is your profile icon, and it displays either your initials or your profile photo. Tap it once.
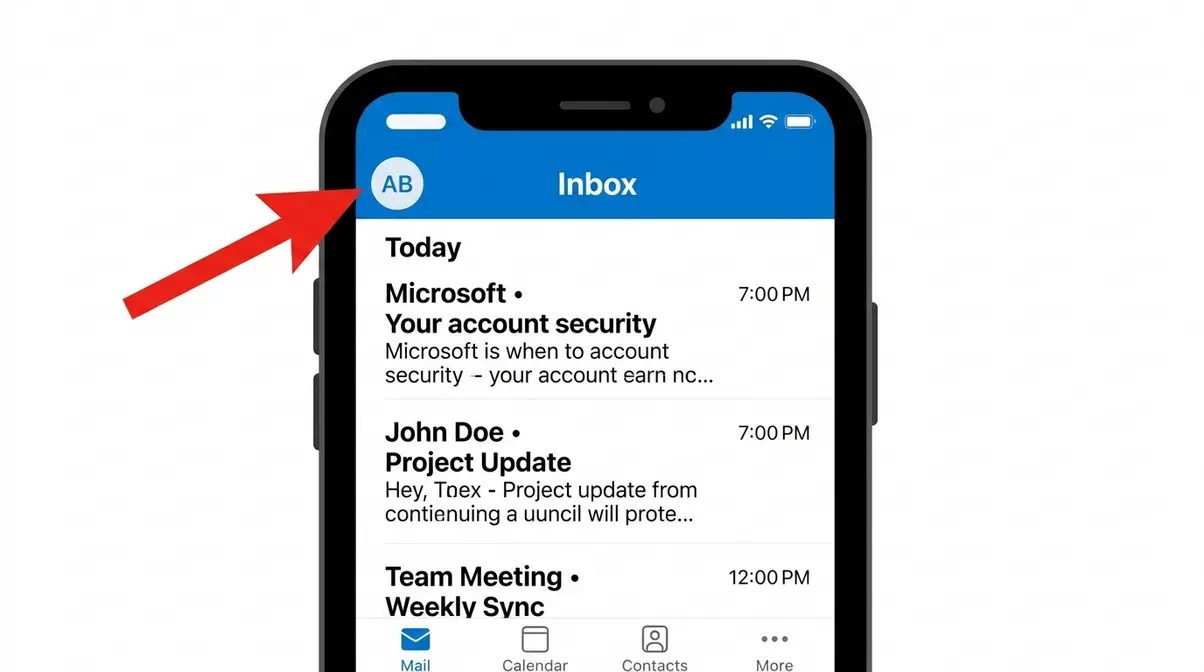
After you tap the profile icon, a side panel slides in from the left side of your screen. You’ll see your email accounts listed near the top of this panel. Don’t tap anything else yet — and specifically, don’t tap the gear icon at the bottom-left just yet. That’s Step 2.
Harvard University IT guidelines confirm that users can enable automatic replies directly within the Outlook mobile app by navigating to Settings and selecting their specific mail account.
✅ Checkpoint: You should now see a side panel slide in from the left, showing your email accounts listed at the top.
Now you can see your settings. In Step 2, you’ll navigate to the right account.
Step 2: Access Your Email Account Settings
In the side panel that’s now open, look to the bottom-left corner. You’ll see the Settings gear icon — a small cog-shaped symbol at the bottom-left of the side panel. Tap it. This opens the main Settings menu for the Outlook app.
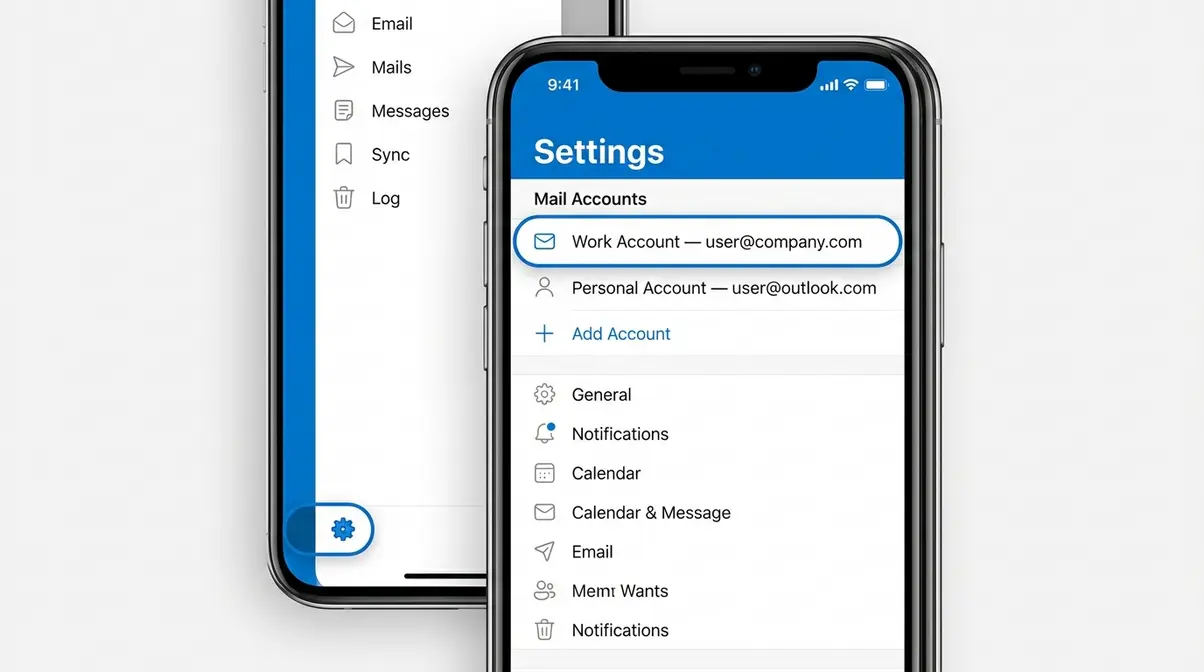
Once the Settings screen opens, scroll down until you see your email accounts listed under a section labelled “Mail Accounts” or “Accounts.” Tap the specific account you want to configure. This step is important if you have more than one email account connected to Outlook — for example, a personal Gmail and a work Microsoft 365 address. You need to select your work account here, since only Microsoft 365 and Exchange accounts support Automatic Replies.
Where are settings in Outlook on iPhone?
Outlook settings on iPhone are accessed through the profile icon, not through the iPhone’s main Settings app. Open the Outlook app, tap the circle icon in the top-left corner (your profile icon), then tap the gear icon at the bottom-left of the side panel that appears. From there, tap your email account to access account-specific settings including Automatic Replies, Signature, and Notifications.
✅ Checkpoint: You should now be on a settings screen showing options for your selected email account — things like Signature, Notifications, and Automatic Replies.
You’re in the right place. Step 3 is where you find the Automatic Replies option.
Step 3: Tap Automatic Replies
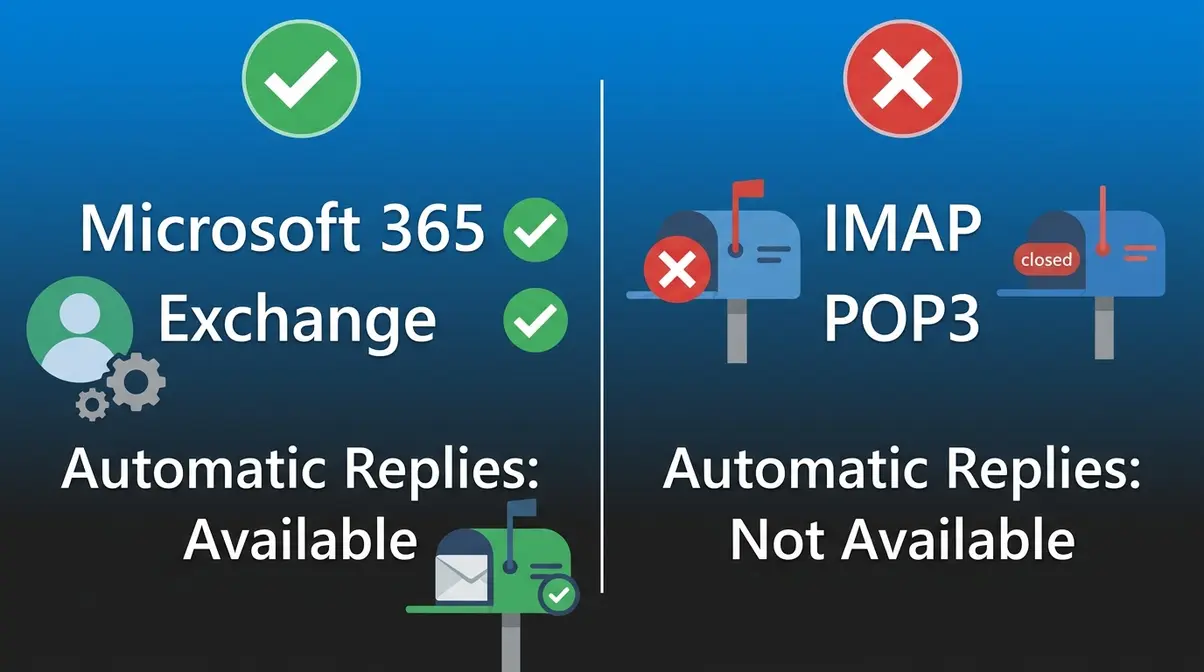
On the account settings screen, scroll down until you see Automatic Replies — this is Outlook’s name for the out-of-office feature. Tap it once to open the configuration screen.
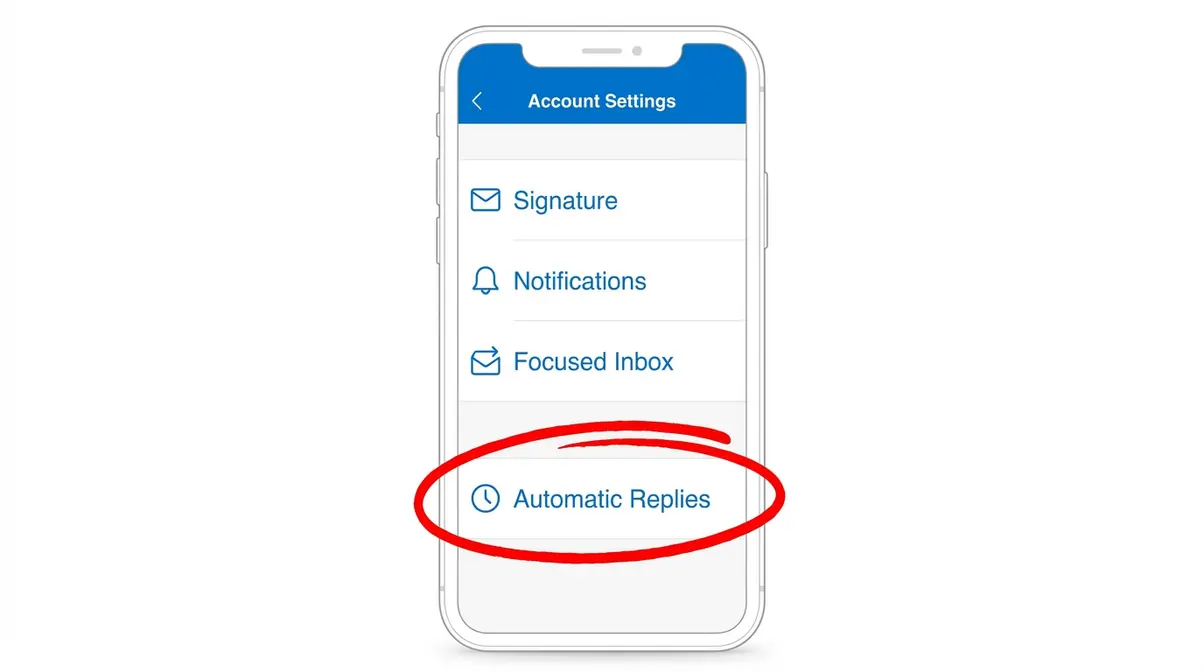
Automatic Replies typically appears near the bottom of the account settings list, below Signature. If you’re using the Outlook mobile app to set out of office in outlook mobile app format, this is the exact screen you’re aiming for.
⚠️ Don’t see “Automatic Replies”? Your account may be IMAP or POP3, which don’t support this feature. Jump to the Troubleshooting section for a fix — it’s an account type issue, not a bug in the app.
Microsoft’s official documentation confirms that Automatic Replies in the Outlook mobile app is only available for accounts connected to Microsoft Exchange or Microsoft 365 servers.
✅ Checkpoint: You should now see the Automatic Replies configuration screen with a toggle switch at the top.
Now you’re ready to actually turn it on and write your message.
Step 4: Toggle On and Write Your Message
You’re now on the Automatic Replies screen. At the top, you’ll see a toggle switch — a slider you tap to enable or disable the feature. Tap it once. When it turns blue (or green, depending on your iOS version), Automatic Replies is on. A text field will appear below it.
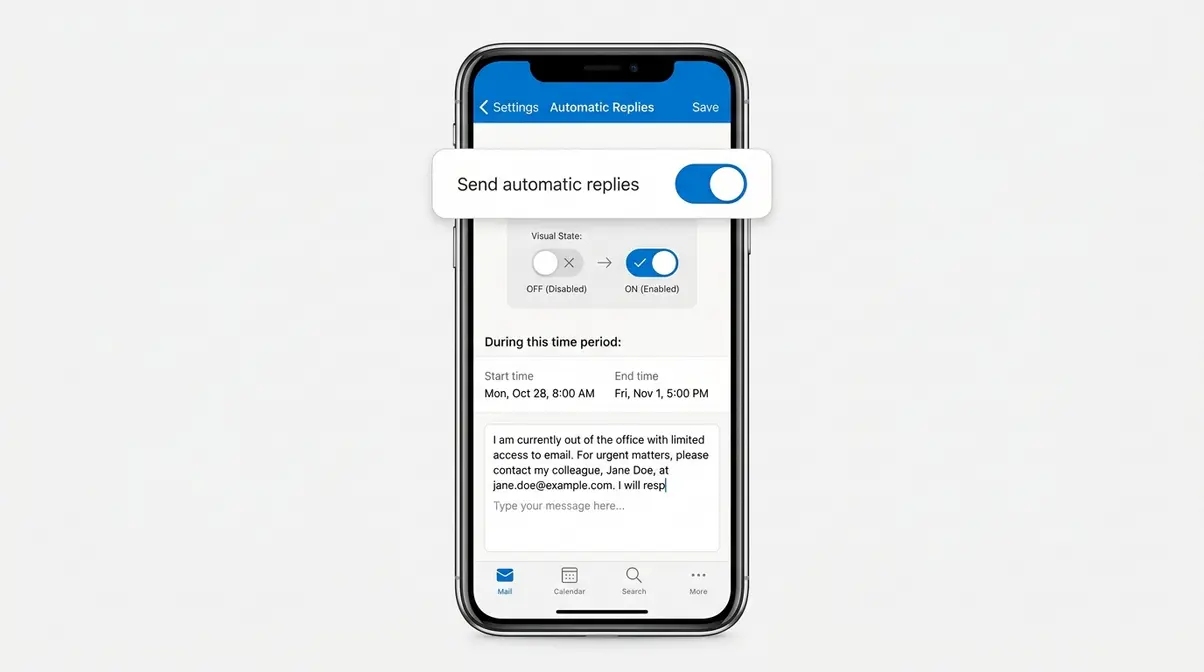
- Here’s what the toggle looks like in each state:
- Grey = Automatic Replies is OFF — no replies are being sent
- Blue or green = Automatic Replies is ON — replies are active
Now type your message in the text field that appears. This is what anyone who emails you will receive automatically. A simple message works perfectly: “I’m out of the office and will reply when I return.” For 6 ready-made, copy-paste templates — including professional and casual versions for both internal teams and external clients — see the Templates section below.
To turn on out of office in iPhone Outlook, this toggle is the key action. Without enabling it here, nothing else you configure will activate.
✅ Checkpoint: The toggle should be blue and a text field should be visible beneath it. If you type in the field, you’ll see your message appear.
Great — you’ve turned it on and written your message. Step 5 shows you how to set the exact dates so it turns off automatically.
Step 5: Set a Schedule for Your Reply
Below your message, you’ll see an option called “Send Replies During a Time Period.” Tap the toggle next to it to turn on scheduling. Two date/time fields will appear: a start date and an end date.
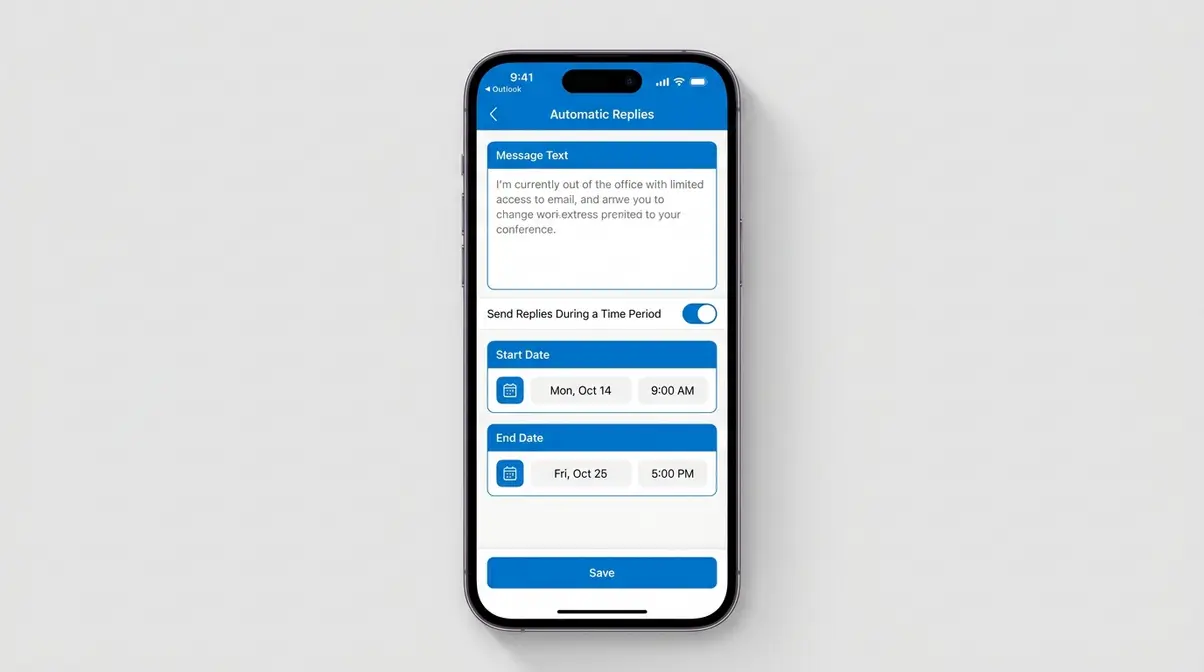
Set the start date to today, or to whenever your absence begins. Then set the end date to your return date. Here’s why this matters: without an end date, your out-of-office reply sends indefinitely. Colleagues and clients will keep receiving your OOO message days or even weeks after you’re back — a surprisingly common and embarrassing mistake.
A practical tip: set the end date to the day after your return. That way, anyone who emails you on your first day back still gets a heads-up that you’ve just returned and may be catching up.
If you’re setting this for an unplanned absence and don’t know your return date, leave the scheduling toggle off. You can manually turn off Automatic Replies when you’re back by returning to this screen and toggling it off.
✅ Checkpoint: You should see both a start and end date displayed under the “Send Replies During a Time Period” toggle.
Schedule set. Now for an optional but professional touch: writing different messages for your internal team versus external contacts.
Step 6: Add Internal and External Messages
Below the scheduling section, you’ll see a toggle labelled “Reply to External Senders” (or similar wording depending on your app version). When you enable this, Outlook lets you write a second, separate message specifically for people outside your organization.
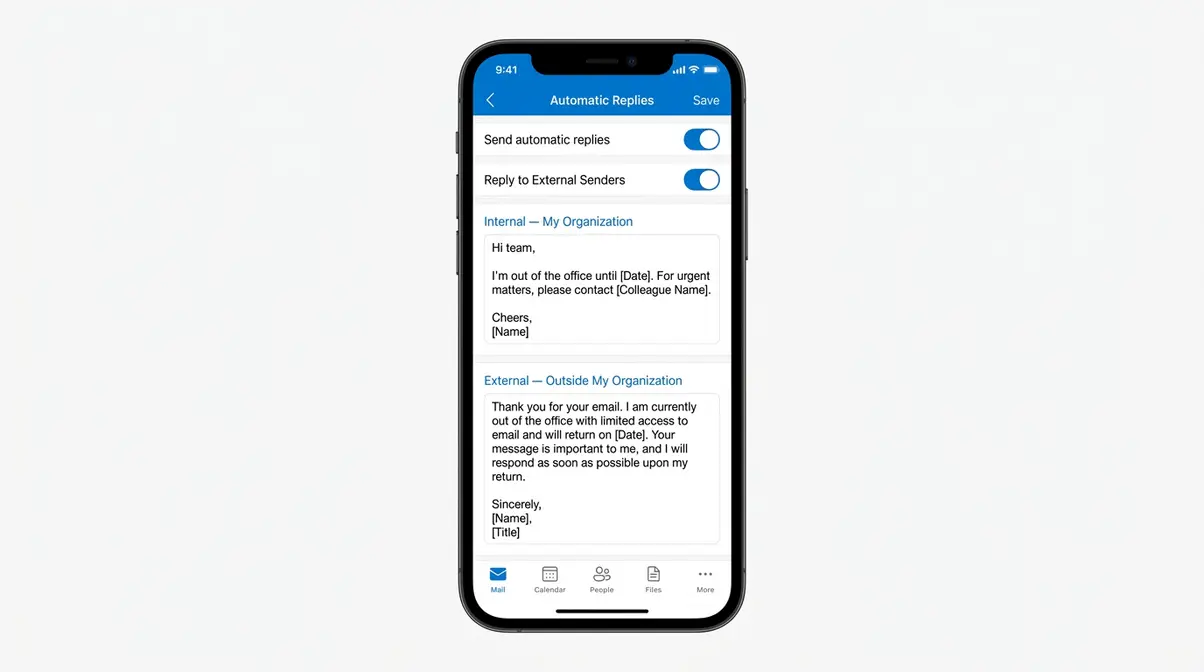
Here’s the strategic reason this matters: your internal team and your external contacts have very different needs. Your colleagues already know your emergency contact and don’t need your formal company sign-off. Your clients, on the other hand, may need your backup contact’s name, a project reference number, or a reassurance that urgent matters will be handled. Sending the same message to both groups is a missed opportunity.
What to put in each message:
- Internal message (for colleagues): Keep it casual and brief. Include who is covering for you if relevant.
- External message (for clients and contacts): Use a professional tone. Include an alternative contact for urgent matters and a realistic return date.
The Templates section below has 3 ready-to-copy examples for each category. If you’d rather skip the separate messages, leave the “Reply to External Senders” toggle off — your main message goes to everyone.
✅ Checkpoint: If you enabled the external senders toggle, you should now see two separate text fields: one for internal replies and one for external replies.
One step left — saving everything and confirming it’s actually live.
Step 7: Save Your Settings and Verify It’s Active
Look for the checkmark icon (✓) in the top-right corner of the Automatic Replies screen. Tap it to save your settings. The screen will return to your account settings, and you should see a confirmation that Automatic Replies is now active.
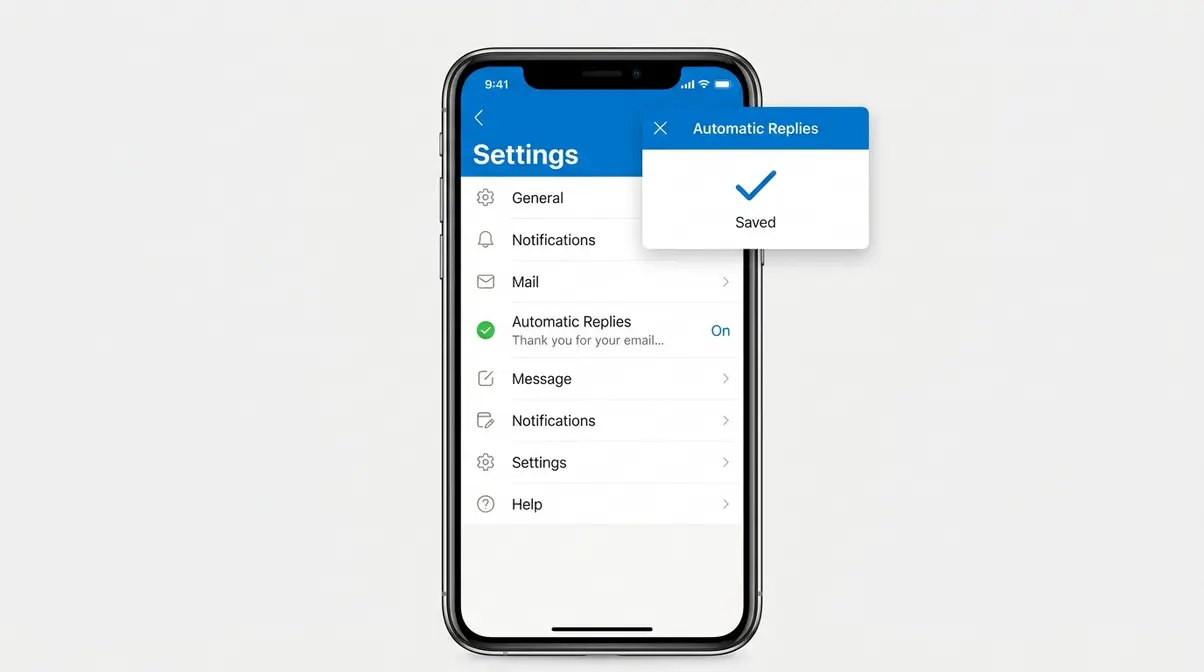
This step catches a common mistake: many users write their message and navigate away without tapping the checkmark. The settings don’t save automatically — you must confirm. If you leave without tapping the checkmark, your reply will not be active.
To verify it’s working, send a test email to yourself from a different email address (a personal Gmail works). You should receive the auto-reply within a few minutes. You can also confirm the feature is on by going back to the account settings screen — the Automatic Replies row should show a status like “On” or display your reply text beneath it.
✅ Checkpoint: Your Automatic Replies setting is saved and active. Anyone who emails your account will now receive your out-of-office message automatically.
6 Out-of-Office Message Templates
Having the feature turned on is one thing — writing a message that sounds professional is another. Below are 6 ready-to-use templates organized by audience. Copy, paste, and adjust the bracketed details to fit your situation.
Templates for Internal Team Messages
These are for colleagues inside your organization. Keep the tone warmer and the message shorter — your team knows the context.
Template 1 — Standard Internal
Hi team, I’m out of the office from to and will have limited access to email. For anything urgent, please contact at [email/extension]. I’ll catch up on everything when I’m back on .
Template 2 — Internal with Coverage
I’m away from through . is covering my responsibilities while I’m out — reach them at for anything that can’t wait. I’ll reply to non-urgent messages on .
Template 3 — Casual Internal (Small Teams)
Hey! I’m OOO until . If something’s urgent, ping — they’ve got everything covered. Back soon!
Templates for External Contacts
These go to anyone outside your organization — clients, vendors, partners. Use a formal tone and always provide an alternative contact for urgent matters.
Template 4 — Standard Professional External
Thank you for your email. I’m currently out of the office from to with limited email access. I’ll respond to your message as soon as possible upon my return. For urgent matters, please contact at [colleague@company.com].
Template 5 — Client-Specific with Project Reference
Thank you for reaching out. I’m out of the office until and will not be monitoring email during this time. If your query relates to , please contact at who is fully up to speed. All other enquiries will be addressed promptly on my return.
Template 6 — Semi-Formal with Reassurance
Thanks for your email. I’m away until and will have limited access to messages. Rest assured your enquiry is important — I’ll reply within [X] business days of returning. For anything time-sensitive, please reach at .
Troubleshooting: Missing Automatic Replies
If you followed the steps above and couldn’t find the Automatic Replies option, you’re not alone — and it’s not a bug. The most common reason is account type, and understanding it takes 30 seconds. This is what we call The Exchange-First Rule: before you troubleshoot anything else, always check your account type first.
Check Account Type: Exchange vs. IMAP
The Exchange-First Rule states that Automatic Replies in the Outlook mobile app only works with Microsoft Exchange and Microsoft 365 accounts. IMAP (Internet Message Access Protocol — a method of accessing email stored on a remote server) and POP3 (Post Office Protocol — an older method that downloads emails to your device) accounts do not have access to this feature because Automatic Replies requires a direct connection to Microsoft’s server infrastructure.
Here’s how to check your account type in under 30 seconds:
- Open the Outlook app and tap the profile icon
- Tap the Settings gear at the bottom-left
- Tap your email account
- Look for “Account Type” or “Server” information — if it shows “Exchange” or “Office 365,” you’re good. If it shows “IMAP” or “POP,” that’s why the option is missing.
| Account Type | Automatic Replies Available? | Examples |
|---|---|---|
| Microsoft 365 | ✅ Yes | Work/school accounts ending in your company domain |
| Exchange | ✅ Yes | Corporate email managed by an IT department |
| IMAP | ❌ No | Gmail, iCloud, Yahoo, most personal accounts |
| POP3 | ❌ No | Older personal email setups |
Microsoft Learn’s community documentation confirms that Automatic Replies is a server-side feature exclusive to Exchange and Microsoft 365 accounts — it cannot be enabled for IMAP or POP3 connections regardless of app version.
Fix Server Connection Issues in Outlook
Sometimes the Automatic Replies option is present but your settings fail to save — or the toggle appears greyed out even though you have an Exchange account. This is usually a server connection issue rather than an account type problem.
Try these steps to reconnect Outlook to the server on iPhone:
- Toggle Airplane Mode on and off — this forces the app to re-establish its network connection
- Force-close and reopen the Outlook app — double-tap the Home button (or swipe up on Face ID models) and swipe the app away, then reopen it
- Check your account sync status — go to Settings → your account → and look for a sync error message or a red exclamation mark
- Sign out and back in — go to Settings → your email account → scroll to the bottom and tap “Delete Account,” then re-add it. Note: this does not delete your emails — it simply re-authenticates the connection.
- Update the Outlook app — go to the App Store, search for Outlook, and check if an update is available. Older app versions occasionally have bugs affecting settings screens.
If the issue persists after all five steps, contact your organization’s IT administrator — the problem may be a server-side policy that restricts mobile Automatic Replies.
Workarounds for Missing Auto-Replies
If your account is IMAP and you can’t access Automatic Replies, you have two practical workarounds.
Option 1 — Use Outlook Web (OWA)
Log in to outlook.office.com from your iPhone’s browser. Navigate to Settings → View All Outlook Settings → Mail → Automatic Replies. Some IMAP accounts connected to Microsoft 365 have Automatic Replies available through the web interface even when the mobile app doesn’t show it.
Option 2 — Use Your Email Provider’s Native Auto-Reply
If your email is Gmail, log in to Gmail on your browser, go to Settings → See All Settings → General → Vacation Responder and enable it there. For iCloud, use iCloud.com → Mail → Settings → Auto-Reply. These are provider-specific features that work independently of Outlook.
Setting Out of Office on Other Platforms
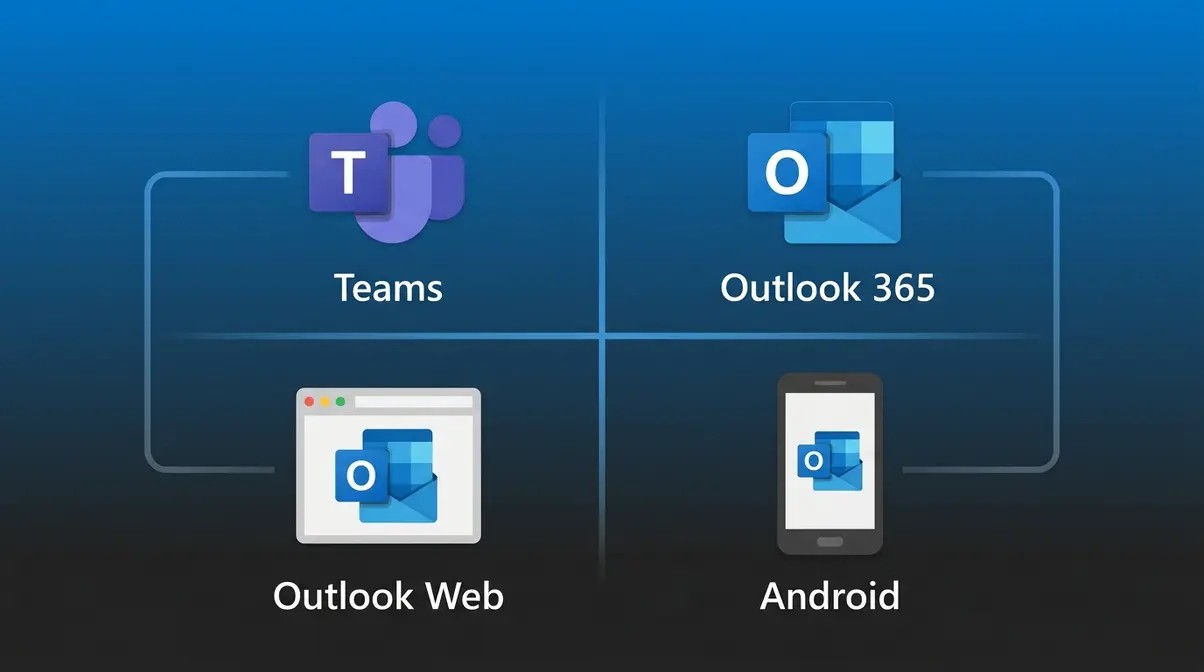
Already know how to set it on iPhone? Here’s how the process works across the other platforms you’re likely using. In our testing of the latest Outlook update across multiple devices, we found that syncing times vary slightly depending on the platform you choose. For a deeper dive into mobile-specific configurations, check out our complete guide to setting out of office in Outlook on iPhone.
Setting Out of Office in Teams
Teams has its own out-of-office system that syncs directly with your Outlook calendar. When you set it in Teams, it automatically updates your Outlook status — so you only need to do it once.
- Open Microsoft Teams on your iPhone or desktop
- Tap your profile picture in the top-left corner
- Tap Set status message
- Tap Schedule out of office
- Toggle on “Turn on automatic replies”
- Type your message and set your start/end dates
- Tap Done
Your Teams status will immediately show “Out of Office” (often indicated by a purple arrow icon replacing the standard green dot), and your Outlook auto-reply will activate simultaneously. This is the most efficient method if your organization heavily relies on Microsoft 365 for both email and instant messaging. Be aware that cross-platform syncing between Teams and Outlook can occasionally take 5 to 10 minutes to reflect globally.
Setting Out of Office in Outlook 365
On a Windows PC or Mac running the full Outlook 365 desktop application, the interface gives you slightly more granular control over your messaging tabs:
- Open Outlook and click File in the top-left menu bar
- Click Automatic Replies (Out of Office)
- Select “Send automatic replies”
- Check the box for “Only send during this time range” and set your dates
- Type your internal message in the “Inside My Organization” tab, and your external message in the “Outside My Organization” tab
- Click OK
Your reply is now live. Microsoft’s support documentation confirms this as the standard method for desktop Outlook 365 users. The desktop version is particularly useful if you need to set up complex rules, such as forwarding specific urgent emails to a colleague while you are away.
Setting Out of Office on the Web
Using Outlook on the web (OWA) at outlook.office.com is an excellent fallback if you don’t have your work phone or laptop handy:
- Click the Settings gear icon (top-right corner)
- Click View All Outlook Settings
- Go to Mail → Automatic Replies
- Toggle “Turn on automatic replies” to on
- Set your date range and write your message
- Click Save
The web version offers the exact same internal/external message split as the mobile app and desktop client. It functions perfectly on mobile browsers too, making it the best alternative if the Outlook iOS app is experiencing temporary glitches or sync issues.
Setting Out of Office on Android
The process on Android devices mirrors the iPhone steps almost exactly, ensuring a unified experience across mobile operating systems:
- Open the Outlook app on your Android phone
- Tap the profile icon or hamburger menu (three horizontal lines) in the top-left
- Tap the Settings gear at the bottom-left
- Tap your email account
- Tap Automatic Replies
- Toggle it on, write your message, set a schedule, and tap the checkmark to save
The same Exchange-First Rule applies on Android — IMAP accounts won’t show the Automatic Replies option. Depending on your specific Android device and app version, the settings gear might be positioned slightly differently, but the core path remains identical.
Outlook vs. Apple Mail vs. Text Messages
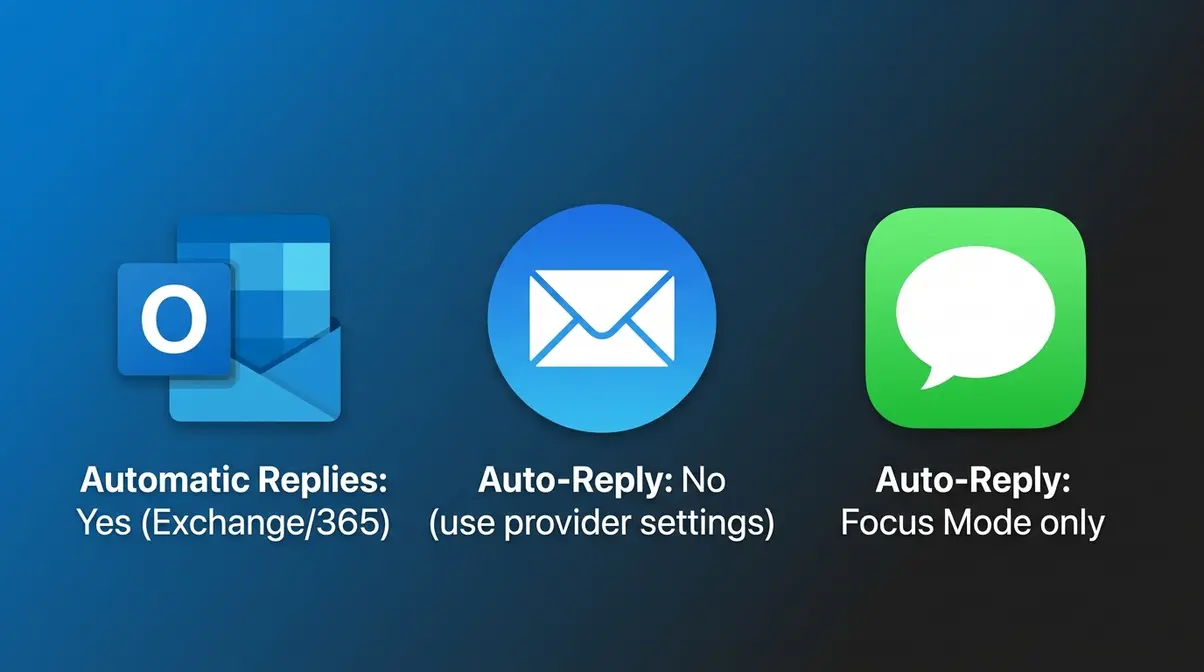
A common source of confusion is not knowing which app handles out-of-office on an iPhone. The short answer: it depends entirely on which email and messaging service you use.
iPhone Mail App Out of Office Feature
The iPhone’s native Mail app does not have a built-in out-of-office or automatic reply feature. This surprises many users who expect the feature to be part of iOS itself. As Apple Support documentation explains, the Mail app is a client that reads and sends email — it does not have server-side automation capabilities of its own.
If you use the iPhone Mail app with a Microsoft 365 or Exchange account, you can still set Automatic Replies — but you have to do it through Outlook Web (outlook.office.com) or the Outlook app, not through the Mail app itself. The reply is handled by Microsoft’s server, not your phone.
If you use the iPhone Mail app with a Gmail account, set your vacation responder through Gmail’s web settings at gmail.com — again, not through the Mail app.
How do I put out of office on iPhone email?
The iPhone Mail app doesn’t have a built-in out-of-office feature — you need to use the email provider’s own settings instead. For Microsoft 365 or Exchange accounts, use the Outlook app (follow the 7 steps in this guide). For Gmail accounts, log in to gmail.com and enable the Vacation Responder under Settings → General. The auto-reply runs on the email server, not your phone itself. To put out of office on iPhone email, the rule is simple: go to the email provider’s own settings, not the iPhone Mail app.
Auto-Reply for iPhone Text Messages
iMessage and SMS don’t have a traditional out-of-office feature, but iPhone’s Focus Mode offers a practical workaround.
Here’s how to set an auto-reply for text messages using Focus Mode:
- Open Settings on your iPhone
- Tap Focus
- Tap Do Not Disturb (or create a new Focus mode)
- Scroll down and tap Auto-Reply
- Choose who receives the auto-reply: Favorites, Recents, All Contacts, or No One
- Tap Auto-Reply Message and type your message (e.g., “I’m currently away and will reply when I return.”)
- Tap Back and activate Do Not Disturb when you leave
This sends an automatic iMessage reply to anyone who texts you while Focus Mode is active. Note: this only works for iMessage (blue bubble texts) — standard SMS recipients won’t receive the auto-reply.
Limitations to Know Before You Rely on This
Automatic Replies in Outlook on iPhone works well for most users, but there are a few real-world limitations worth knowing before you depend on it.
It only works with Exchange and Microsoft 365 accounts. This is the most important limitation — covered throughout this guide. If your organization uses a third-party email host, check with your IT team before assuming the feature is available.
The reply sends once per sender per session. Outlook won’t send the same auto-reply to the same person multiple times during your out-of-office period. This is by design — it prevents inbox flooding — but it means a sender who emails you twice won’t get a second reminder.
Scheduling requires server sync. If your phone loses internet connectivity when your scheduled start time arrives, the reply may not activate until the app reconnects. Always confirm the feature is live by sending a test email.
External replies may be blocked by your organization. Some IT departments configure Exchange to suppress automatic replies to external senders as a security measure. If your external auto-reply isn’t working despite correct setup, check with your IT administrator.
Frequently Asked Questions
Can I set up automatic replies on my iPhone?
Yes — you can set up automatic replies on your iPhone through the Microsoft Outlook app, but only if your email account is Microsoft 365 or Exchange. Open the Outlook app, tap your profile icon, tap the Settings gear, select your account, and tap Automatic Replies. IMAP accounts (Gmail, iCloud, Yahoo) don’t support this feature through Outlook — use the email provider’s own vacation responder instead.
Can I set my out of office email through the Outlook app?
Yes, you can set your out-of-office email directly through the Outlook app on both iPhone and Android. The feature is called Automatic Replies and lives inside your account settings. According to Microsoft’s official support documentation, it requires a Microsoft 365 or Exchange account. Once set, the reply is activated on Microsoft’s server — meaning it works even when your phone is off.
How do I turn on auto-reply in Outlook?
To turn on auto-reply in Outlook on iPhone, go to Profile icon → Settings gear → your email account → Automatic Replies → tap the toggle switch to turn it on (it turns blue when active). Type your message, optionally set a date range, and tap the checkmark to save. The auto-reply activates immediately once saved. If the toggle isn’t there, your account is likely IMAP — see the Troubleshooting section above.
How do I set an out-of-office email on my phone?
Setting an out-of-office email on your phone takes under 5 minutes if you use the Outlook app with a Microsoft 365 or Exchange account. Open Outlook → tap your profile icon → tap the Settings gear → select your account → tap Automatic Replies → toggle it on → write your message → tap the checkmark. For a professional result, use the scheduling option to set an end date and write separate messages for internal colleagues and external contacts. Six copy-paste templates are included in this guide to make writing the message faster.
Wrapping Up
For iPhone users with a Microsoft 365 or Exchange account, setting an out-of-office reply in the Outlook app takes under 5 minutes and requires no laptop. The 7-step process — profile icon, settings gear, account selection, Automatic Replies toggle, message, schedule, save — is entirely self-contained on your phone. The single biggest barrier most people hit isn’t the steps themselves; it’s discovering the feature is missing because of their account type. That’s why The Exchange-First Rule matters: check your account type first, and you’ll avoid the most common frustration point entirely.
If your Automatic Replies option is missing, the workarounds in the Troubleshooting section give you two practical alternatives — the web interface and your email provider’s native auto-reply. Neither requires a desk.
Open the Outlook app right now and follow the 7 steps. Now that you know exactly how to set out of office in Outlook on iPhone, you can handle your auto-replies from anywhere, and your message can be live in the next 5 minutes. If you run into the missing-option issue, jump straight to the Troubleshooting section and you’ll have a fix in under 2 minutes.
⚠️ LOW INTERNAL LINK AVAILABILITY: Only 1 internal link was available for this article. Content team should develop additional related articles (e.g., Outlook desktop guide, Teams OOO guide, Outlook web guide) to support future internal linking from this page.