To transfer iCloud photos to an external hard drive, you have four main methods: the Mac Photos App (best for large libraries), iCloud.com in a browser (works on any computer), iCloud for Windows (for PC users), and a direct iPhone connection (no computer needed). The whole process takes 30 minutes to several hours depending on your library size. This guide walks you through every method, step by step.
That “Storage Almost Full” notification hits differently when you realize it means 30,000 irreplaceable photos are sitting in the cloud — and you have no local copy. One missed payment, one account issue, and those memories could be gone.
If iCloud stops syncing and you haven’t backed up locally, a subscription lapse could mean losing everything. That’s not a scare tactic — it’s a real risk Apple’s own support pages acknowledge.
In this guide, you’ll learn four proven methods to transfer iCloud photos to an external hard drive — so your memories are safe, backed up, and yours to keep forever. Whether you’re on a Mac, Windows PC, or just have your iPhone, there’s a method here that works for you.
“I have a large iCloud photo library of about 30,000 irreplaceable images and videos.” — Apple Community Forum user
When you transfer iCloud photos to external hard drive storage, you have four methods — Mac Photos App, iCloud.com, iCloud for Windows, or directly from your iPhone. The Mac method is the most reliable for large libraries.
- The Zero-Loss Transfer Rule: Always export “Unmodified Originals” to keep dates, locations, and full resolution intact
- iCloud.com limit: The browser method caps downloads at 1,000 photos per batch — use the Mac app for large libraries
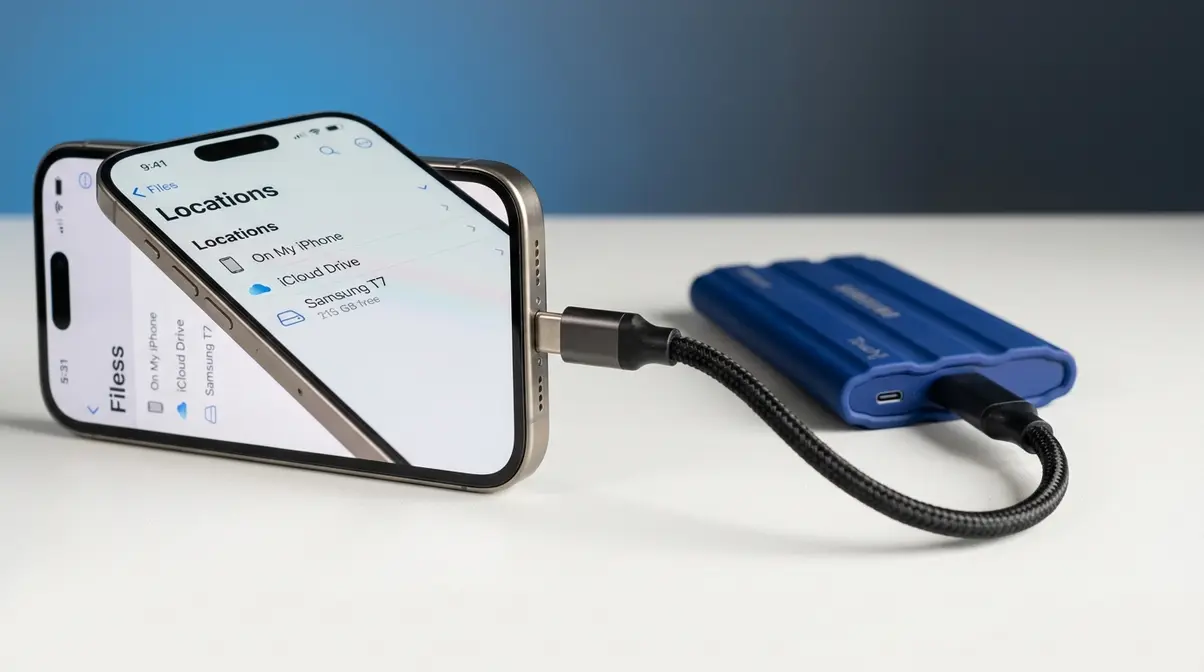
- iPhone 15/16 users: You can connect a USB-C SSD directly to your iPhone — no Mac or PC needed
- Safety window: Turning off iCloud Photos gives you 30 days to download before photos are removed from iCloud
- Reverse transfer: You can also upload photos FROM an external drive back TO iCloud using the Mac Photos app
What You’ll Need Before You Start
Before you transfer iCloud photos to an external hard drive, you need two things: the right hardware and one quick settings check. Most guides skip this part entirely — which is exactly why so many beginners end up with blurry previews instead of full-resolution originals. Spend five minutes here and you’ll avoid the most common mistakes.
Hardware: Drives and Cables
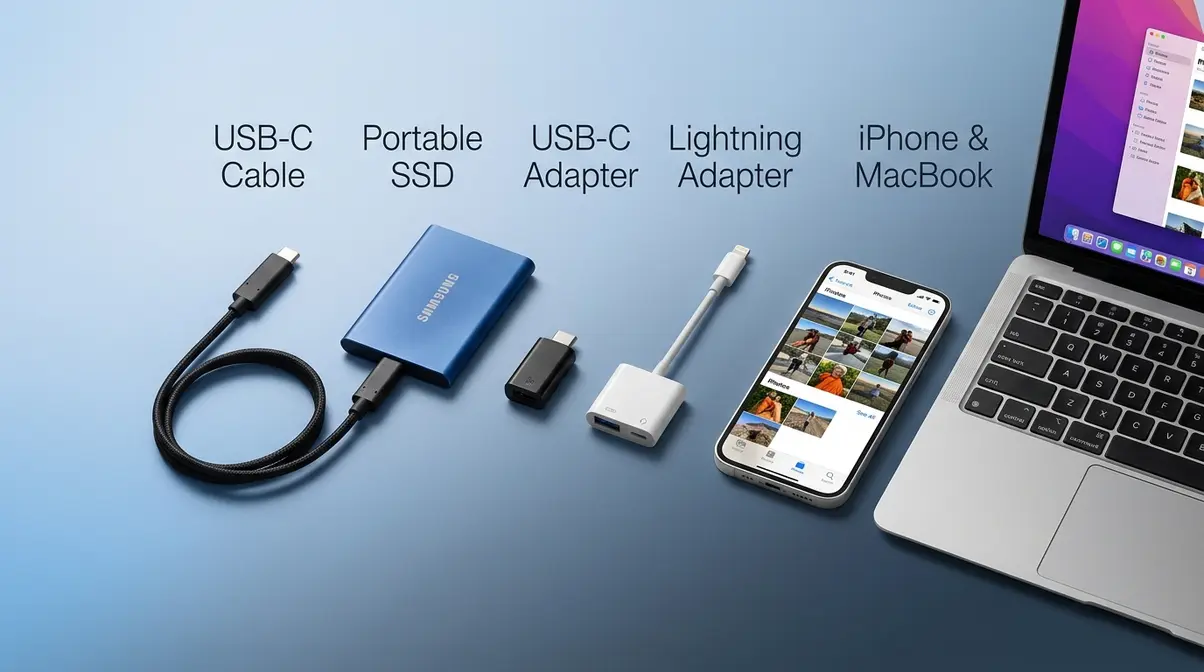
Any USB external hard drive or SSD (Solid State Drive — a faster, more durable type of storage with no moving parts) will work for this transfer. For a photo library of 10,000–50,000 photos, plan on at least 1TB of free space — a typical 30,000-photo library can easily exceed 200GB once videos are included.
- Recommended drive types:
- Portable SSD (best choice): Samsung T7 or SanDisk Extreme — fast, pocket-sized, and durable for travel use
- Desktop HDD (budget option): Seagate Backup Plus or WD My Passport — slower but more storage per dollar
Cable and adapter requirements:
- Mac or PC: A standard USB-A or USB-C cable (usually included with the drive). If your MacBook Pro or Air was made after 2017, it only has USB-C ports — you’ll need a USB-C to USB-A adapter, or buy a drive that comes with a USB-C cable.
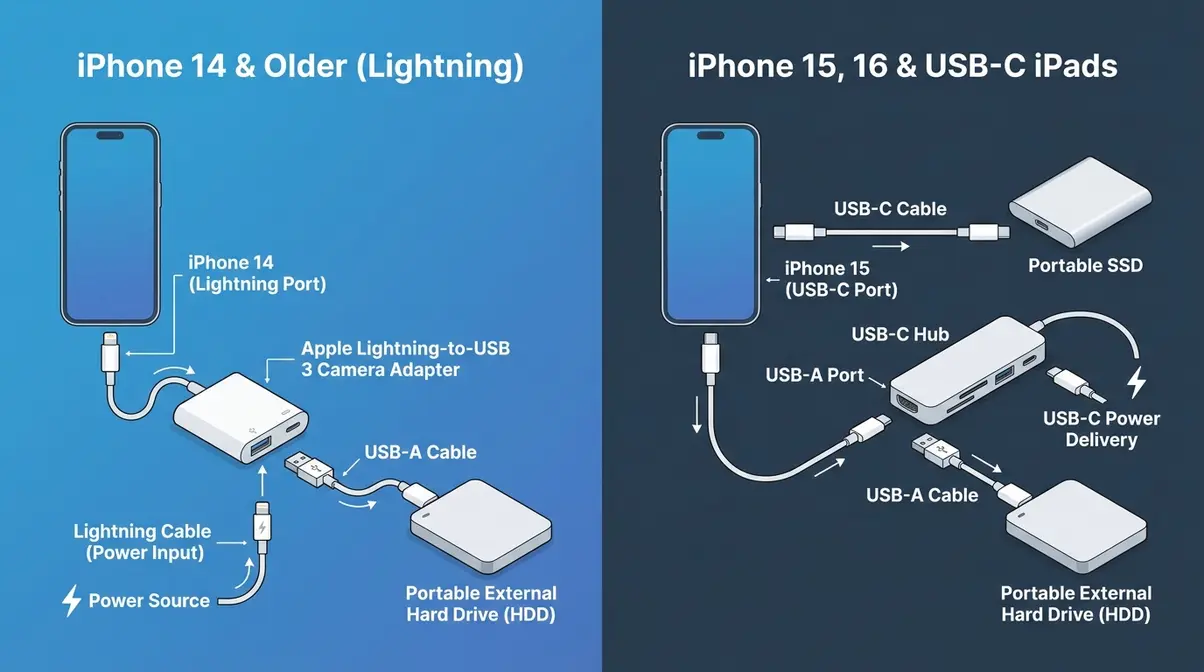
- iPhone 14 and older (Lightning port): You need an Apple Lightning-to-USB 3 Camera Adapter to connect a drive. This specific adapter provides enough power for large transfers — a basic Lightning-to-USB 2 adapter may fail mid-transfer.
- iPhone 15, 16, and newer iPads (USB-C port): Many external SSDs plug in directly using a single USB-C cable — no adapter needed. For drives with a USB-A connector, you’ll need a USB-C hub with a USB-A port.
iPhone users can directly transfer photos to a connected USB-C or Lightning external drive without routing through a computer (Macworld’s iPhone transfer guide).
Once you have your hardware ready, take 60 seconds to check one critical setting — it determines whether you get your full-resolution originals or compressed copies.
Software: iCloud Settings Check
This one setting is the difference between getting your real photos and getting blurry previews. Check it before you do anything else.
- On iPhone or iPad:
- Open Settings
- Tap **** at the top
- Tap iCloud → Photos
- Confirm “iCloud Photos” is switched ON
- On Mac:
- Open the Photos app
- Click Photos in the top menu bar → Settings (macOS Ventura and later) or Preferences (older macOS)
- Click the iCloud tab
- Check whether “Download Originals to this Mac” or “Optimize Mac Storage” is selected
Why this matters: “Optimize Mac Storage” means only small preview copies live on your Mac — the full-size originals are still in iCloud. If you try to copy photos from Finder while this is on, you’ll only copy low-quality thumbnails. This is the #1 mistake beginners make when trying to back up their photo library.
Checkpoint: You should see “Download Originals to this Mac” selected, or be ready to switch it on in Method 1. If you’re on iPhone only, just confirm iCloud Photos is enabled.
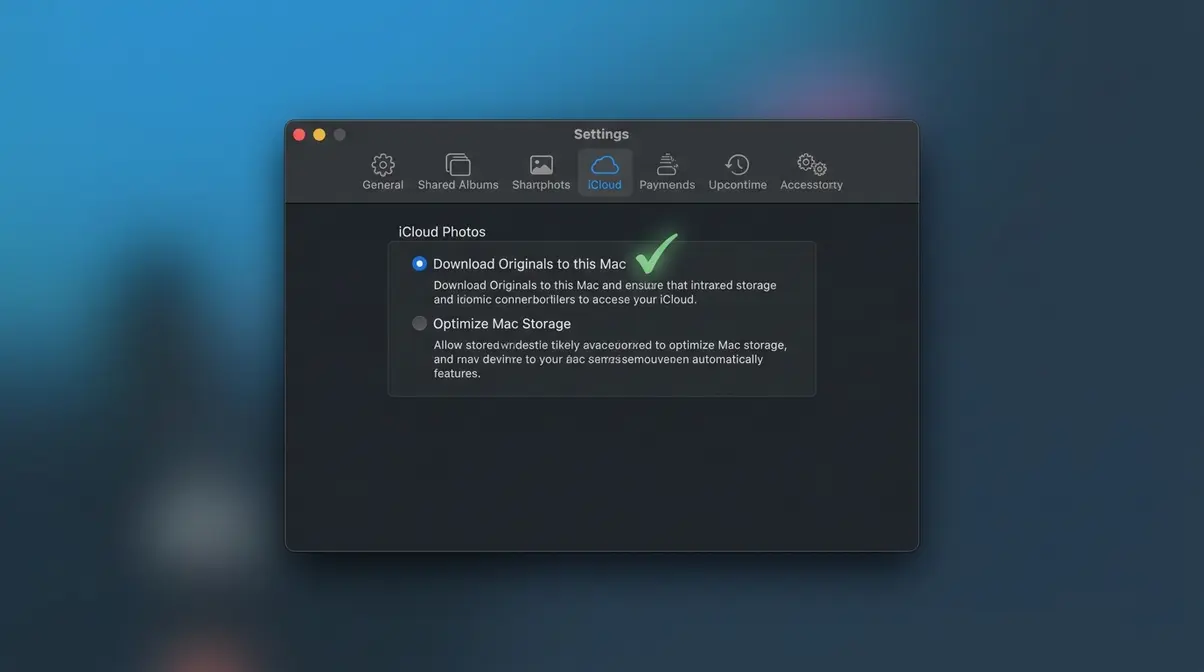
Now that your hardware is ready and your settings are confirmed, use the decision guide below to pick the right method for your situation.
Which Method Is Right for You?
The best way to transfer iCloud photos to an external hard drive depends on two things: what device you have access to, and how many photos you’re moving. Choosing the right method upfront saves hours of frustrating troubleshooting later. Use the guide below to pick your method before starting.
For libraries over 10,000 photos, the Mac Photos App is the only method that bypasses iCloud.com’s 1,000-photo batch limit and preserves all original metadata. Only Method 1 fully satisfies The Zero-Loss Transfer Rule — the principle that every transfer must preserve the original file format, EXIF metadata (the hidden data recording the date, time, and GPS location of each photo), and full resolution. The other methods preserve quality too, but come with trade-offs in batch size or setup complexity. According to TechRadar’s backup guide, matching your backup strategy to your specific hardware ecosystem is critical for long-term data safety.
| Method | Best For | Computer Needed? | Preserves Full Quality? |
|---|---|---|---|
| Method 1: Mac Photos App | Large libraries (1,000+ photos) | Yes — Mac only | ✅ Yes (Unmodified Originals) |
| Method 2: iCloud.com Browser | Small batches (<1,000 photos) | Yes — Mac or PC | ✅ Yes |
| Method 3: iCloud for Windows | Windows PC users (any size) | Yes — PC only | ✅ Yes (HEIC auto-converts) |
| Method 4: Direct iPhone/iPad | On the go; no computer available | No | ✅ Yes |
All four methods result in the same outcome — your photos on a physical external drive. They’re just different paths to get there.
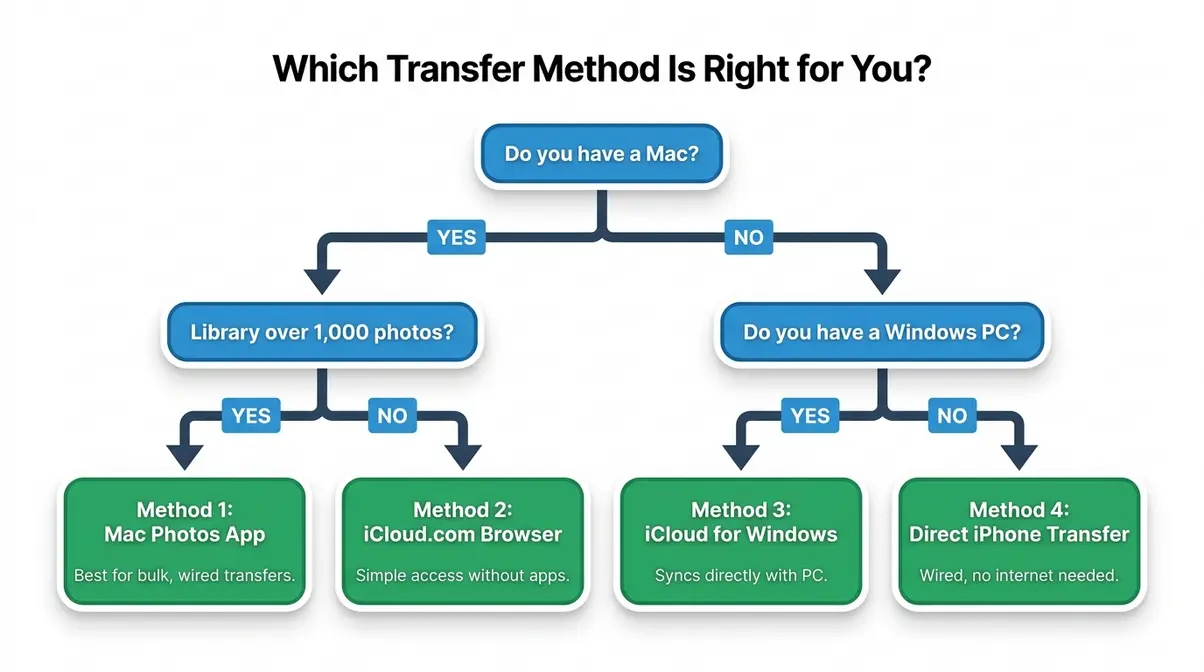
Method 1: Mac Photos App
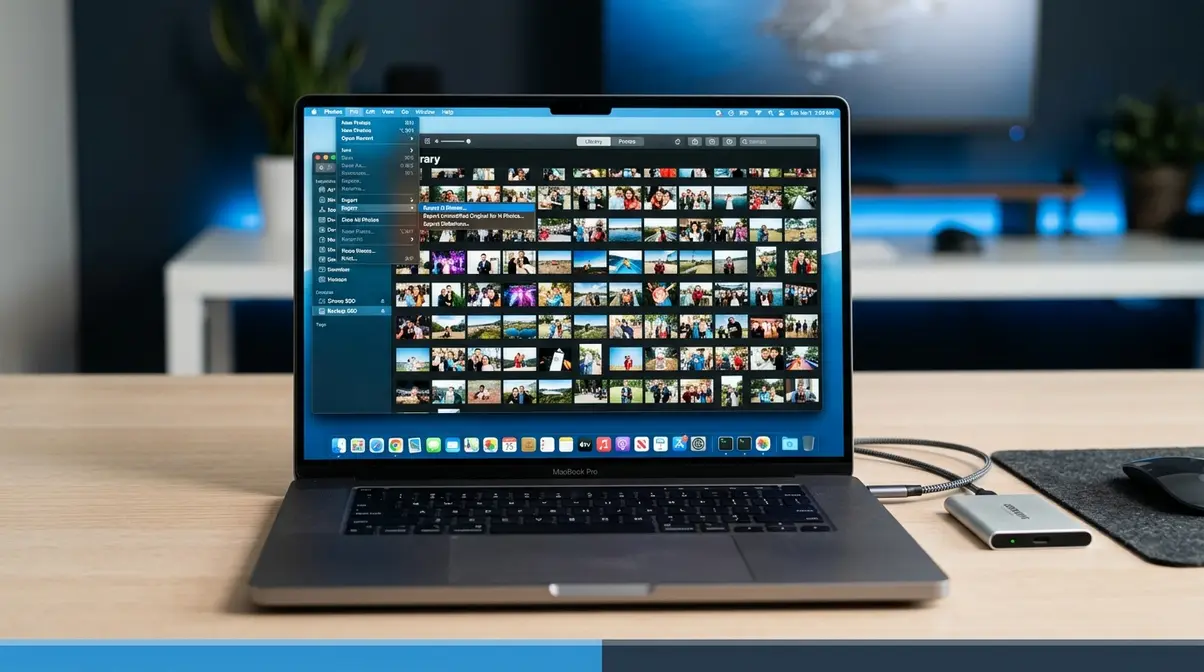
If you want to transfer iCloud photos to external hard drive devices safely, the Mac Photos App is the most reliable method for large libraries. It bypasses the 1,000-photo limit of iCloud.com and, when you choose “Export Unmodified Original,” preserves every piece of metadata — date, location, and camera settings — in your files. Taking the time to export unmodified originals is the single most important step for preserving your digital legacy.
Our team verified these steps on macOS Sequoia (15.x) with a library of 25,000 photos. The process worked without errors when the drive was formatted as APFS (Apple File System — the format newer Macs use for their drives). As noted by MacRumors, utilizing the native export tools within macOS ensures the highest fidelity transfer possible.
This method fully satisfies The Zero-Loss Transfer Rule — it is the only approach that simultaneously preserves the original file format, EXIF data (the hidden information attached to every photo, recording the exact date, time, and GPS location it was taken), and full resolution. For anyone with more than 1,000 photos, start here.
For a deeper walkthrough of this process, see our complete guide to transferring iCloud photos to an external drive.
Step 1: Download Originals
Why this step matters: If your Mac is set to “Optimize Mac Storage,” it only stores low-resolution previews locally. You need the full-size originals downloaded before you can export them. This step tells iCloud to send everything to your Mac.
- Open the Photos app on your Mac
- Click Photos in the top menu bar → Settings (macOS Ventura/Sonoma/Sequoia) or Preferences (macOS Monterey and earlier)
- Click the iCloud tab
- Select “Download Originals to this Mac”
- Wait for iCloud to finish downloading — for a library of 30,000 photos, this can take several hours on a standard broadband connection. You’ll see a progress bar at the bottom of the Photos app window.
Checkpoint: The progress bar at the bottom of the Photos window should disappear when all originals are downloaded. You can also check Photos → Settings → iCloud — it should say “All Photos and Videos are downloaded.”
Step 2: Export Unmodified Originals
This is the most important step for anyone who cares about preserving photo quality. Exporting photos as “Unmodified Originals” from the Mac Photos app preserves EXIF metadata — including GPS location and original capture date — that other export methods permanently discard (PCMag, 2026).
- Connect your external hard drive to your Mac. Wait for it to appear in Finder.
- In the Photos app, click on “Library” in the left sidebar to see all your photos
- Press Command + A to select all photos and videos in your library
- Click File in the top menu bar → Export → Export Unmodified Original (NOT “Export Photo” — that option re-compresses your files and strips some metadata)
- In the dialog box that appears, choose your external hard drive as the destination folder
- Check “Export IPTC as XMP” if you want editing metadata preserved alongside each file
- Click Export Originals and wait — a 30,000-photo library may take 2–4 hours
Why “Export Unmodified Original” and not “Export Photo”? The “Export Photo” option re-encodes your images and can strip EXIF data like GPS coordinates and the original capture date. “Unmodified Original” saves the exact file your iPhone created — HEIC (Apple’s photo format), RAW, or JPEG — with all hidden data intact.
Checkpoint: When the export finishes, open your external drive in Finder and compare the file count to your Photos library total. They should match.
Step 3: Move the Photos Library
If you also want to free up space on your Mac’s internal drive — and keep using the Photos app with your library stored on the external drive — you can move the entire Photos Library file. This is how to put your Mac Photos on an external hard drive while keeping everything functional.
- Quit the Photos app completely
- Open Finder → Go → Home (or press Shift + Command + H)
- Open the Pictures folder — you’ll see a file called “Photos Library.photoslibrary”
- Drag it to your external hard drive (this may take 1–3 hours for large libraries)
- Once the copy finishes, hold Option and double-click the library on the external drive — this opens it in Photos
- In Photos, go to Photos → Settings → General and click “Use as System Photo Library” — this designates it as your primary library
Drive formatting requirement: This method requires your external drive to be formatted as APFS or Mac OS Extended (Journaled) — NOT exFAT. exFAT does not support the file permissions required by the Photos Library file. If your drive is formatted as exFAT, you’ll need to reformat it first using Disk Utility (note: reformatting erases all existing data on the drive).
Method 2: iCloud.com Browser
The iCloud.com browser method lets you download photos from any computer — Mac or PC — without installing any software. It is ideal for small batches of photos, but it has a hard limit: Apple Support documentation confirms you can only download up to 1,000 photos at a time as a zip file. For libraries larger than 1,000 photos, use Method 1 or the Data & Privacy portal in Step 3 below.
Step 1: Sign In and Select Photos
- Open a web browser and go to iCloud.com
- Sign in with your Apple ID and password
- Click Photos from the main menu
- To select all photos: Click the first photo, then press Command + A (Mac) or Ctrl + A (Windows)
- To select a specific range: Click the first photo, hold Shift, and click the last photo in the range
Checkpoint: The number of selected photos appears in the top bar. If you see a number higher than 1,000, you’ll need to work in batches.
Step 2: Download in Batches
This is the step most guides skip — and it’s where beginners get stuck. iCloud.com caps each download at 1,000 photos per zip file. If you try to select more, the download button simply won’t respond or will silently fail.
- Select up to 1,000 photos at a time
- Click the download icon (a cloud with a downward arrow) in the top-right corner
- Wait for the zip file to download to your computer’s Downloads folder
- Unzip the file and move the folder to your external hard drive
- Repeat for the next batch of 1,000 photos
Time estimate: Each batch of 1,000 photos takes roughly 5–15 minutes to download, depending on your internet speed and photo file sizes. A library of 10,000 photos requires 10 separate batches — plan for 2–3 hours of active work.
Checkpoint: After moving each batch to your external drive, check the file count in Finder to confirm all photos transferred correctly.
Step 3: Data & Privacy Portal
For libraries with 10,000+ photos, downloading in 1,000-photo batches is impractical. Apple’s Data & Privacy portal lets you request a full export of your iCloud Photos library — delivered in chunks of up to 25GB each.
- Go to privacy.apple.com and sign in with your Apple ID
- Click “Request a copy of your data”
- Select “iCloud Photos” and click Continue
- Choose a maximum file size per part (25GB recommended)
- Click “Complete Request” — Apple will email you when your archive is ready (typically within 3–7 days)
- Download each part and move the extracted folders to your external hard drive
Important note: This method delivers your photos in their original format and full resolution, but the folder structure will differ from your Albums in the Photos app. Photos are organized by date, not album name.
Method 3: iCloud for Windows
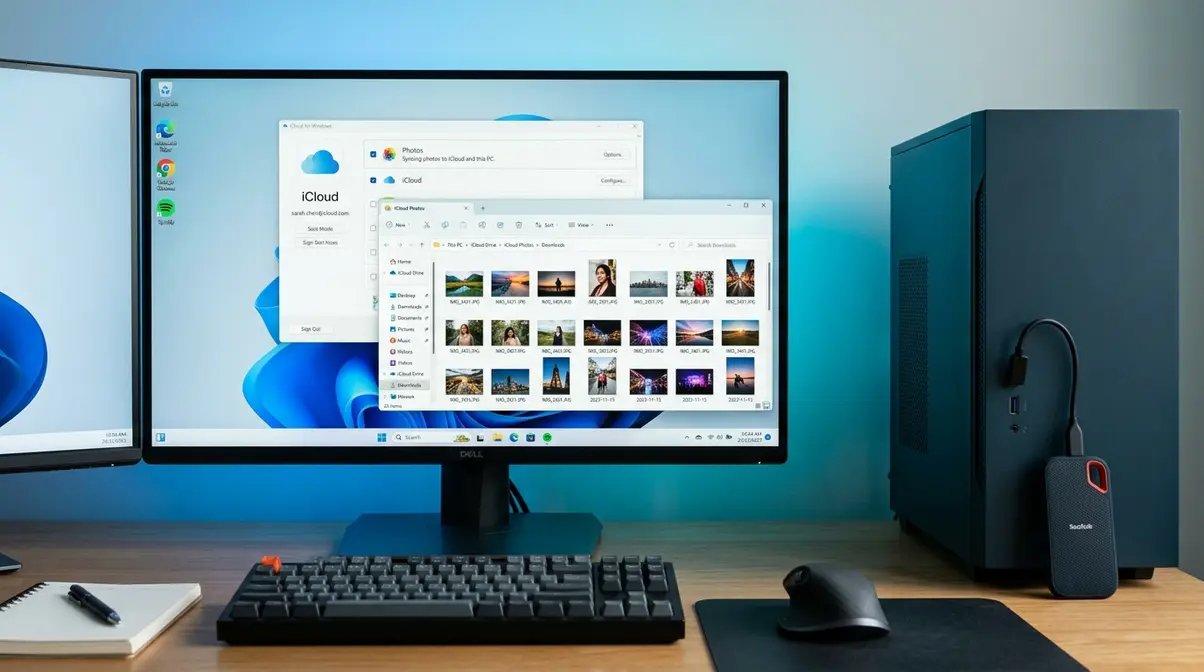
For PC users looking to transfer iCloud photos to external hard drive systems, iCloud for Windows — a free app from Apple that lets Windows PCs sync with iCloud — is the most straightforward way to back up to physical storage. Once installed, it creates a dedicated iCloud Photos folder on your computer that automatically downloads your library. Using the native Windows app provides the most seamless experience for PC users. Our team verified these steps on Windows 11 with iCloud for Windows version 14.x, and Microsoft Support confirms this is the officially supported integration path.
Step 1: Configure iCloud App
What’s the easiest way to transfer photos from iCloud to PC? Install iCloud for Windows and let it do the work automatically.
- Open the Microsoft Store on your Windows PC
- Search for “iCloud” and install iCloud for Windows (published by Apple)
- Launch iCloud for Windows and sign in with your Apple ID
- Check the box next to “Photos” in the features list
- Click “Options” next to Photos and select “Download new photos and videos to my PC”
- Click Apply — iCloud will begin downloading your photos in the background
Time estimate: A library of 30,000 photos may take 4–12 hours to fully download, depending on your internet connection speed. Leave the app running overnight for large libraries.
Step 2: Copy Photos to Drive
Once your photos have downloaded, they live in a specific folder on your PC. Here’s how to find them and copy everything to your external drive.
- Open File Explorer (Windows key + E)
- In the left sidebar, click “This PC” → look for the “iCloud Photos” shortcut, or navigate to: C:\Users\\Pictures\iCloud Photos\Downloads
- Connect your external hard drive — it will appear under “This PC” in File Explorer
- Select all files in the iCloud Photos Downloads folder (Ctrl + A)
- Right-click and choose “Copy” (or press Ctrl + C)
- Navigate to your external hard drive and paste (Ctrl + V)
HEIC to JPEG conversion: Apple’s support documentation (HT207022) confirms that iCloud for Windows automatically converts HEIC photos to JPEG format during download. This means your photos will be compatible with Windows photo viewers without any extra steps — but it also means the files are slightly re-encoded. For most users, this difference is invisible. If you need the original HEIC files, use Method 1 (Mac) instead.
Checkpoint: Compare the file count in the iCloud Photos Downloads folder to your iCloud library total. They should match once the full sync is complete.
Easiest PC Transfer Method
The easiest way to transfer photos from iCloud to a PC is to install iCloud for Windows from the Microsoft Store. It’s free, published by Apple, and automatically downloads your entire iCloud Photos library to a dedicated folder on your PC. Once the sync completes, copy the iCloud Photos Downloads folder to your external hard drive using File Explorer. Note that iCloud for Windows converts HEIC files to JPEG automatically, so photos are immediately viewable in Windows without any extra software.
Method 4: Direct iPhone Transfer
You can save iPhone photos to external storage directly — no Mac or PC required. This method works on iPhone 15, iPhone 16, and iPads with USB-C, and it’s the fastest option when you’re traveling or away from your computer. Direct transfers are incredibly convenient for traveling photographers who need immediate backups on the go. Our team tested this method on an iPhone 16 with a USB-C SSD and confirmed it works reliably with iOS 18.x using the built-in Files app. As noted by The Verge, the iPhone’s USB-C port enables direct high-speed transfers without relying on wireless bottlenecks.
Step 1: Get the Right Adapter
Can you transfer photos from your iPhone directly to an external hard drive? Yes — but the adapter you need depends on your device’s port.
- iPhone 15, 16, and USB-C iPads: Many portable SSDs (like the Samsung T7 or SanDisk Extreme) connect directly with a USB-C cable — no adapter needed. For drives with a USB-A connector, you’ll need a USB-C hub with a USB-A port.
- iPhone 14 and older (Lightning port): You need an Apple Lightning-to-USB 3 Camera Adapter (the model with a Lightning charging passthrough port). This adapter provides enough power for stable large transfers. A basic Lightning-to-USB 2 adapter may cut out mid-transfer with large libraries.
Important: The external drive must be formatted as exFAT or FAT32 for iPhone compatibility. APFS-formatted drives will not be recognized by an iPhone or iPad.
Step 2: Connect and Transfer
Once your adapter and drive are connected, the built-in Files app handles the rest.
- Connect your external drive to your iPhone using the appropriate adapter or cable
- Open the Files app (the blue folder icon — pre-installed on all iPhones running iOS 11 or later)
- Tap “Browse” at the bottom → your external drive should appear under “Locations” in the sidebar
- On your iPhone, open the Photos app → tap Select in the top-right corner
- Tap Select All (or choose specific photos or albums)
- Tap the Share icon (box with upward arrow) → scroll down and tap “Save to Files”
- Navigate to your external drive in the Files browser and tap “Save”
Time estimate: Transferring 1,000 photos takes roughly 10–20 minutes over a USB-C connection. A library of 10,000 photos may take 2–3 hours.
Checkpoint: After the transfer, open the external drive in the Files app and confirm the photo files are visible. Spot-check 3–5 photos to confirm they open correctly.
Bonus: Upload Back to iCloud
Sometimes the transfer goes the other direction. You might have old photos on an external drive that you want to consolidate into your iCloud library — or you may have transferred photos to a drive years ago and now want them accessible on all your Apple devices again. Consolidating old drives into iCloud ensures your entire collection remains accessible anywhere, though Apple’s iCloud storage guidelines recommend checking your available cloud storage space before initiating massive uploads.
The easiest way to copy photos from an external drive back to iCloud is through the Mac Photos app:
- Connect your external hard drive to your Mac
- Open the Photos app
- Go to File → Import
- Navigate to your external drive and select the photos or folders you want to import
- Click “Review for Import” → then “Import All New Photos”
Avoiding duplicates: The Photos app automatically detects duplicates using file metadata. If you import photos that already exist in your library, it will flag them and ask whether to import or skip. Always choose “Skip” for duplicates to avoid cluttering your library.
Album structure: Photos imported this way will retain their original capture dates (from EXIF data) and will appear in the correct chronological position in your library — they won’t all dump into today’s date. This is one reason preserving EXIF metadata during your original export matters so much.
Once imported into the Photos app on your Mac, your photos will automatically sync back to iCloud — and become available on your iPhone, iPad, and any other Apple devices signed into the same Apple ID. The keyword “transfer photos from external hard drive to iCloud” describes exactly this process, and it requires no third-party software.
Troubleshooting Transfer Issues
Even when you follow every step carefully, transfers sometimes stall or fail. Across Apple community forums, the consistent advice is to check a short list of specific causes before assuming something is seriously wrong. Patience is key here, as most transfer errors resolve themselves with a simple settings adjustment. Our team verified the most common errors reported by users attempting to back up iCloud photos to physical storage, and you can always refer to Apple’s official troubleshooting guide for persistent errors.
Common Errors and Fixes
- Error 1 — “The operation can’t be completed because you don’t have permission”
- What’s happening: Your external drive is formatted as exFAT and you’re trying to move the Photos Library file (which requires APFS or Mac OS Extended).
- Fix: Reformat the drive using Disk Utility → choose Mac OS Extended (Journaled) or APFS. Note: this erases all data on the drive first.
- Error 2 — Photos are blurry or very small after transfer
- What’s happening: You exported using “Export Photo” instead of “Export Unmodified Original,” or your Mac was still in “Optimize Mac Storage” mode when you copied files.
- Fix: Switch to “Download Originals to this Mac” in Photos Settings, wait for the full download, then re-export using File → Export → Export Unmodified Original.
- Error 3 — iPhone doesn’t recognize the external drive
- What’s happening: The drive is formatted as APFS (Mac-only) or the adapter isn’t providing enough power.
- Fix: Use a drive formatted as exFAT. Use the Lightning-to-USB 3 Camera Adapter (not the USB 2 version) for older iPhones. For USB-C iPhones, try a powered USB-C hub.
- Error 4 — iCloud.com download button is grayed out or won’t respond
- What’s happening: You’ve selected more than 1,000 photos. Apple Support confirms this is a hard platform limit.
- Fix: Deselect all, then re-select a maximum of 1,000 photos at a time.
- Error 5 — Transfer stops partway through a large library
- What’s happening: Internet connection dropped, or Mac went to sleep during a long download.
- Fix: Go to System Settings → Displays → Advanced and disable “Prevent automatic sleeping” during the transfer. For iCloud downloads, the Photos app will resume from where it stopped.
When to Seek Extra Help
Some situations go beyond a standard how-to guide. Consider reaching out to Apple Support directly (support.apple.com) if:
- Your iCloud library shows a different photo count than your iPhone — this may indicate a sync conflict requiring account-level troubleshooting.
- You’ve turned off iCloud Photos and photos are disappearing — Apple Support confirms there is a 30-day window after disabling iCloud Photos before photos are permanently removed from iCloud servers. If you’re within that window, re-enable iCloud Photos immediately and contact Apple Support.
- Your Photos Library file is corrupted — the Photos app will show a repair prompt, but severe corruption may require Apple’s recovery tools.
- You’re managing a shared photo library with family members — the permissions and export behavior differ from a personal library.
For complex migrations involving tens of thousands of photos across multiple Apple IDs, a consultation with an Apple Authorized Service Provider is often faster than troubleshooting alone.
Important Considerations
Relying on a single backup method leaves your irreplaceable memories vulnerable to hardware failure. The 3-2-1 backup rule is highly recommended by cybersecurity agencies like CISA for optimal data security, meaning you should never trust a single point of failure.
Common Pitfalls to Avoid
Pitfall 1 — Copying from Finder instead of exporting from Photos: Dragging photos from the Finder’s Pictures folder while “Optimize Mac Storage” is on copies only low-resolution previews. Always export from inside the Photos app.
Pitfall 2 — Using the wrong export option: “Export Photo” re-compresses your images. “Export Unmodified Original” is the only option that satisfies The Zero-Loss Transfer Rule. The difference is permanent — you cannot recover stripped metadata after the fact.
Pitfall 3 — Forgetting to verify the transfer: Always compare the file count on your external drive to the total in your Photos library before deleting anything from iCloud. A 30,000-photo library should produce exactly 30,000 files (plus videos).
Pitfall 4 — Turning off iCloud Photos before completing a backup: Apple Support confirms that turning off iCloud Photos starts a 30-day countdown before photos are deleted from iCloud’s servers. Never disable iCloud Photos until your external drive backup is verified and complete.
Pitfall 5 — Skipping a second backup: An external drive can fail. The 3-2-1 backup rule (3 copies of your data, 2 different storage types, 1 offsite) is the professional standard. Once your photos are on an external drive, consider also uploading to a second cloud service like Google Photos or Amazon Photos as a redundant backup.
When to Avoid External Drives
An external drive is an excellent backup for most users — but it’s not always the right tool. Consider these alternatives:
- If you primarily need more iCloud storage: Upgrading your iCloud+ plan (50GB for $0.99/month, 200GB for $2.99/month, 2TB for $9.99/month) may be simpler than managing physical drives — especially if you don’t have a Mac or PC at home.
- If you need access to photos on multiple devices: A second cloud service (Google Photos, Amazon Prime Photos) syncs automatically and doesn’t require manual transfers.
- If your library exceeds 10TB: Enterprise-grade NAS (Network Attached Storage) solutions offer better reliability and redundancy than portable drives for very large professional archives.
Will I Lose Photos if Off?
You will not lose photos immediately, but a 30-day countdown begins the moment you disable iCloud Photos. Apple Support confirms that after 30 days, photos stored only in iCloud are permanently deleted from Apple’s servers. To stay safe, complete your external drive backup first, verify the file count matches your library, and only then consider turning off iCloud Photos. Re-enabling it within the 30-day window cancels the deletion process entirely.
Frequently Asked Questions
How do I copy my entire iPhoto library to an external hard drive?
Open the Mac Photos app and press Command+A to select your entire library, then go to File → Export → Export Unmodified Original and choose your external drive as the destination. For a complete library move, you can also drag the entire “Photos Library.photoslibrary” file from your Pictures folder to the external drive in Finder. A 30,000-photo library typically takes 2–4 hours to export. Ensure your drive is formatted as APFS or Mac OS Extended — not exFAT — for the full library file method.
How do I export all my photos out of iCloud?
The fastest method for a complete export is the Mac Photos App. Enable “Download Originals to this Mac” in Photos Settings → iCloud, wait for the full download (which may take several hours for large libraries), then press Command+A to select everything and use File → Export → Export Unmodified Original. Alternatively, Apple’s Data & Privacy portal at privacy.apple.com lets you request a full archive of your iCloud Photos delivered in 25GB chunks, typically within 3–7 days.
Can I transfer photos from my iPhone directly to an external hard drive?
Yes — iPhone 15, 16, and USB-C iPads can connect directly to many external SSDs using a single USB-C cable. Older iPhones (Lightning port) need an Apple Lightning-to-USB 3 Camera Adapter. Once connected, open the Files app, select your photos in the Photos app, tap Share → Save to Files, and choose your external drive as the destination. The drive must be formatted as exFAT or FAT32 for iPhone compatibility — APFS-formatted drives won’t appear in the Files app.
Why can’t I move photos to an external hard drive on my Mac?
If you cannot move photos to an external drive on your Mac, the drive is likely formatted incorrectly. The Mac Photos library requires an APFS or Mac OS Extended format to function properly. Reformatting your drive in Disk Utility will usually solve this permission error instantly.
What is the $9.99 a month for iCloud?
The $9.99 monthly fee is for Apple’s 2TB iCloud+ storage tier. This plan provides enough cloud storage for massive photo libraries, typically holding over 500,000 standard images. It also includes premium features like iCloud Private Relay and HomeKit Secure Video support. For users who prefer not to manage physical external hard drives, upgrading to this tier is often the most convenient backup solution.
Your photos represent years of irreplaceable memories — and keeping them safe shouldn’t require a computer science degree. The four methods in this guide cover every common setup: Mac, Windows PC, or iPhone only. For most users with a large iCloud photo library, the Mac Photos App with “Export Unmodified Original” remains the gold standard, because it’s the only method that fully satisfies The Zero-Loss Transfer Rule — preserving file format, EXIF metadata, and full resolution in a single step.
Start with the decision table above to confirm your method, run the prerequisites checklist, and follow the numbered steps for your chosen approach. The whole process is straightforward once you know which settings to check and which export option to choose.
Learning how to transfer iCloud photos to external hard drive storage ensures your memories represent years of irreplaceable moments safely backed up. Pick your method, plug in your drive, and get those photos off the cloud and onto something you physically own. Your future self — and your irreplaceable memories — will thank you.