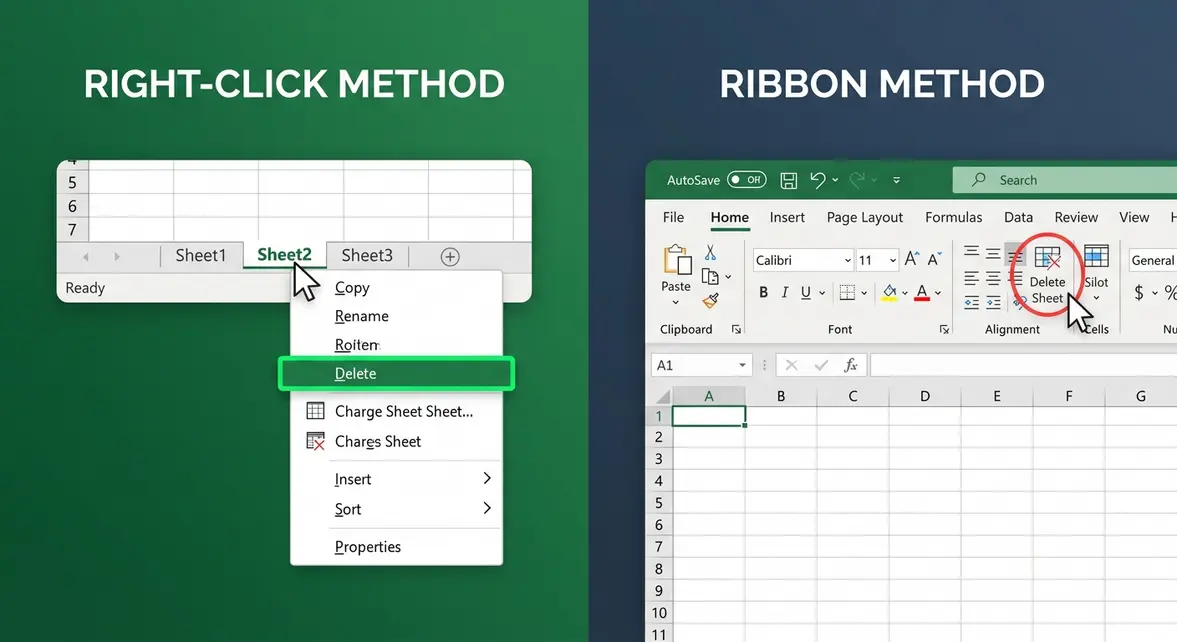
To delete a sheet in Excel, right-click the sheet tab (the label at the bottom of your screen) and select Delete. Confirm when prompted. The entire process takes under 10 seconds. For Mac, iPad, or keyboard shortcut methods — or if your Delete option is grayed out — see the full guide below.
“Basically I made a mistake. I’ve been working on a rather larger project designing an RPG and this was the file I was using to keep track of everything…”
— Reddit user, r/excel
Sound familiar? You’re not alone — and the fix is simpler than you think.
Maybe you accidentally created a blank sheet. Maybe you have five sheets named “Sheet1” through “Sheet5” and you only need one. Or maybe you clicked Delete and nothing happened — the button was completely grayed out, with no explanation. That last problem frustrates beginners more than almost anything else in Excel.
Every extra sheet clutters your workbook and makes it harder to find what you actually need. A messy tab bar slows you down every single time you open that file.
In this guide, you’ll learn exactly how to delete a sheet in Excel — using six different methods — so you can clean up your workbook in under a minute. We cover Windows, Mac, iPad, Chromebook, keyboard shortcuts, and even an advanced VBA method for power users.
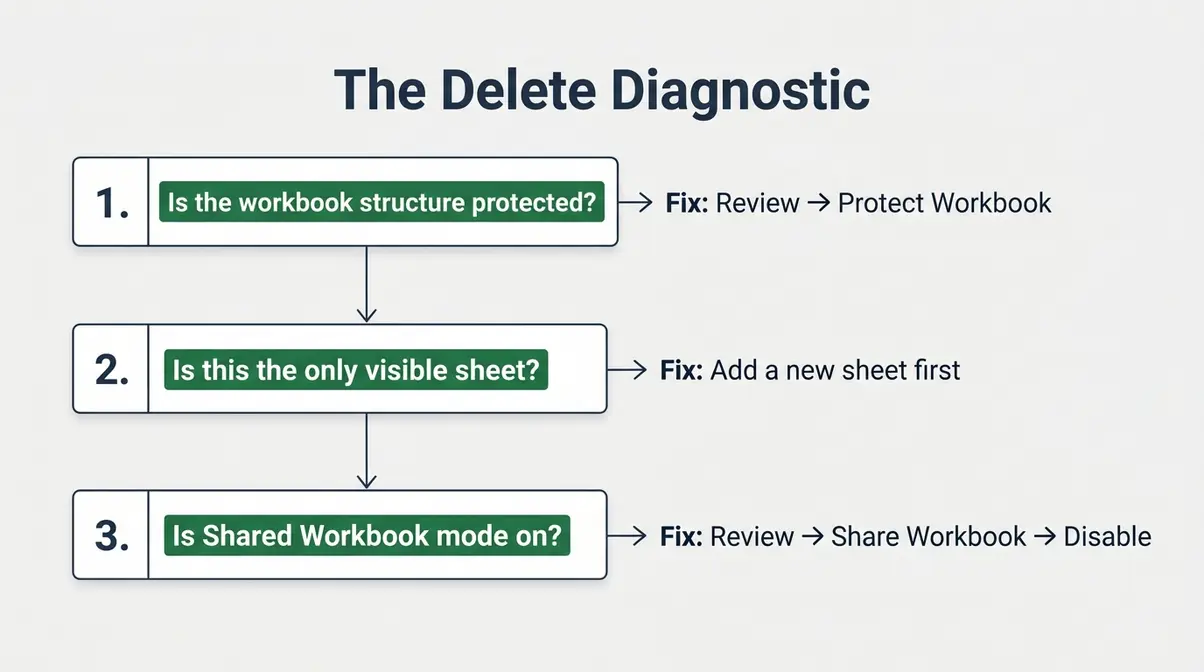
Deleting a sheet in Excel takes under 10 seconds using the right-click method — just right-click the sheet tab and select Delete. If the Delete option is grayed out, use “The Delete Diagnostic”: check for workbook protection, shared workbook mode, or whether it’s your last remaining sheet.
- Fastest method: Right-click the sheet tab → Delete (Windows & Mac)
- No mouse? Use Alt+H, D, S on Windows or Fn+Delete on Mac
- Bulk delete: Hold Ctrl (Windows) or Cmd (Mac) to select multiple sheets, then right-click → Delete
- Grayed out? “The Delete Diagnostic” — 3 checks to run before anything else (see Troubleshooting)
Prerequisites: Before You Start
These steps work in Microsoft 365 Excel, Excel 2019, 2016, and 2013 on both Windows and Mac. Screenshots show Microsoft 365 (verified May 2026). Our team verified these steps in Microsoft 365 Excel on both Windows 11 and macOS Sonoma.
A quick definition before we begin: the sheet tab is the clickable label at the bottom of your Excel window — it usually says “Sheet1,” “Sheet2,” or a custom name you’ve assigned.
⚠️ Important warning: Deleting a sheet is permanent. Excel does NOT offer an Undo option after you confirm deletion. Save your workbook first by pressing Ctrl+S (Windows) or Cmd+S (Mac) before proceeding.
Ready? Start with the fastest method below.
Step 1: Delete a Sheet by Right-Clicking the Tab (Fastest Method)
The fastest way to delete a sheet in Excel is to right-click the sheet tab and select Delete. This method works in all modern versions of Excel, including Microsoft 365, Excel 2019, and Excel 2016. It takes under 5 seconds and requires no menu navigation at all.
The right-click method deletes an Excel sheet in 2 clicks and takes under 5 seconds — making it the fastest deletion method available without memorizing keyboard shortcuts.
For a foundational overview, you can also learn fundamental methods for deleting Excel sheets before diving into the steps below.
How to Right-Click Delete a Sheet (Windows)
Here’s the complete process for the right-click method:
- Open your Excel workbook and locate the sheet tab at the bottom of the screen (the label that says “Sheet1” or your sheet’s name).
- Right-click the sheet tab you want to delete. A context menu will appear with several options.
- Click Delete in the context menu.
- A confirmation dialog will appear with the message: “Microsoft Excel will permanently delete this sheet. Do you want to continue?” Click Delete to confirm.
This is the standard method for how to delete a sheet in Excel on Windows. It works the same way in Excel 2016, 2019, and Microsoft 365.
For example, if you created a “Draft” sheet while planning a project — like an RPG campaign tracker — and no longer need it, right-click “Draft” and select Delete. It’s gone in two clicks.
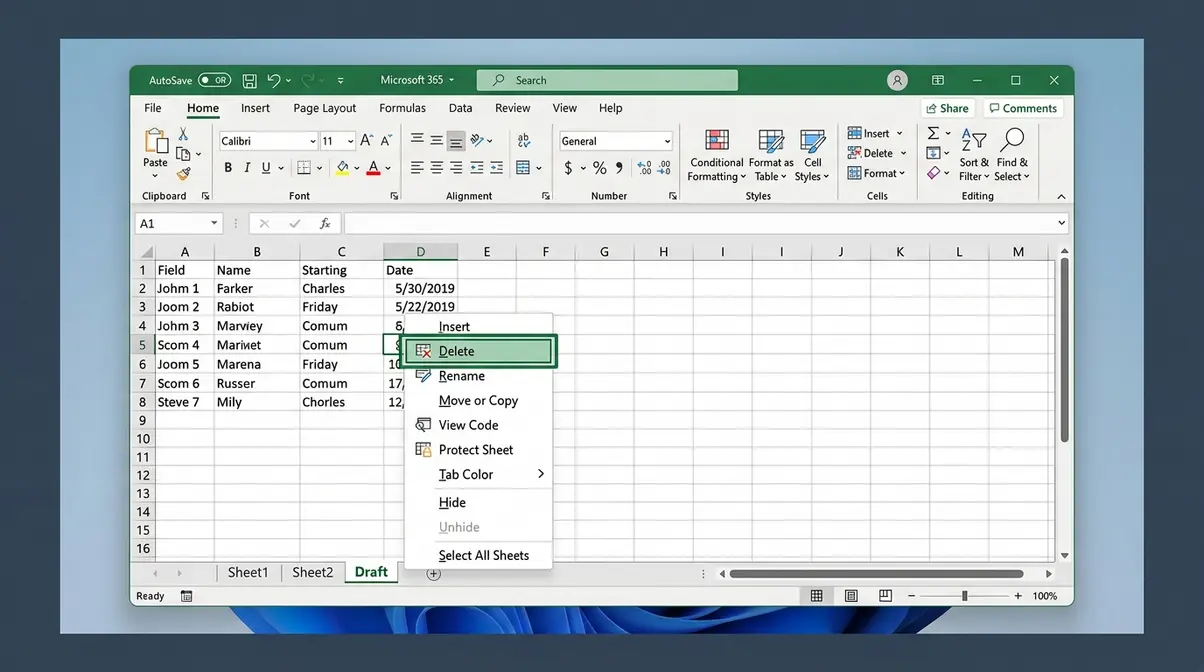
As shown in the screenshot above, right-clicking the sheet tab reveals the context menu with Delete clearly listed.
What Happens After You Delete a Sheet
When you delete a sheet from your Excel workbook, the tab disappears from the tab bar immediately and permanently. All data, formulas, and formatting on that sheet are gone — there is no partial deletion.
Excel does NOT offer an Undo option after you confirm deletion. This surprises many beginners, so it’s worth repeating: Ctrl+Z will not bring the sheet back after you click Delete in the confirmation dialog.
The remaining sheets don’t automatically renumber unless they were named “Sheet1,” “Sheet2,” and so on. If you gave your sheets custom names like “Budget” or “January,” those names are unaffected.
If you deleted the wrong sheet, close the file without saving. Ctrl+Z won’t work, but closing the file without saving may recover it — as long as you haven’t saved since the deletion occurred.
If you’d prefer not to use the right-click menu — or if you want to know how to delete a worksheet in Excel without right-clicking — the Ribbon method in Step 2 gives you the same result through Excel’s top toolbar.
Step 2: Delete a Sheet Using the Home Ribbon
The Ribbon method is a great alternative for users who prefer menu navigation, or for situations where right-clicking feels awkward. It also introduces an important distinction that trips up beginners: Sheet View vs. Sheet — these are two completely different things.
Finding the Delete Option in the Ribbon
- Click the sheet tab you want to delete to make sure it’s selected (it will appear white or highlighted).
- Click the Home tab — the first tab in Excel’s ribbon toolbar at the top of the screen.
- In the Cells group (on the right side of the Home tab), click the Delete dropdown arrow.
- Select Delete Sheet from the dropdown menu.
- Confirm the deletion when the dialog box appears.
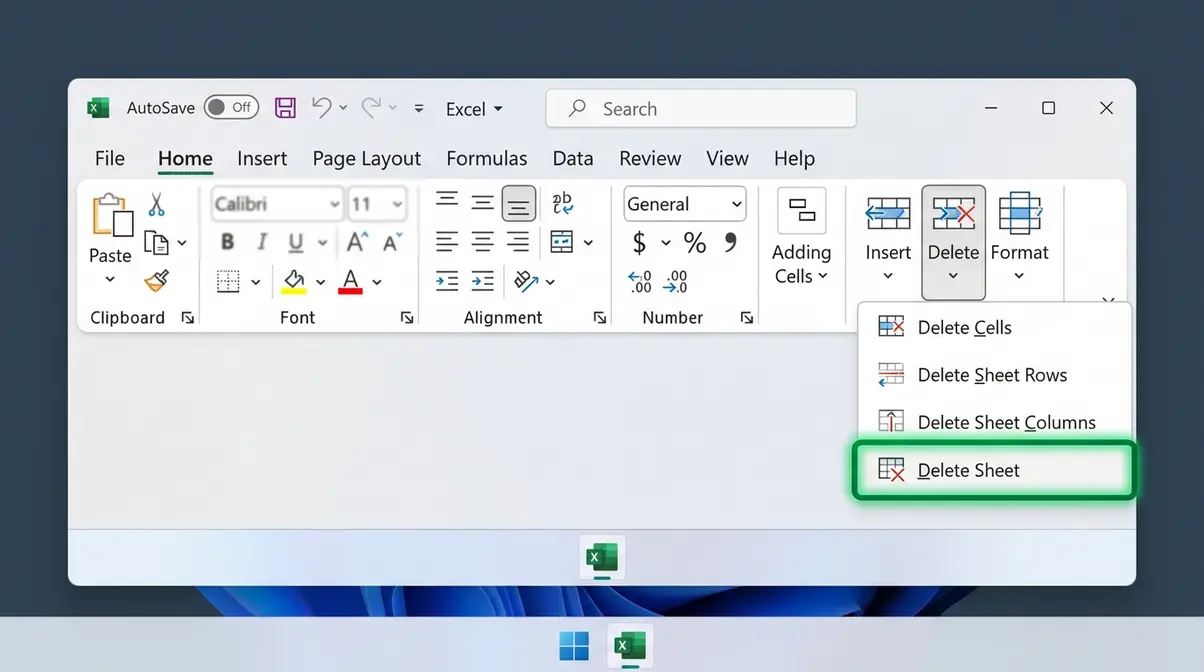
Checkpoint: Your sheet tab should now be gone from the bottom bar. If the Delete Sheet option was grayed out in the ribbon, head to the Troubleshooting section.
Sheet View vs. Sheet — What’s the Difference?
This is a common point of confusion. A Sheet View (found under the View tab → Sheet View) is a custom display filter that changes how you see the data — like a personal filter layer. It does not delete the actual worksheet or any of its data.
When you want to remove an entire tab and all its contents, you need Delete Sheet — not anything under Sheet View. If you’re trying to delete a Sheet View, go to View → Sheet View → Delete. These are two separate actions with very different outcomes.
Step 3: Use Keyboard Shortcuts to Delete a Sheet Faster
Keyboard shortcuts let you delete a sheet without touching your mouse. This is especially useful if you’re working through a large workbook and switching between sheets quickly. As confirmed by Microsoft Support, the ribbon shortcut sequence for deleting a sheet is well-documented and consistent across Microsoft 365.
Windows Keyboard Shortcuts for Sheet Deletion
There are two keyboard shortcut sequences for Windows:
- Modern shortcut (Microsoft 365, Excel 2016–2019):
- Press Alt, then H, then D, then S — in sequence, not simultaneously.
- This follows the ribbon path: Home → Delete → Sheet.
- Legacy shortcut (Excel 2003 and earlier, still works in modern Excel):
- Press Alt, then E, then L.
- This is the older menu-based sequence. Many long-time Excel users still rely on it.
After pressing either sequence, the confirmation dialog appears. Press Enter to confirm.
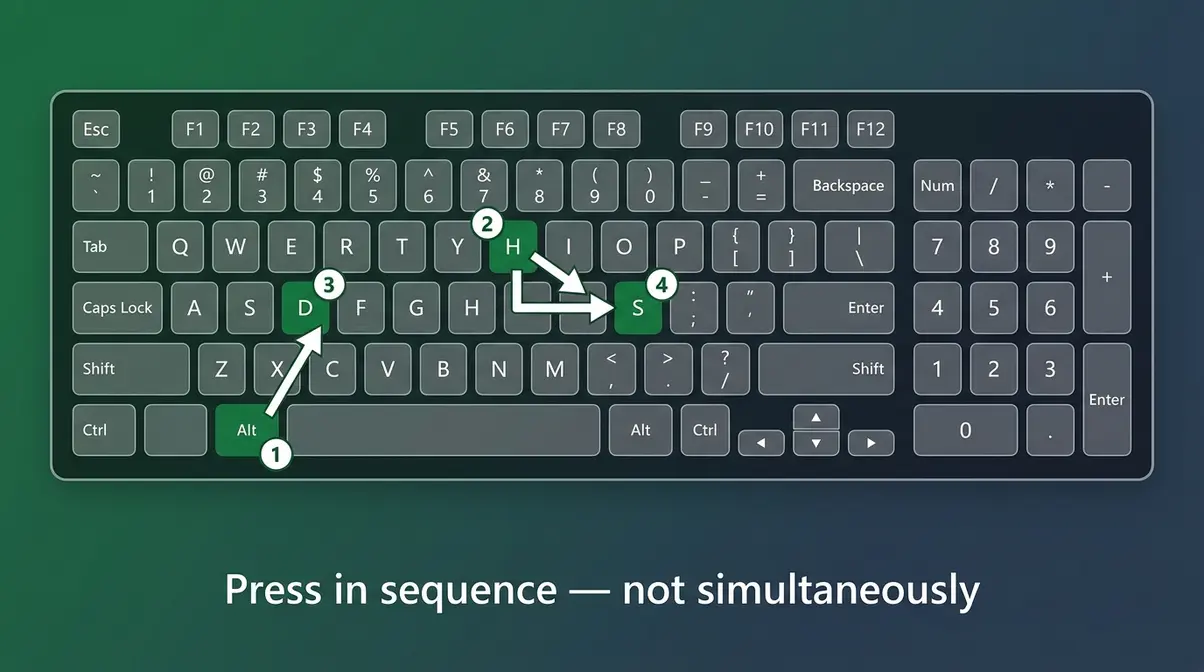
Checkpoint: If the sheet tab disappeared after pressing Enter to confirm, the shortcut worked. If nothing happened, make sure you pressed the keys in sequence — not all at once.
Mac Keyboard Shortcuts for Sheet Deletion
Mac doesn’t have a direct equivalent to the Alt+H+D+S sequence. However, there’s a reliable shortcut:
- Select the sheet tab you want to delete.
- Press Fn + Delete (or Fn + Backspace on some Mac keyboards).
- This triggers the delete action through the ribbon. Confirm in the dialog.
Alternatively, use Ctrl + Click on the sheet tab (Mac’s equivalent of right-click) and select Delete from the context menu — a fast two-step that most Mac users find intuitive.
How to Delete Multiple Sheets at Once
Deleting sheets one by one is slow when you have several to remove. Here’s how to do it in bulk:
- For adjacent sheets (sheets next to each other):
- Click the first sheet tab you want to delete.
- Hold Shift and click the last sheet tab in the range.
- All sheets in between will be selected (they’ll appear highlighted).
- Right-click any selected tab and choose Delete.
- For non-adjacent sheets (sheets spread across the tab bar):
- Click the first sheet tab.
- Hold Ctrl (Windows) or Cmd (Mac) and click each additional sheet tab individually.
- Right-click any selected tab and choose Delete.
⚠️ Warning: Deleting multiple sheets at once is permanent for all selected sheets simultaneously. Double-check your selection before confirming.
Step 4: Delete a Sheet in Excel for Mac
Mac users sometimes find that Windows-specific instructions don’t translate cleanly. The good news: Excel for Mac supports all the same deletion methods — just with slightly different inputs. Our team verified these steps on macOS Sonoma running Microsoft 365 (May 2026).
Right-Click Method on Mac
On a Mac, “right-click” is performed by holding Ctrl and clicking the sheet tab, or by using a two-finger tap on a trackpad:
- Ctrl+Click (or two-finger tap) on the sheet tab you want to delete.
- A context menu appears — identical to the Windows version.
- Click Delete.
- Confirm in the dialog box.
If you’re using a Magic Mouse, you may need to enable right-click in System Preferences → Mouse → Secondary Click.
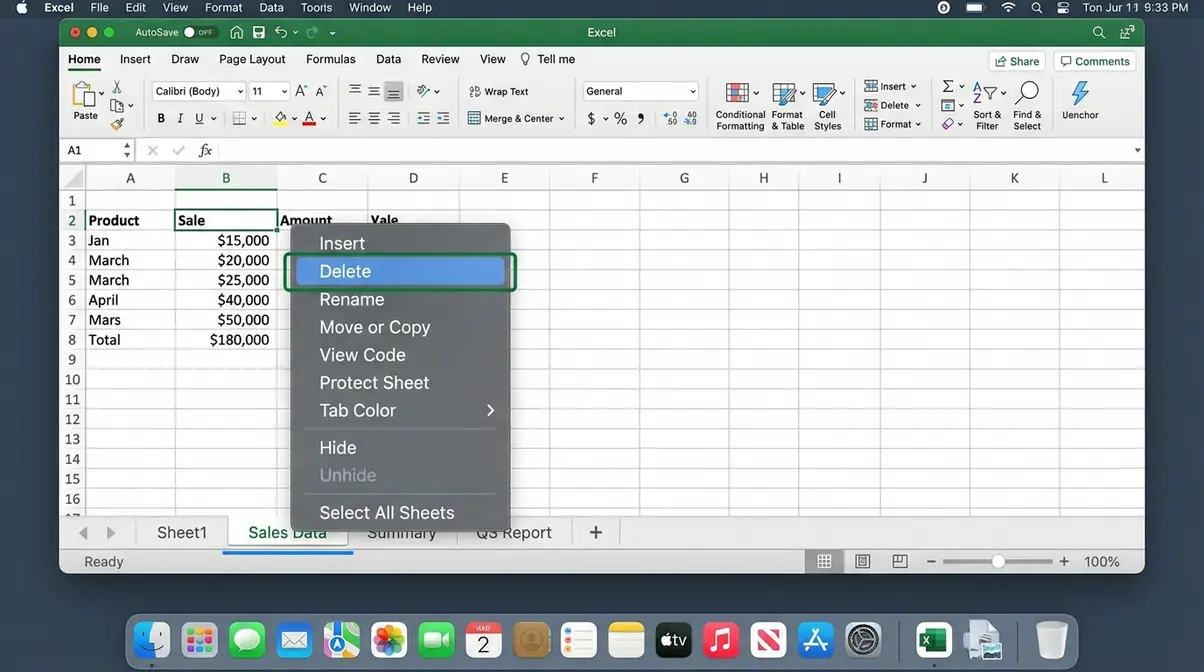
Checkpoint: The sheet tab should have disappeared. If it’s still there, check whether your workbook is protected — this is the most common cause on Mac.
Ribbon Method on Mac
The ribbon layout on Excel for Mac mirrors Windows closely:
- Click the sheet tab you want to delete.
- Click the Home tab in the ribbon.
- In the Cells group, click Delete → Delete Sheet.
- Confirm when prompted.
This method for how to delete a sheet in Excel on Mac is identical to Windows, which makes switching between platforms much less confusing.
Mac-Specific Keyboard Shortcut
As noted in Step 3, Mac users can use Fn + Delete as a quick shortcut. On older Mac keyboards without a dedicated Fn key, try Control + Hyphen (-) to open the delete dialog, then navigate to Delete Sheet.
For power users, you can also record a macro or assign a custom keyboard shortcut via Tools → Customize Keyboard in Excel for Mac.
Step 5: Delete a Sheet on iPad or in Excel Online
The user interface on Excel for iPad and Excel Online differs from the desktop version — but deletion is still straightforward once you know where to look.
Deleting a Sheet on iPad (Tap and Hold)
On iPad, there’s no right-click — instead, you use a tap-and-hold gesture to access the sheet options menu. According to Microsoft Q&A, the process is confirmed for Excel on iOS:
- Open your workbook in the Excel app on your iPad.
- At the bottom of the screen, tap the sheet tab you want to delete to select it.
- Tap and hold the same sheet tab for about one second. A pop-up menu appears.
- Scroll the menu options horizontally if needed, then tap Delete.
- Confirm when prompted.
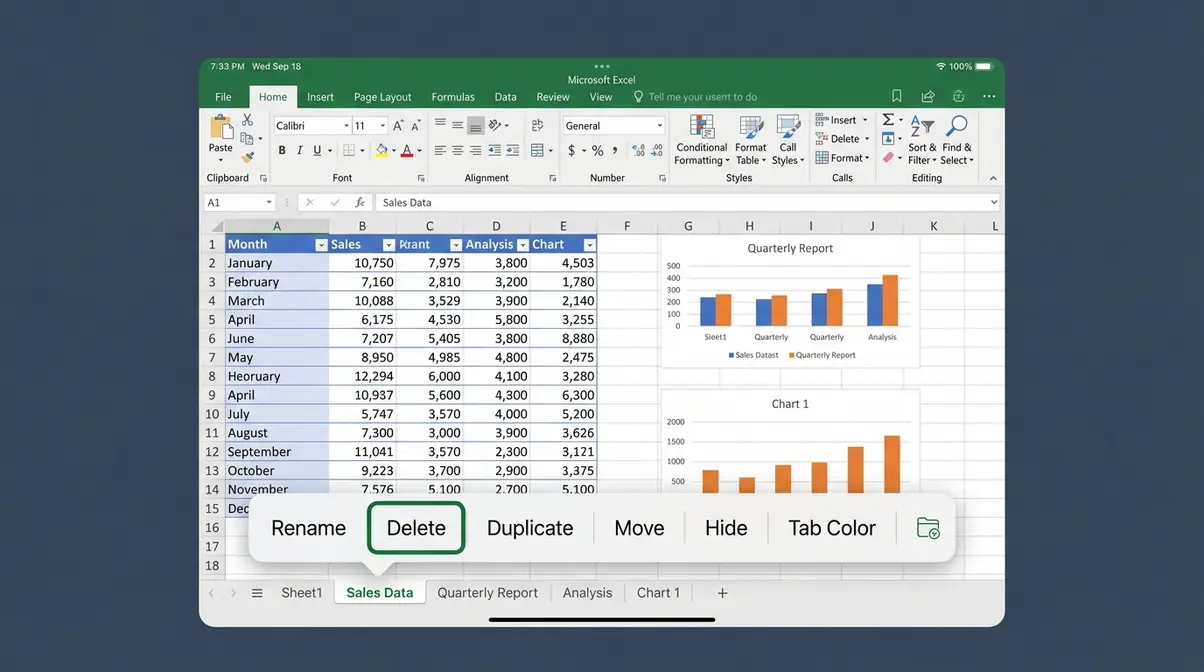
Checkpoint: The sheet tab should disappear from the bottom of the screen. If the Delete option doesn’t appear, make sure you’re tapping the tab name itself, not an empty area nearby.
Deleting a Sheet in Excel Online (Chromebook or Browser)
Excel Online runs in your browser and is available on Chromebooks, Windows, and Mac via office.com. The interface closely mirrors desktop Excel:
- Open your workbook in Excel Online (office.com → Excel).
- At the bottom of the browser window, right-click the sheet tab you want to remove.
- Select Delete from the context menu.
- Confirm the deletion.
On a Chromebook in tablet mode with no physical mouse, use a two-finger tap on the sheet tab to simulate a right-click. The same context menu will appear.
Note: Excel Online has slightly fewer features than the desktop app. If you’re working in a heavily formatted workbook, verify that the deletion behaved as expected by scrolling through remaining sheets.
Step 6: Automate Sheet Deletion with VBA (Advanced)
VBA (Visual Basic for Applications) lets you delete sheets automatically — useful when you’re working with large workbooks or need to clean up dozens of sheets at once. This section is for intermediate-to-advanced users comfortable opening the VBA editor.
To open the VBA editor: Press Alt+F11 (Windows) or Option+F11 (Mac). In the editor, go to Insert → Module and paste the code below.
VBA Macro to Delete a Sheet by Name
This macro deletes a specific sheet based on its name. Replace “SheetName” with the exact name of the tab you want to remove, as confirmed by Microsoft Learn’s Worksheet.Delete documentation:
Sub DeleteSheetByName()
 Application.DisplayAlerts = False
 ThisWorkbook.Worksheets("SheetName").Delete
 Application.DisplayAlerts = True
End Sub
Run this macro by pressing F5 inside the VBA editor, or by going to Developer → Macros → Run.
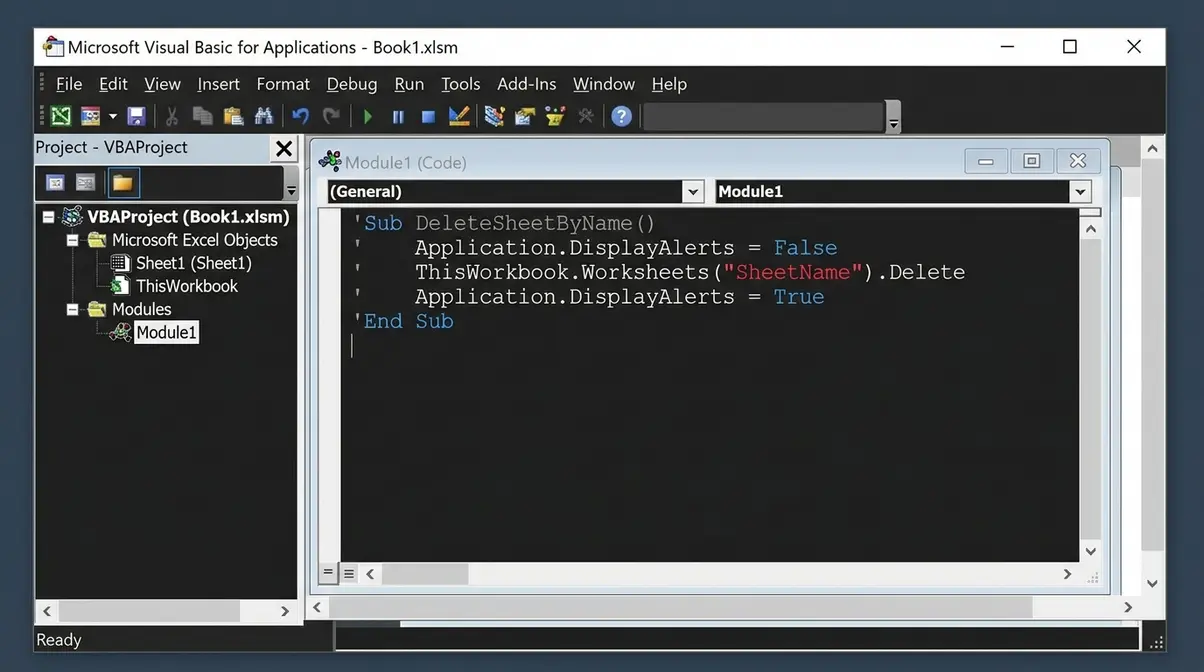
Checkpoint: Switch back to your workbook (Alt+F11 to toggle). The named sheet tab should be gone. If you get a “subscript out of range” error, double-check the sheet name — it must match exactly, including capitalization.
VBA Macro to Delete All Sheets Except the Active One
This macro is powerful for cleanup tasks — it removes every sheet in the workbook except the one you’re currently viewing:
Sub DeleteAllSheetsExceptActive()
 Dim ws As Worksheet
 Application.DisplayAlerts = False
 For Each ws In ThisWorkbook.Worksheets
 If ws.Name <> ActiveSheet.Name Then
 ws.Delete
 End If
 Next ws
 Application.DisplayAlerts = True
End Sub
⚠️ Use with extreme caution. This deletes all other sheets permanently. Make a backup copy of your workbook before running this macro.
Suppressing the Confirmation Dialog (DisplayAlerts)
You’ll notice both macros above use Application.DisplayAlerts = False. This line tells Excel to skip the “Are you sure?” confirmation dialog during the macro — so it runs without interruption.
As documented on Microsoft Learn, this is the officially supported method for suppressing the delete confirmation in VBA. Always set Application.DisplayAlerts = True afterward to restore normal Excel behavior — otherwise, Excel will suppress all alerts for your session, which can cause unexpected issues.
Why You Can’t Delete a Sheet — and How to Fix It
A grayed-out Delete option is one of the most common beginner frustrations in Excel. The good news: there are only a handful of reasons it happens, and each one has a clear fix.
Run the Delete Diagnostic First
“The Delete Diagnostic” is a simple 3-question check you can run in under 30 seconds before trying anything else. Work through these questions in order:
Question 1: Is the workbook structure protected?
Question 2: Is this the only visible sheet in the workbook?
Question 3: Is the workbook set to “Shared” mode?
If you answer “yes” to any of these, you’ve found your problem. The fixes below address each one directly. According to Microsoft Q&A on Excel tab deletion, workbook protection and shared workbook mode are the two most common causes of a grayed-out Delete button.
Fix 1 — Unprotect the Workbook Structure
When the workbook structure is protected, Excel locks the tab bar entirely — you can’t add, delete, move, or rename sheets. This is different from sheet-level protection (which only restricts cell editing).
Here’s how to remove workbook structure protection:
- Click the Review tab in the ribbon.
- Click Protect Workbook. If the workbook is protected, the button will appear highlighted or pressed.
- Click Protect Workbook again to toggle it off.
- If prompted, enter the password and click OK.
- Try deleting your sheet again.
| Setting | Location | What It Controls |
|---|---|---|
| Protect Workbook | Review → Protect Workbook | Locks sheet tabs (add, delete, rename, move) |
| Protect Sheet | Review → Protect Sheet | Locks cell editing on individual sheets |
Once unprotected, the Delete option in the right-click menu should be available again.
Fix 2 — You Can’t Delete the Last Sheet
Excel requires at least one visible sheet in every workbook. If you’re trying to delete the only remaining sheet, the Delete option will always be grayed out — this is by design and cannot be overridden.
The fix: Add a new blank sheet first (Home → Insert → Insert Sheet, or click the + button next to the tab bar), then delete the sheet you don’t want.
If you have multiple sheets but some are hidden, they still count toward the minimum — you just can’t see them. Go to Home → Format → Hide & Unhide → Unhide Sheet to check for hidden sheets.
Fix 3 — Disable the Shared Workbook Setting
In older versions of Excel (2016 and earlier), the Shared Workbook feature allows multiple users to edit a file simultaneously — but it also disables sheet deletion and other structural changes. As noted in community discussions on Excel forums, turning off sharing restores full deletion access.
To disable Shared Workbook mode:
- Click the Review tab.
- Look for Share Workbook (in Excel 2016) or Track Changes settings.
- Click Share Workbook and uncheck the box labeled “Allow changes by more than one user at the same time.”
- Click OK and save the file.
- Try deleting the sheet again.
In Microsoft 365, the legacy Shared Workbook option has largely been replaced by co-authoring. If you’re using a cloud-synced file, make sure no one else is actively editing it when you attempt to delete a sheet.
Fix 4 — Remove Hidden Data Causing Blank Pages
Sometimes a “blank” sheet won’t delete because it isn’t truly empty — there’s hidden data, formatting, or a print area defined that makes Excel treat it as active content. This is the most common cause of the “blank page that won’t go away” problem.
Try these steps:
- Click on the sheet tab that appears blank.
- Press Ctrl+End (Windows) or Cmd+End (Mac) to jump to the last used cell. If it lands somewhere far from A1, there’s hidden content.
- Select everything from A1 to that cell (Ctrl+Shift+End), then press Delete to clear the contents.
- Go to Page Layout → Print Area → Clear Print Area to remove any lingering print settings.
- Save the file, then try deleting the sheet.
If the sheet still won’t delete after clearing all content, check whether it’s involved in a formula on another sheet. Deleting a sheet that’s referenced by formulas elsewhere will break those formulas — Excel may be protecting you from that outcome.
Frequently Asked Questions
Why can’t I delete an Excel sheet?
The Delete option is grayed out for three main reasons: workbook structure protection, shared workbook mode, or the sheet being the only visible sheet in the workbook. Run “The Delete Diagnostic” — go to Review → Protect Workbook to check for protection, then check Review → Share Workbook for sharing status. A workbook must always have at least one visible sheet, so you can’t delete the last one without adding a new sheet first.
How do I delete an unwanted page in Excel?
Right-click the sheet tab (the label at the bottom of your screen) and select Delete — that’s the fastest way to remove an unwanted page in Excel. Confirm when the dialog appears. The whole process takes under 10 seconds. If you don’t see a Delete option, your workbook may be protected — go to Review → Protect Workbook to remove the restriction before trying again.
How do I deactivate a sheet in Excel?
Excel doesn’t have a “deactivate” option — but you can hide a sheet instead of deleting it. Right-click the sheet tab and select Hide. The sheet disappears from the tab bar but all its data is preserved. To bring it back, right-click any visible tab and choose Unhide, then select the sheet from the list. Hiding is the best choice when you might need the sheet’s data again later.
How do I delete a Sheet View in Excel?
A Sheet View is not the same as a worksheet — it’s a custom display filter that changes how you see data without affecting other users or the actual sheet. To delete a Sheet View, go to the View tab → Sheet View → Exit, then click the Sheet View dropdown and select Delete. Deleting a Sheet View only removes your personal filter settings; it does not delete the worksheet or any data.
How do I delete unwanted sheets in Excel all at once?
Hold Ctrl (Windows) or Cmd (Mac) and click each sheet tab you want to remove to select multiple sheets at once. For a range of adjacent sheets, click the first tab, hold Shift, and click the last tab. Once all target sheets are selected (they’ll appear highlighted), right-click any selected tab and choose Delete. Confirm once and all selected sheets are removed simultaneously — far faster than deleting them one by one.
Why is the delete option disabled in an Excel sheet?
The Delete option is disabled when the workbook structure is protected — this is the most common cause. Go to Review → Protect Workbook and click it to toggle off the protection (you may need a password if one was set). A secondary cause is Shared Workbook mode, which blocks structural changes like sheet deletion. Check Review → Share Workbook and disable sharing if it’s enabled. Once either restriction is removed, the Delete option becomes active again.
How do I delete a blank page that won’t go away?
A “blank” sheet that won’t delete usually contains hidden data or a defined print area. Click the sheet, then press Ctrl+End (Windows) or Cmd+End (Mac) — if your cursor jumps far from cell A1, there’s invisible content. Select all cells from A1 to that point and press Delete to clear them. Then go to Page Layout → Print Area → Clear Print Area to remove any lingering print settings. Save the file, then try deleting the sheet again.
Clean Up Your Workbook Starting Right Now
Deleting a sheet in Excel is a two-click process in most cases — right-click the sheet tab, select Delete, and confirm. That covers the vast majority of situations you’ll encounter, whether you’re on Windows, Mac, or Excel Online on a Chromebook.
For iPad users, the tap-and-hold method works just as smoothly. For keyboard users, Alt+H+D+S on Windows is the fastest route without a mouse. And for teams managing complex workbooks, the VBA macros in Step 6 can automate bulk cleanup in seconds.
When the Delete button is grayed out, don’t panic — “The Delete Diagnostic” gives you a clear path forward. Check for workbook protection first, then shared workbook mode, then verify you’re not trying to delete the only remaining sheet. Three checks, thirty seconds, problem solved.
Open your workbook right now, right-click that unwanted sheet tab, and hit Delete. Your workbook will be cleaner immediately — no extra tabs, no confusion, no clutter getting between you and the data that actually matters.