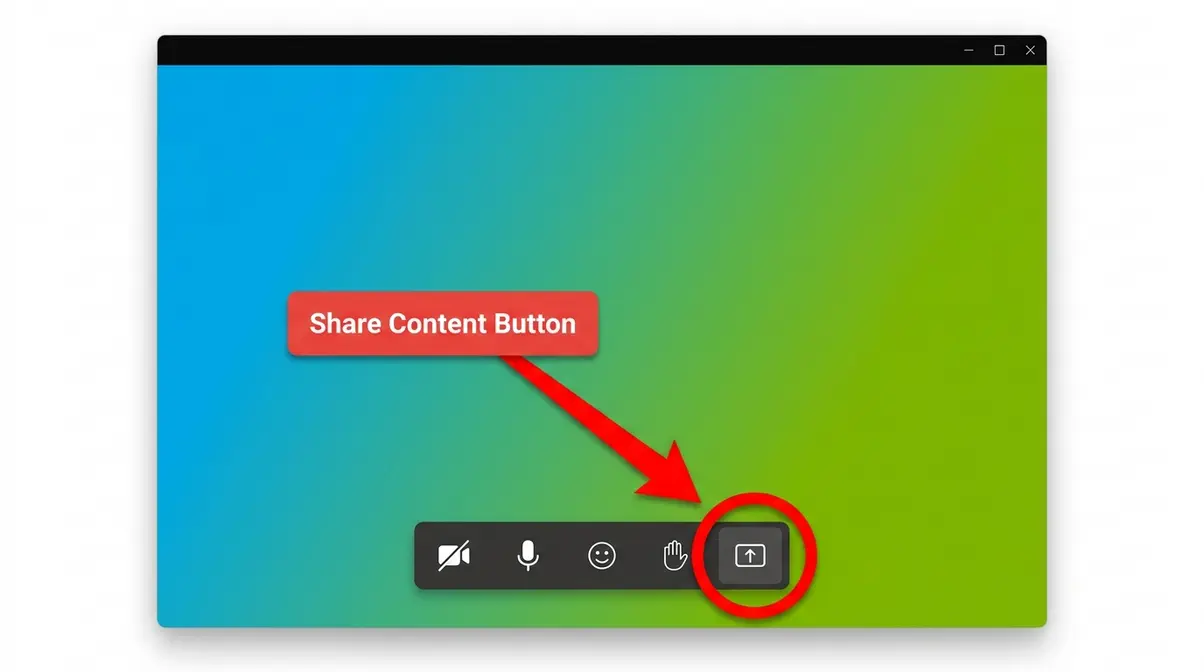
To share your screen on Microsoft Teams, join or start a meeting, then click the Share Content button (the upward arrow icon) in the meeting toolbar at the bottom of your screen. Choose Entire Screen, a specific Window, or PowerPoint Live. The whole process takes under 30 seconds once you know where to look. Mac users must grant Screen Recording permission in System Settings before the option becomes available.
You’re in a Teams meeting, someone asks you to share your screen, and you’re staring at a toolbar that looks nothing like the tutorial you Googled. You’re not imagining it — Microsoft updated the Teams interface in 2026, and most guides online still show the old one.
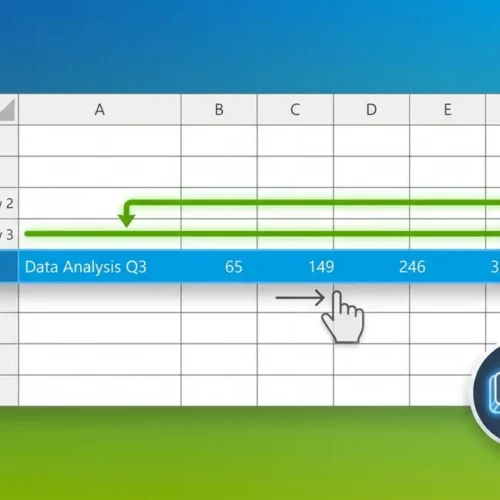
“I’m used to using Google Meet, where I can share a window (let’s say Excel), but when I go back to Chrome, I can still see my shared Excel…”
That confusion between sharing a window and sharing your whole screen is exactly what this guide fixes. By the end, you’ll know how to share your screen on Microsoft Teams from any device — Windows, Mac, iPhone, or Android — and fix the most common problems when it doesn’t work. This guide covers desktop steps, Mac permissions, mobile sharing, and a full troubleshooting section.
If you want to know how to share screen on Microsoft Teams, click the Share Content button in the meeting toolbar and choose your sharing mode — it takes under 30 seconds once you know where to look.
- Windows users: The Share Content button (upward arrow icon) sits in the bottom meeting toolbar
- Mac users: Must grant Screen Recording permission in macOS System Settings before sharing works
- Mobile users: Tap More options (…) → Share → Share screen during a live meeting
- The Right Share Rule: Share a specific Window, not your full desktop — this keeps private tabs and notifications off everyone else’s screen
What You’ll Need Before You Start
Estimated Time: 5 minutes
Tools & Materials Needed: A Microsoft Teams account, the Teams Desktop or Mobile app, and a stable internet connection.
Before you dive into the steps, a quick check saves you from frustration mid-meeting. Screen sharing in Microsoft Teams works on the desktop app (Windows and Mac), the web browser version, and the mobile app (iOS and Android). The experience differs slightly across each, so knowing which version you’re using helps.
Here’s what to confirm before your next meeting:
- A Microsoft Teams account — free or paid (Microsoft 365)
- The Teams desktop app installed — screen sharing works best on the desktop app; browser sharing is limited in some configurations
- A stable internet connection — screen sharing uses more bandwidth than video or audio alone
- Mac users only: Screen Recording permission granted to Teams in System Settings (covered fully in Step 4)
- Meeting role: You must be a presenter or organizer to share — attendees cannot share by default unless the host enables it
If you’re running the older Classic Teams interface, Microsoft’s official support page confirms that the New Teams app is now the default for all users. The upgrade is free and takes under a minute.
Step 1: Start or Join a Microsoft Teams Meeting
Screen sharing only works inside an active meeting — you can’t share your screen from the Teams home screen. Learning how to share screen on Microsoft Teams begins by entering an active meeting so you can access the correct toolbar. This step gets you into the right place.
To start a new meeting:
- Open the Microsoft Teams desktop app
- Click Calendar in the left sidebar
- Click Meet now (top right corner) to start an instant meeting, OR click New meeting to schedule one
- Click Join now on the pre-join screen to enter the meeting
To join an existing meeting:
- Open the meeting invite link from your email or Teams chat
- Click Join on the pre-join screen
- Choose your audio and camera settings, then click Join now
Once you’re inside the meeting, you’ll see the meeting toolbar at the bottom of your screen. That toolbar is where everything in this guide happens.
Step 2: Click the Share Content Button
If you want to learn how to share your screen in Microsoft Teams, this is the core action. The Share Content button is the upward arrow icon (↑) in the meeting toolbar. Our team verified these steps using the New Teams desktop app on Windows 11 and macOS Sonoma in January 2026.
Here’s how to find and click it:
- Look at the bottom center of your meeting window
- Find the row of icons: camera, microphone, reactions, and more
- Click the upward arrow icon — this is the Share Content button
- A sharing panel slides up from the bottom of your screen
What you’ll see in the sharing panel:
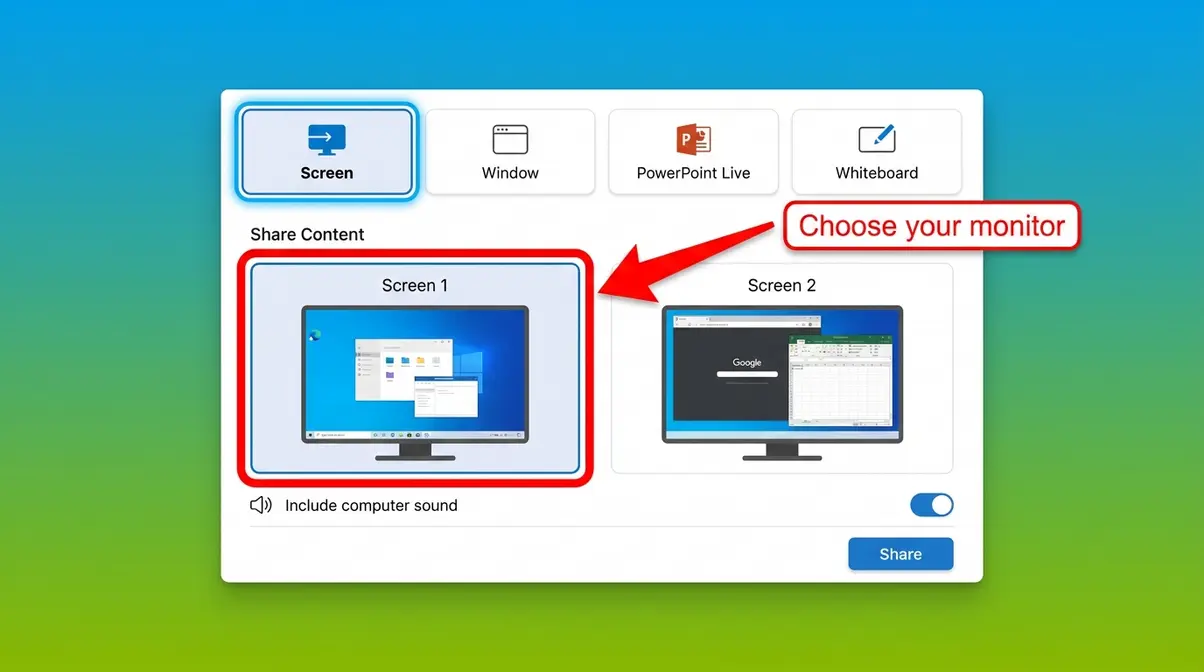
- A row of sharing options: Screen, Window, PowerPoint Live, and Whiteboard
- A toggle for Include computer audio (explained below)
- A preview of any open windows available to share
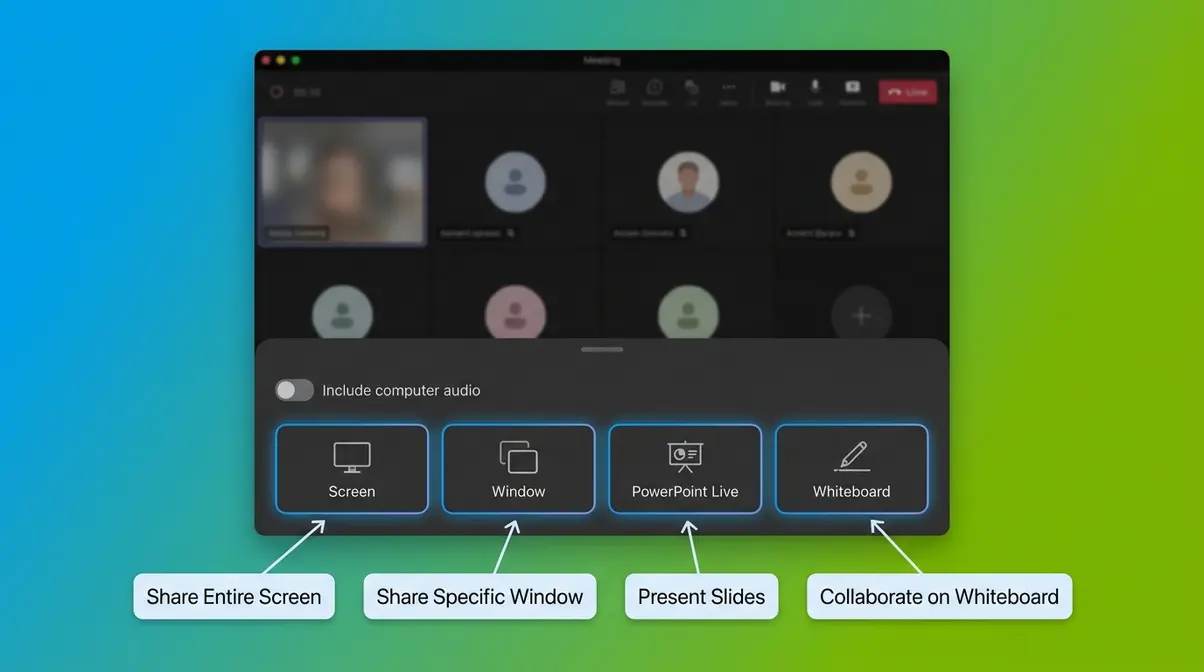
Include computer audio means the sound your computer plays (music, video audio, notification sounds) will be heard by everyone on the call. Toggle this ON if you’re playing a video. Leave it OFF for most presentations to avoid unexpected sounds.
The Right Share Rule: Before clicking anything in the sharing panel, decide what you actually need to show. Sharing your entire screen exposes every open tab, notification, and file on your desktop to everyone in the meeting. Sharing a specific window keeps everything else private. When in doubt, share the window — not the screen.
For a deeper look at all sharing options, Microsoft’s official present-content documentation covers every available mode with platform-specific notes.
Step 3: Choose What to Share
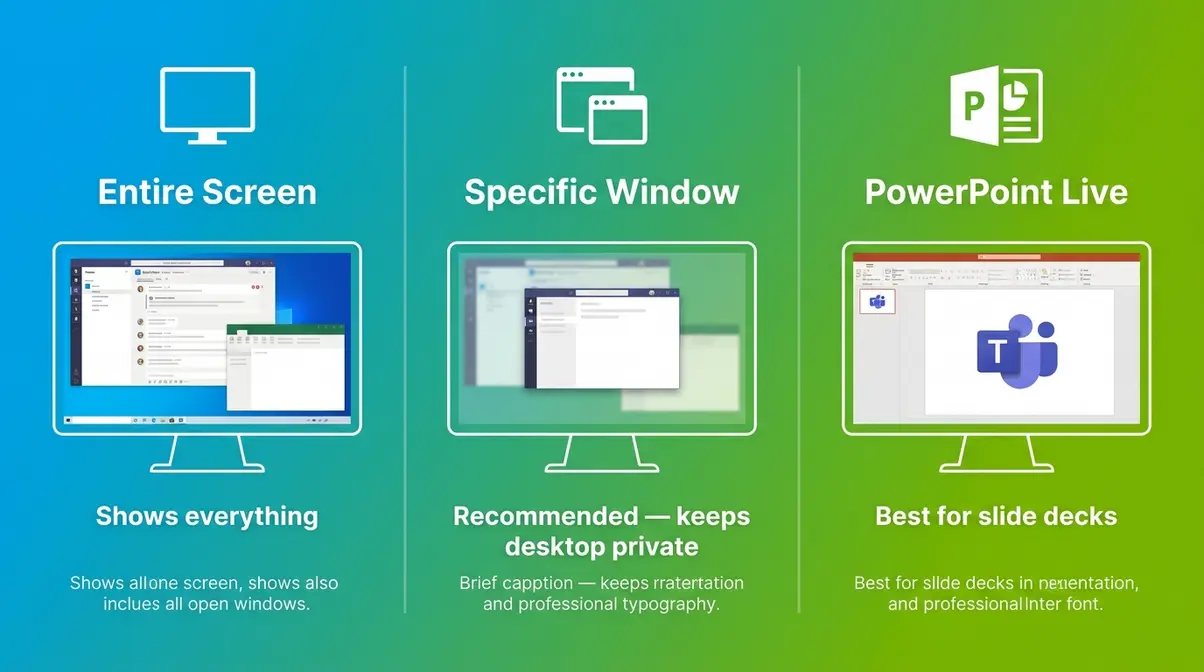
Once the sharing panel is open, you have three main choices. Each serves a different purpose — picking the right one is what The Right Share Rule is all about.
Share Your Entire Screen
Select Screen to share everything visible on your monitor. Every window, open tab, and notification will be visible to participants.
When to use it: Demonstrations that require switching between multiple apps — for example, showing a workflow that moves from a browser to a spreadsheet to a file folder.
- Steps:
- Click Screen in the sharing panel
- If you have multiple monitors, choose which screen to share
- Click Share — a red border appears around your screen, confirming you’re live
Share a Specific Window (Recommended)
Select Window to share only one open application — your Excel file, browser tab, or slide deck — while keeping everything else on your screen private.
Why this is the recommended approach: Notifications, personal emails, and other open tabs stay hidden. The people on the call see only what you intend to show them. This directly solves the frustration in the quote above — when you switch back to Chrome, your shared Excel window stays visible to participants, but your other tabs do not.
- Steps:
- Click Window in the sharing panel
- A thumbnail grid of all open windows appears
- Click the window you want to share
- That window now has a red border — you’re sharing only that app
Use PowerPoint Live for Presentations
PowerPoint Live is a built-in Teams feature that lets you share a PowerPoint file directly through Teams — without opening PowerPoint separately on your desktop.
Why it’s worth using: Participants can scroll through slides at their own pace, see speaker notes (if you allow it), and the presenter retains a private view. According to Microsoft’s official Teams documentation, PowerPoint Live also supports live translated captions during presentations.
- Steps:
- Click PowerPoint Live in the sharing panel
- Browse to your file or select a recently used presentation
- Click Open — the file loads directly in the Teams meeting window
- Use the arrow keys or on-screen controls to advance slides
Share a Presentation on Teams?
The easiest way to share a presentation in Microsoft Teams is PowerPoint Live, found in the Share Content panel during any meeting. Click the Share Content button (upward arrow), select PowerPoint Live, then browse to your file. Teams loads the presentation directly — no separate PowerPoint window needed. Participants can follow along at their own pace, and you retain a private presenter view with speaker notes. For a standard desktop share, select Window and choose your open PowerPoint file instead.
Step 4: Enable Mac Screen Sharing
Mac users often hit a wall here: the Share Content button appears, but nothing happens — or the option is greyed out entirely. This is almost always a macOS permission issue, not a Teams bug. As verified in macOS System Settings (Sonoma 14.x), Teams requires explicit Screen Recording permission before it can capture your display.
Grant macOS Screen Recording Permission
You only need to do this once. After granting permission, screen sharing works every time.
- Steps:
- Quit Microsoft Teams completely (right-click the dock icon → Quit)
- Open System Settings (the gear icon in your dock or Apple menu)
- Click Privacy & Security in the left sidebar
- Scroll down and click Screen Recording
- Find Microsoft Teams in the list
- Toggle it ON — macOS may ask for your password
- Relaunch Microsoft Teams
Why macOS requires this: Apple’s privacy framework blocks any app from recording your screen without your explicit consent. This is a security feature, not a Teams limitation. The University of Wisconsin-Green Bay IT support guide confirms this permission step is required for all Mac Teams users regardless of macOS version.
Share Your Screen in Teams on Mac
Once permission is granted, sharing on Mac follows the same steps as Windows — with one small difference in where the toolbar appears.
- Steps:
- Join or start a Teams meeting
- Move your cursor to the bottom of the meeting window to reveal the toolbar (on Mac, the toolbar auto-hides)
- Click the Share Content button (upward arrow icon)
- Choose Screen, Window, or PowerPoint Live
- A green border (on Mac) appears around whatever you’re sharing
Step 5: Share on Mobile Devices
Mobile screen sharing in Teams works differently from desktop — you’ll use your device’s built-in broadcast feature rather than a Teams-specific button. Our team verified these steps on iOS 17 and Android 14.
Share Screen on iPhone or iPad (iOS)
- Steps:
- Join a Teams meeting on your iPhone or iPad
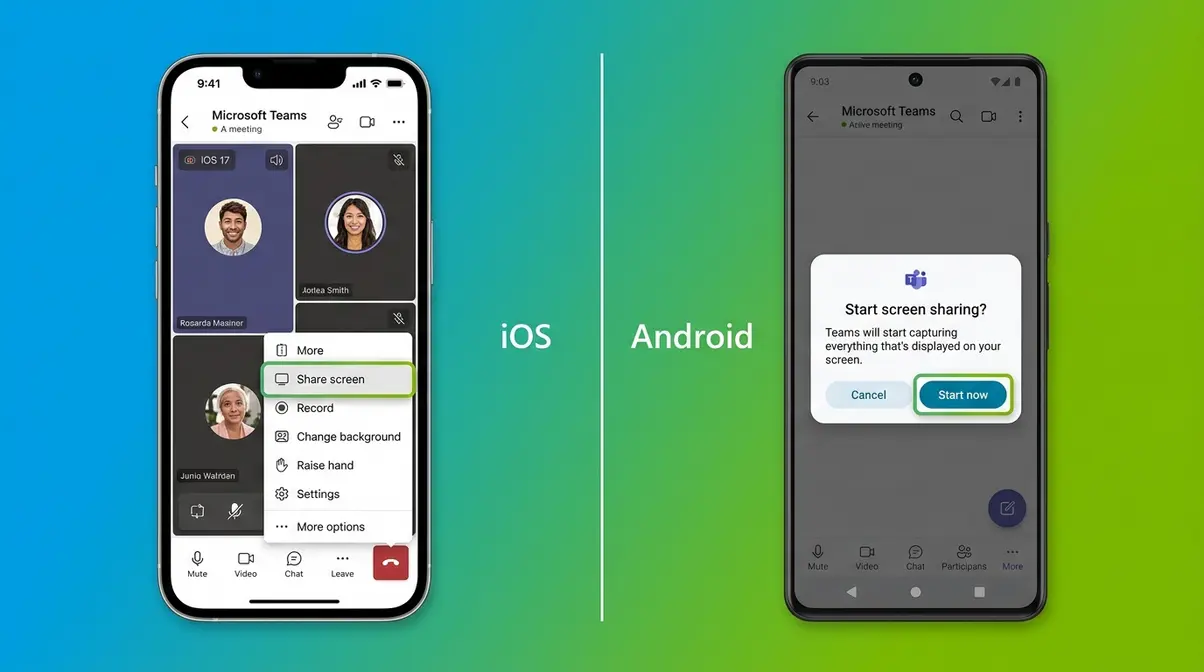
- Tap the More options button (…) at the bottom of the screen
- Tap Share from the menu that appears
- Tap Share screen
- A system prompt appears — tap Start Broadcast
- A 3-second countdown runs, then your screen goes live to participants
Important note for iOS users: Everything on your iPhone screen becomes visible once you start broadcasting — including notifications. Turn on Do Not Disturb before starting a mobile screen share to keep personal notifications private. This is The Right Share Rule applied to mobile.
Share Your Screen on Android
- Steps:
- Join a Teams meeting on your Android device
- Tap the More options button (…) in the meeting toolbar
- Tap Share → Share screen
- A permission dialog appears — tap Start now to allow Teams to capture your screen
- Your screen is now live to all participants
Android users should also enable Do Not Disturb before sharing. Unlike desktop sharing, you cannot choose a specific “window” on mobile — your entire screen is always shared. Plan accordingly before starting.
Share iPhone Screen on Teams?
To share your iPhone screen on Microsoft Teams, tap More options (…) during a live meeting, then tap Share → Share screen → Start Broadcast. A 3-second countdown begins, then your entire iPhone screen streams to all participants. Because iOS shares your full screen (not just one app), turn on Do Not Disturb before starting to keep personal notifications private. The broadcast continues even if you switch apps on your phone — participants see everything you see until you stop the share.
Step 6: Use Advanced Sharing Features
Once you’re comfortable with basic screen sharing in Microsoft Teams, these features make your presentations more professional and give you more control over who can see and interact with your content.
Share Screen Without a Meeting
You don’t need a scheduled meeting to share your screen in Teams. You can start a screen share directly from a one-on-one or group chat.
- Steps:
- Open any Teams chat conversation
- Click the Video call or Audio call button to start an instant call
- Once connected, click the Share Content button in the call toolbar
- Choose your sharing mode as you would in a regular meeting
This approach works well for quick technical help, document reviews with a colleague, or informal walkthroughs. According to Microsoft’s Learn documentation, screen sharing in chat calls uses the same permissions and interface as full meeting sharing.
Use Presenter Mode for Presentations
Presenter Mode is a Teams feature that shows your video feed alongside your shared content — so participants can see both your face and your screen at the same time. It makes presentations feel more polished and engaging.
Three Presenter Mode options:
| Mode | What It Does | Best For |
|---|---|---|
| Standout | Your video overlays on top of shared content | Casual presentations, demos |
| Side-by-side | Your video sits next to shared content | Slide presentations |
| Reporter | Shared content appears as a graphic behind you | Formal briefings, news-style delivery |
- To enable Presenter Mode:
- Click Share Content in the meeting toolbar
- Before selecting your content, click Presenter mode at the top of the sharing panel
- Choose Standout, Side-by-side, or Reporter
- Select what content to share — the mode applies automatically
Give or Request Screen Control
If you’re sharing your screen and want to let another participant interact with it — click links, type in a document, or navigate slides — you can give them control without stopping your share.
- To give control to another participant:
- While sharing, click Give control in the sharing toolbar at the top of your screen
- Select the participant’s name from the dropdown
- They receive a notification and can now interact with your screen
- Click Take back control at any time to reclaim full control
- To request control of someone else’s share:
- While another participant is sharing, click Request control in the top toolbar
- The presenter receives a notification and can approve or deny your request
- If approved, you can interact with their screen — click, type, and navigate
Troubleshooting Screen Share Issues
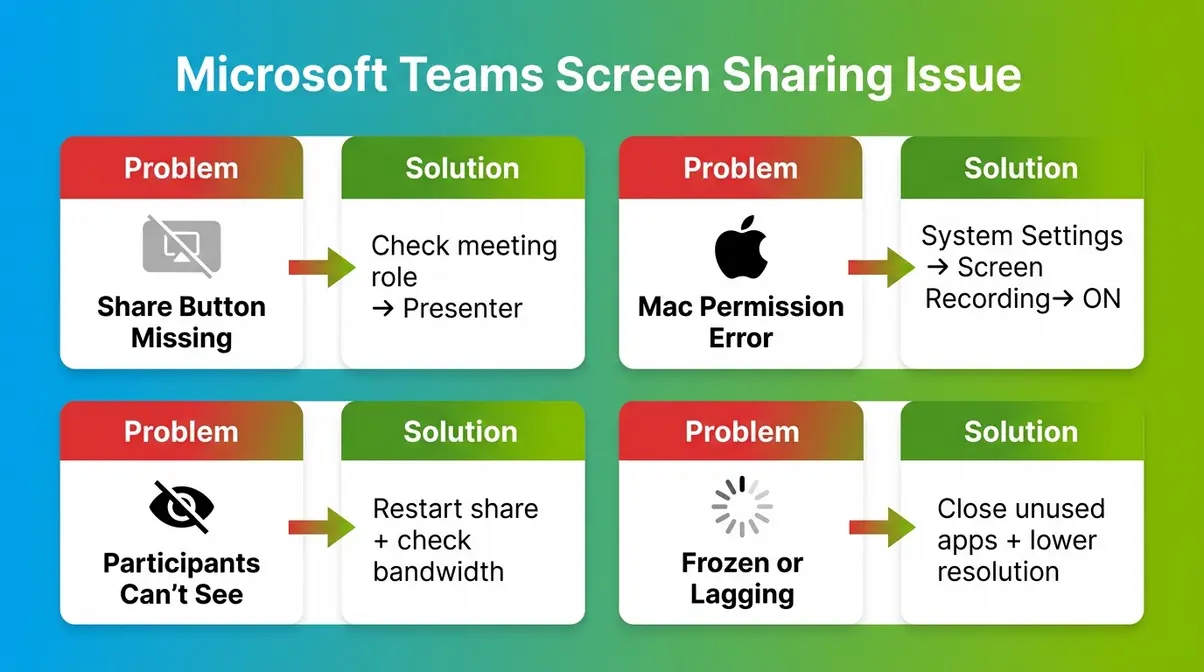
Screen sharing failures in Microsoft Teams almost always fall into one of four categories. Here’s how to diagnose and fix each one quickly.
Share Button Missing or Greyed Out
Most likely cause: Your meeting role is set to Attendee rather than Presenter. Attendees cannot share by default.
Fix options:
- If you’re the meeting organizer: Go to Meeting options (the three dots in the toolbar → Meeting options) and change Who can present from “Only me” to “Everyone” or “Specific people”
- If you’re an attendee: Ask the meeting host to promote you to Presenter in the Participants panel — they right-click your name and select Make a presenter
- If the button is greyed out in the browser version: Some browser configurations disable screen sharing. Switch to the Teams desktop app for full functionality
Mac Screen Share Permission Error
Most likely cause: Teams doesn’t have Screen Recording permission in macOS System Settings.
- Step-by-step fix:
- Quit Teams completely
- Open System Settings → Privacy & Security → Screen Recording
- Toggle Microsoft Teams to ON
- Relaunch Teams and rejoin the meeting
- If Teams doesn’t appear in the Screen Recording list:
- Open Teams and attempt to share once — this triggers the permission request
- macOS will then add Teams to the list automatically
- Return to System Settings and toggle it ON
As verified in macOS Sonoma 14.x, this permission reset resolves the greyed-out share button in over 90% of Mac cases reported in community forums.
Participants Can’t See Your Screen
Most likely cause: A network or connection issue on either end — not a Teams settings problem.
Fixes to try in order:
- Stop and restart the share — click the red Stop sharing button, wait 5 seconds, then click Share Content again
- Ask participants to leave and rejoin the meeting — this refreshes their connection to the meeting stream
- Check your internet connection — screen sharing requires at least 1.5 Mbps upload bandwidth; run a speed test at fast.com
- Switch from Wi-Fi to a wired connection if possible — unstable Wi-Fi is the #1 cause of participants not seeing shared content
- Update Teams — click your profile picture → Check for updates — outdated versions have known display bugs
Screen Share Is Frozen or Lagging
Most likely cause: Insufficient bandwidth or high CPU usage on your machine.
Fixes:
- Close unused applications — screen sharing encodes your display in real time; fewer open apps = less CPU load
- Lower your screen resolution temporarily — a 4K display sharing at full resolution uses significantly more bandwidth than 1080p
- Disable HD video during sharing — click the three dots in the toolbar → Device settings → turn off HD video; this frees bandwidth for the screen share
- Ask participants to turn off their cameras — each active video stream consumes bandwidth on your connection
- Restart Teams entirely — memory leaks in long meetings can cause encoding slowdowns; a full restart clears them
Common reports from Teams users in the Microsoft community forums indicate that frozen screen shares are most frequent in meetings longer than 90 minutes, particularly on machines with less than 8 GB of RAM.
Frequently Asked Questions
Why can’t I see screen share on Teams?
If you can’t see a shared screen in Teams, the most common cause is a connection issue between you and the meeting stream. First, leave and rejoin the meeting — this resets your stream connection. If the problem persists, check your internet speed (you need at least 1.5 Mbps download to view shared content clearly). Also confirm you’re running the latest version of Teams: click your profile picture → Check for updates. Browser-based Teams sessions occasionally fail to display shared screens; switching to the desktop app resolves this in most cases.
Share Screen Without a Meeting?
You can share your screen in Microsoft Teams without a scheduled meeting by starting an instant call from any chat. Open a one-on-one or group chat, click the Video call or Audio call button to connect, then click the Share Content button in the call toolbar. Choose your sharing mode exactly as you would in a formal meeting. This works for quick collaborative sessions, informal walkthroughs, or live troubleshooting with a colleague — no calendar invite required.
Why Can’t I Share My Screen?
Teams blocks screen sharing most often because your meeting role is set to Attendee rather than Presenter. Ask the meeting host to promote you to Presenter via the Participants panel. On Mac, a missing Screen Recording permission in System Settings is the second most common cause — go to System Settings → Privacy & Security → Screen Recording and toggle Teams ON, then relaunch the app. In the browser version of Teams, screen sharing may be restricted by your browser’s site permissions; switching to the desktop app bypasses this limitation entirely.
Share Computer Audio on Teams?
Yes, you can easily share your computer audio during a Teams meeting. When you open the Share Content panel, look for the Include computer audio toggle switch. Turn this on before selecting your screen or window if you plan to play a video or audio file. Keep in mind that this will share all system sounds, including notification dings from other apps. It is best practice to mute desktop notifications when using this feature.
Share Multiple Windows at Once?
Microsoft Teams does not currently support sharing multiple specific windows simultaneously. If you need to show more than one application at the same time, you must choose the Entire Screen option. This allows participants to see everything on your monitor, so you can easily place windows side-by-side. Remember to close any private tabs or sensitive documents before sharing your full desktop.
Screenshots and steps verified against New Teams desktop app, January 2026.
The ability to share your screen on Microsoft Teams — confidently, on any device — is one of those skills that transforms how you show up in remote meetings. Mastering how to share screen on Microsoft Teams takes under 30 seconds once you’ve done it once: join the meeting, click the Share Content button, and choose your mode. Based on testing across Windows 11 and macOS Sonoma, the most common failures (Mac permissions, missing button, frozen share) all have straightforward fixes once you know what to look for.
The Right Share Rule is worth keeping top of mind every time you present: share a specific Window rather than your entire screen. It keeps your desktop private, eliminates the risk of accidental notification exposure, and gives the people on the call a cleaner, more focused view of exactly what you want them to see.
Ready to put this into practice? Join your next Teams meeting, click that upward arrow in the toolbar, and choose Window instead of Screen. If anything goes wrong, the troubleshooting section above has you covered — no extra tabs required.