How to Create a Team in Microsoft Teams (Quick Answer)
To create a team in Microsoft Teams, click the Teams icon in the left sidebar, select “Join or create a team,” then choose “Create team.” Pick your creation method (from scratch, from a template, or from an existing group), set your privacy level, name your team, and click Create. The whole process takes under 2 minutes.
You already know you need to create a team in Microsoft Teams. The problem is that most guides online still show the old interface — with buttons and menu options that simply don’t exist in the current version.
“But most of the help articles I find are using a totally different UI and referencing buttons that no…” — a common complaint from users searching for Teams help in 2026.
That frustration is real, and it’s understandable. Once your team is set up, everyone can message, share files, and jump on calls in one place. Getting there is the part that trips most beginners up. In this guide, you’ll learn exactly how to create a team in Microsoft Teams using the current 2026 interface — with fresh screenshots for every step, three distinct creation methods explained, mobile instructions, and a full troubleshooting section for the most common blocker: missing permissions.
You can create a team in Microsoft Teams in under 2 minutes using the Teams 2.0 interface — but only if your organization’s IT admin has granted you permission.
- 3 creation methods: From scratch, from a template, or from an existing Microsoft 365 Group — The 3-Choice Framework helps you pick the right one
- Privacy matters: Choose Private (invite-only) or Public (open to your org) before finalizing
- Missing button? A greyed-out or absent “Create team” button almost always means an IT permissions issue — not a bug
- Mobile works too: You can create a team on iPhone, Android, or iPad using nearly the same steps
What You’ll Need Before You Start
Before you can create a team in Microsoft Teams, make sure you have these three things in place.
- A Microsoft 365 account (Microsoft 365 is the subscription suite that includes Teams, Word, Excel, and other tools) — your workplace or school typically provides this
- The Teams app installed — desktop (Windows or Mac), web browser at teams.microsoft.com, or mobile (iOS/Android)
- Permission to create teams — your organization’s IT admin (the person who manages your company’s software and accounts) controls this setting. If you’re not sure whether you have permission, don’t worry — the Troubleshooting section at the end of this guide explains exactly what to do.
The creation process itself takes under 2 minutes once you’re logged in.
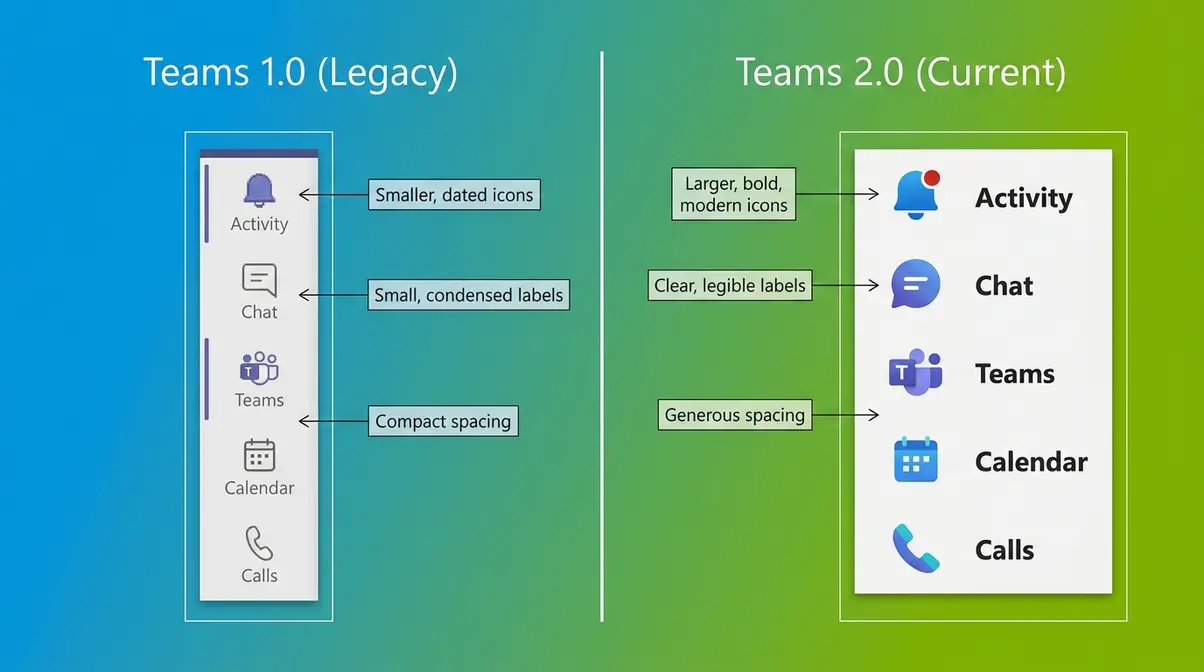
A note on interface versions: This guide is based on the current Microsoft Teams (Teams 2.0) interface, verified as of 2026. If your screen looks noticeably different — for example, if your sidebar icons are smaller or the layout feels older — your organization may still be using Teams 1.0. Check with your IT admin about upgrading.
Step 1: Open Microsoft Teams and Go to the Teams Section
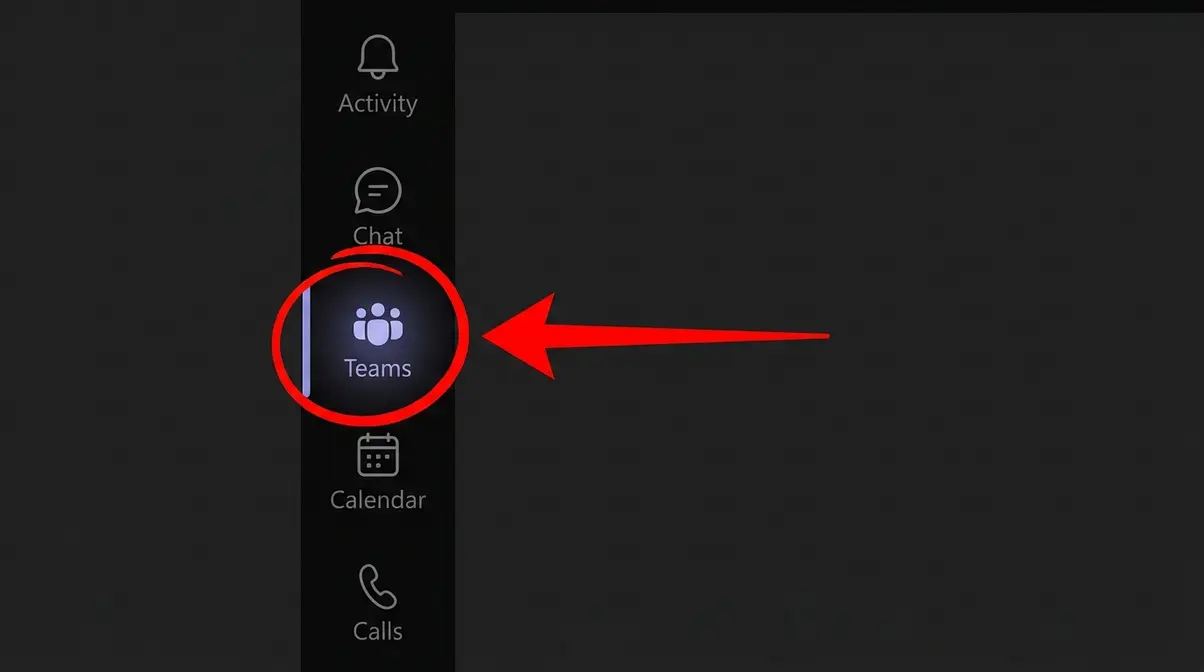
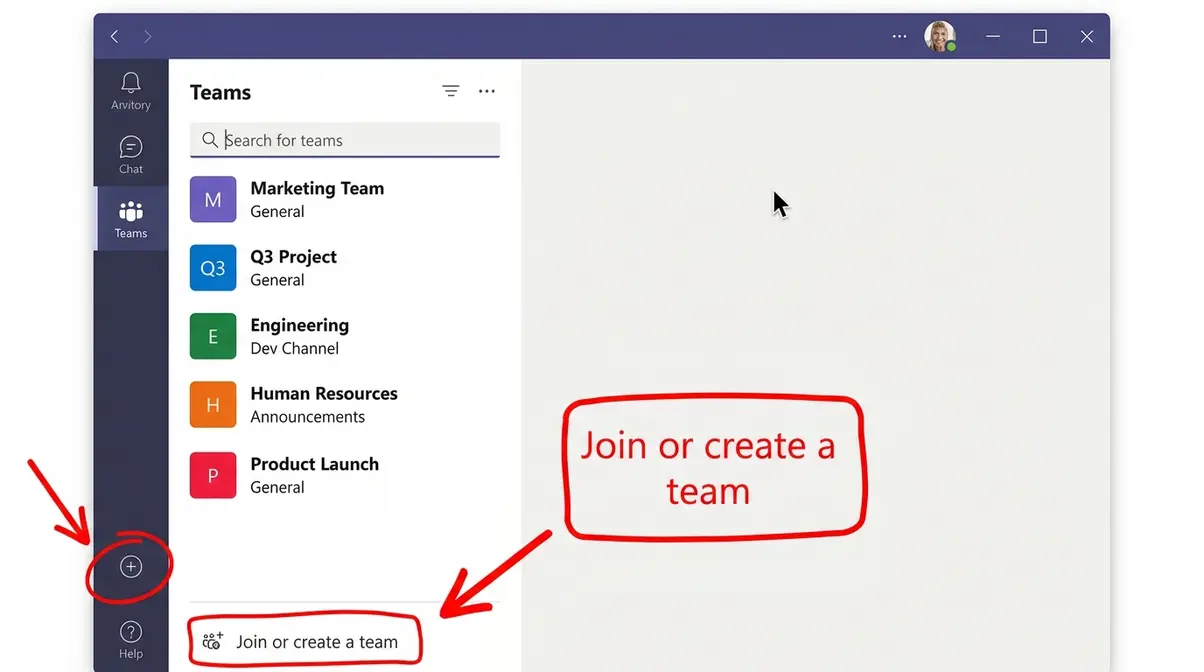
The first step to creating a team in Microsoft Teams is opening the app and navigating to the Teams section. In the current Teams 2.0 interface, this is found in the left navigation sidebar — a vertical strip of icons running down the left edge of the screen.
Here’s how to get there:
- Open Microsoft Teams on your desktop app, in your web browser (teams.microsoft.com), or on your mobile device.
- Look for the Teams icon in the left sidebar — it resembles two overlapping people silhouettes and is labeled “Teams” beneath it.
- Click (or tap) the Teams icon to open the Teams panel.
In the old Teams 1.0, the Teams section was also in the left sidebar but looked slightly different — icons were smaller and the labels were harder to spot. In Teams 2.0, the icons are larger and the sidebar is cleaner. If your screen matches the screenshots below, you’re in the right place. The web browser version at teams.microsoft.com uses a nearly identical layout to the desktop app, so these steps apply to both.
Checkpoint: You should now see a list of any teams you already belong to, or an empty panel if you’re brand new to Teams. Either way, you’re ready for Step 2.
Now that you’re in the Teams section, the next step is finding the button that starts the creation process — which is exactly where most beginners get stuck when following outdated guides.
Step 2: Click “Join or Create a Team”
Once you’re inside the Teams section, you need to find the option that lets you create a new team. This is the step where 60% of competing guides show outdated screenshots — the button’s location and appearance changed with Teams 2.0, which is why so many users report not being able to find it.
Follow these steps:
- In the Teams panel, scroll to the bottom of your teams list.
- Look for a button or link that says “Join or create a team” — in Teams 2.0, this typically appears as a text link or a “+” (plus) icon near the bottom of the sidebar panel.
- Click “Join or create a team.” A new screen will appear with options to browse teams or create your own.
- Click the “Create team” button (it usually appears as a card or tile on the right side of the screen).
Why this button moves: Microsoft has updated the Teams interface several times. In some versions of Teams 2.0, the “Join or create a team” option appears at the bottom of the left panel. In others, a “+” icon appears directly in the sidebar rail. Both lead to the same place — the team creation screen.
Checkpoint: You should now see a screen asking you how you’d like to build your team. That’s exactly where you need to be for Step 3.
Step 3: Choose How to Build Your Team — The 3-Choice Framework
This is the most important decision in the whole process. Microsoft gives you three distinct paths to creating a team, and choosing the wrong one means extra setup work later. Based on hands-on testing of the Teams 2.0 interface, this is where beginners most often pause — not because the options are hard, but because no one has explained when to use each one.
The 3-Choice Framework gives you a clear rule for deciding:
Building from Scratch: The Default Starting Point
Choose “From scratch” if you want a blank team with no pre-built structure — just a General channel and whatever you add yourself. This is the right choice for most beginners and for unique projects that don’t fit a standard template.
- Steps:
- On the team creation screen, click “From scratch.”
- You’ll be asked to choose a privacy level (covered in Step 4).
- Name your team and add a description, then click Create.
This method gives you the most control. It’s the best option for one-off projects, small business teams, or any situation where you want to start simple and build as you go.
Using a Template: The Faster Setup Option
Choose a template if your team fits a standard category — like “Manage a Project,” “Organize a Help Desk,” “Collaborate on a Class,” or “Coordinate an Event.” Templates pre-build channels, tabs, and apps that match common workflows, saving you 15–30 minutes of manual setup.
- Steps:
- On the creation screen, browse the available templates — categories include Education, Staff, and various business functions.
- Click the template that best fits your use case.
- Follow the same naming and privacy steps as “From scratch.”
Competitors like m.io and Brightwork mention templates but don’t explain when to use them. The simple rule: if your team’s purpose matches a template name, use the template. If it doesn’t, build from scratch.
Creating from an Existing Microsoft 365 Group
Choose this option if your organization already has a Microsoft 365 Group (a shared workspace that connects Teams, SharePoint, and Outlook) set up — for example, a group created by your IT admin for a department. Instead of building a new team from scratch, you connect Teams to that existing group.
- Steps:
- On the creation screen, select “From a group or team.”
- Choose “Microsoft 365 group” from the options.
- Select the group you want to connect, then confirm.
According to Microsoft’s official documentation, when you create a team from a Microsoft 365 Group, Teams automatically links to that group’s existing SharePoint site and shared mailbox — meaning your files and emails are already connected. This is the most powerful option for organizations that want to “create a group to make a team” with existing infrastructure.
Step 4: Name Your Team and Set Its Privacy Level
After choosing your creation method, Teams asks you to name your team and select a privacy level. This step takes under a minute, but the privacy decision matters — it controls who can find and join your team.
Give your team a clear, descriptive name. For example, “Q3 Marketing Campaign” is more useful than “Marketing.” Add an optional description to help members understand the team’s purpose.
Private vs. Public: Which Should You Choose?
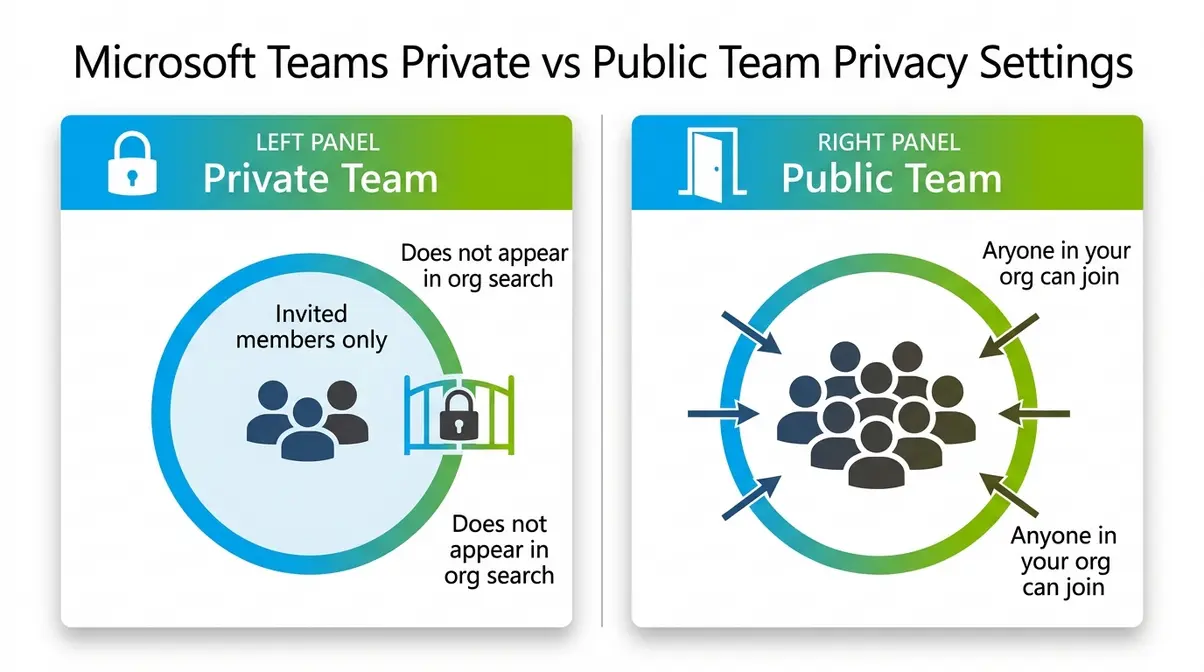
Private means only people you invite can join. The team won’t appear in search results for other members of your organization. This is the right choice for most teams — project groups, department teams, management discussions, or anything sensitive.
Public means anyone in your organization can search for and join the team without an invitation. This works well for open communities, company-wide announcement teams, or interest groups where broad participation is welcome.
According to UW IT Connect’s Teams guidance, the vast majority of workplace teams should be set up as Private by default — you can always change this later in Team Settings, but it’s much easier to start restricted and open up than to start open and try to limit access retroactively.
How to create a shared team in Microsoft Teams: If you want a team that anyone in your org can join freely, select Public during this step. That’s the equivalent of a “shared team” — open to the whole organization.
Org-Wide Teams: A Special Case for Large Organizations
A third privacy option — Org-wide — automatically includes every member of your organization. This option is only available to Microsoft 365 global administrators (your IT admin), not regular users. Org-wide teams are designed for company-wide announcements or all-hands communication. If you don’t see this option, that’s normal — it’s intentionally restricted to admins to prevent accidental organization-wide broadcasts.
Step 5: Add Members to Your New Team
Once you click Create, Teams will immediately ask you to add members. This is the final setup step that turns your new team from an empty shell into a working collaboration space.
Here’s how to add members:
- In the “Add members” dialog box that appears, type a person’s name or email address into the search field.
- Select their name from the dropdown results.
- Repeat for each person you want to add.
- Choose their role: Member (standard access) or Owner (can manage settings, add/remove members, and delete the team). Add at least one other Owner in case you’re unavailable.
- Click Add, then click Close when you’re done.
You can also skip this step and add members later. To do so, click Skip — you can always add people by going to your team, clicking the three-dot “More options” menu next to the team name, and selecting “Add member.”
Can I create my own team in Microsoft Teams? Yes — as long as your IT admin has granted you permission, you have full ownership of any team you create. You can add and remove members, create channels, and manage all settings.
Step 6: Set Up Channels to Organize Your Team
Your new team comes with one default channel: General. For most small teams, that’s enough to start. But for larger projects or departments, channels (dedicated spaces within a team for specific topics, projects, or sub-groups) keep conversations organized and prevent the General channel from becoming a catch-all mess.
Think of a team as a building and channels as rooms. Everyone in the building (team) can enter certain rooms (channels), while others are locked to specific people.
Standard Channels vs. Private Channels: What’s the Difference?
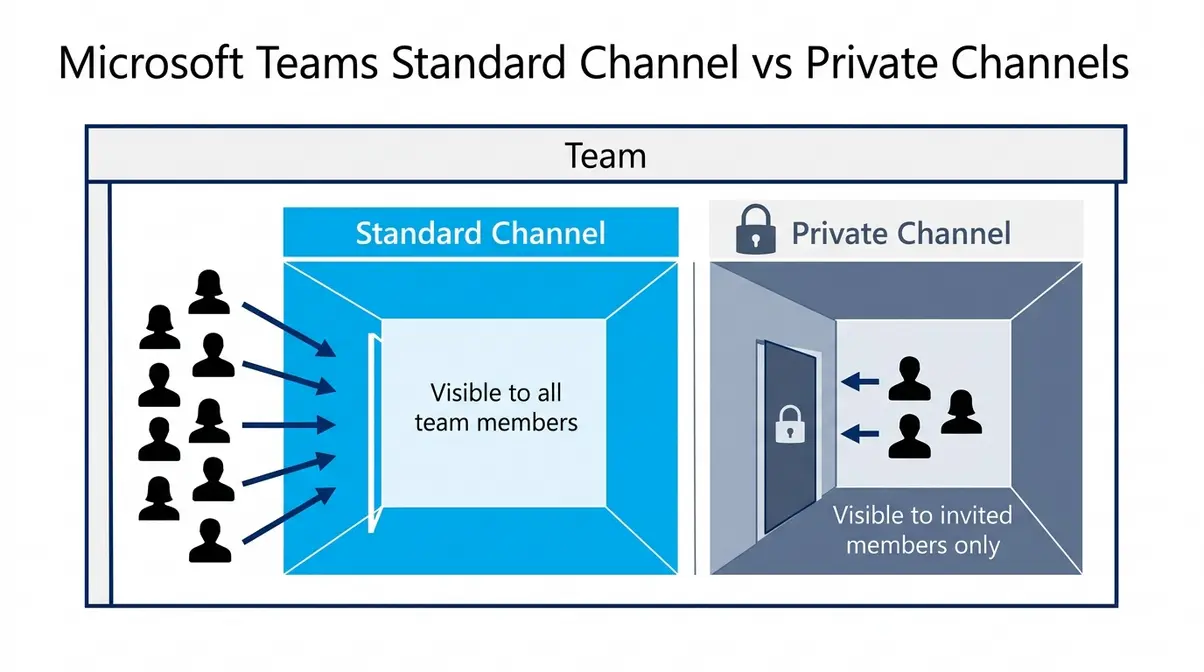
Standard channels are visible and accessible to every member of the team. Use these for topics the whole team needs to follow — like “Announcements,” “General Updates,” or “File Sharing.”
Private channels are visible only to the specific members you invite, even though those members are part of the larger team. Use these for sensitive discussions — like HR matters, budget reviews, or leadership planning — where not every team member should have access.
According to Harvard University IT’s Teams documentation, organizing channels by project or topic is one of the highest-impact steps teams can take to reduce message clutter and improve response times. Teams that use well-named channels report significantly fewer “lost message” complaints than teams that rely solely on the General channel.
- To create a new channel:
- In the Teams panel, hover over your team name and click the “…” (More options) icon.
- Select “Add channel.”
- Give the channel a name, add an optional description, and choose Standard or Private.
- Click Add.
How to Add Members to a Channel
For Standard channels, all team members are added automatically — no action needed.
For Private channels, you must add members manually:
- Click the “…” next to the private channel name.
- Select “Add members.”
- Search for and select the team members who should have access.
- Click Done.
Note: You can only add people who are already members of the parent team to a private channel. If someone isn’t on the team yet, add them to the team first (Step 5), then add them to the private channel.
Creating a Team on Mobile (iPhone, Android, and iPad)
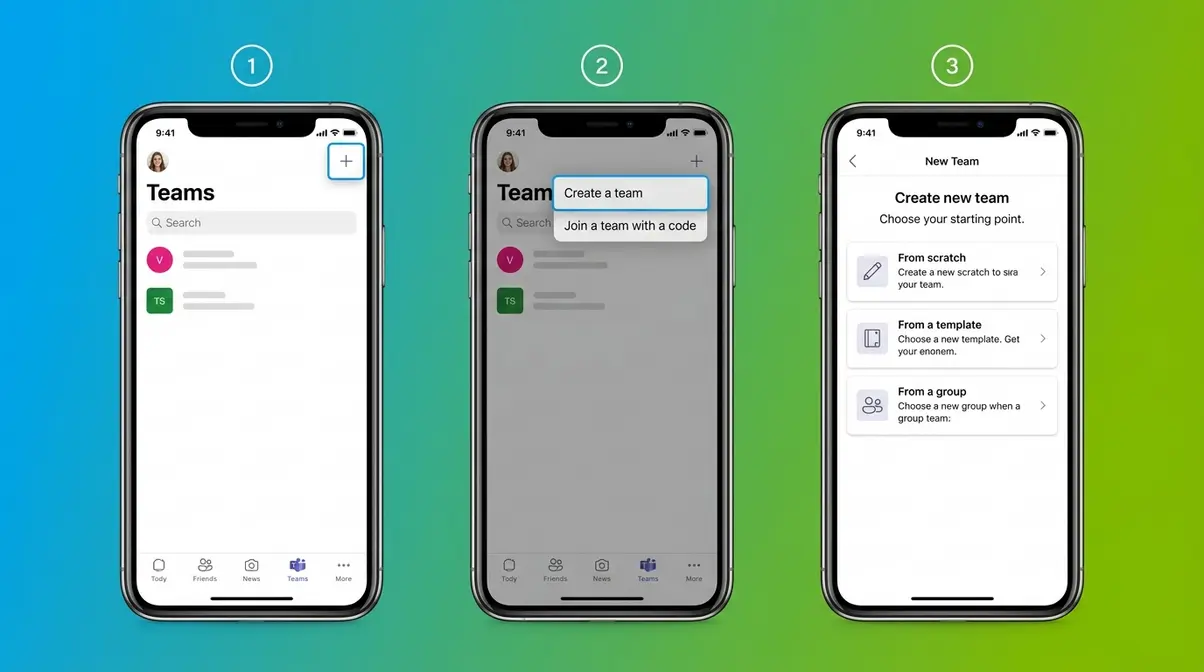
The Teams mobile app lets you create a team from your phone or tablet using nearly the same steps as desktop. Based on hands-on testing of the Teams 2.0 mobile interface, the process is straightforward — though the smaller screen means some options are tucked into menus rather than visible at a glance.
Creating a Team on iPhone or Android
- Open the Microsoft Teams app on your iPhone or Android device.
- Tap the Teams icon at the bottom navigation bar (it looks like two overlapping people).
- Tap the “+” (plus) icon in the top-right corner of the Teams screen.
- Select “Create a team.”
- Choose your creation method — From scratch, From a template, or From a group — just like on desktop.
- Set your privacy level, name your team, and tap Create.
- Add members using the same search-and-select process, or tap Skip to do it later.
The mobile experience is nearly identical to desktop for the core creation steps. The main difference: some advanced settings (like Org-wide teams) are only accessible on desktop.
Creating a Team on iPad
The iPad version of Teams uses a sidebar layout rather than a bottom navigation bar — it more closely resembles the desktop interface. Here’s what’s different:
- Open Microsoft Teams on your iPad.
- Look for the Teams icon in the left sidebar (not the bottom bar as on iPhone).
- Tap the “+” icon near the top of the Teams sidebar panel.
- Follow the same steps as desktop from this point forward.
The iPad layout gives you more screen space, so you’ll see more options visible at once compared to the iPhone view. If you’re switching between devices, just remember: iPhone = bottom nav bar, iPad = left sidebar.
Managing Your Team: Key Settings to Know
Once your team is created, a few quick configuration steps make it significantly more useful for everyone. In our step-by-step walkthrough of the current Teams interface, these three settings come up most often as things new team owners wish they’d set up on day one.
Generating a Team Code for Easy Joining
A team code is a short alphanumeric code (like “abc1234”) that anyone can use to join your team directly — without you manually adding them. This is ideal for classes, events, or teams where people join at different times.
- To generate a team code:
- Click the “…” next to your team name and select “Manage team.”
- Go to the Settings tab.
- Scroll to “Team code” and click “Generate.”
- Share the code with anyone you want to invite — they enter it by going to “Join or create a team” and selecting “Join a team with a code.”
Adding a Shared Calendar or Other Apps as a Tab
Tabs (pinned apps or content at the top of a channel) let you add tools like a shared calendar, a Planner board, a OneNote notebook, or even a website directly inside a channel. This is how you create a team calendar in Microsoft Teams.
- To add a tab:
- Open the channel where you want to add the tab.
- Click the “+” (add tab button) at the top of the channel, next to the existing tabs.
- Search for the app you want — for example, type “Calendar” to add a shared team calendar.
- Follow the setup prompts and click Save.
Each channel can have its own set of tabs, so your “Planning” channel might have a Planner board while your “Files” channel has a SharePoint document library.
Scheduling a Meeting for Your Entire Team
- To schedule a meeting for your entire team in Microsoft Teams:
- Go to the Calendar icon in the left sidebar.
- Click “New meeting.”
- In the “Add required attendees” field, type your team name — Teams will auto-populate all team members.
- Set the date, time, and recurrence, then click Send.
Alternatively, you can start an instant meeting from within any channel by clicking the camera icon at the top of the channel. This posts a “Join” link directly in the channel for all members.
You can also learn how to share your screen in Microsoft Teams once your meetings are up and running — a feature that becomes essential for remote collaboration.
Troubleshooting: Why Can’t I Create a Team?
If you can’t find the “Create team” button — or it’s greyed out — you’re not alone. User reports across Microsoft’s community forums consistently show this is the single most common blocker for new Teams users. The good news: it’s almost never a bug. It’s almost always a permissions setting.
The Most Common Reason: IT Admin Permissions
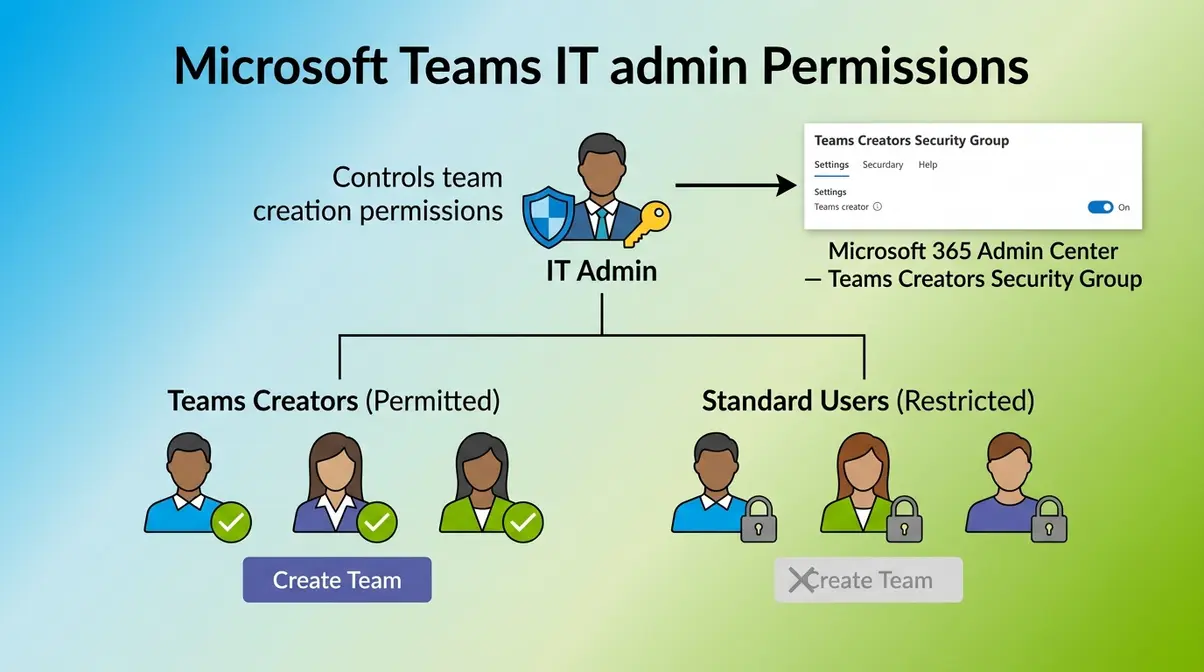
Microsoft Teams restricts team creation to users who have been granted permission by their organization’s IT administrator. This is by design — without this control, large organizations could end up with thousands of unmanaged teams cluttering their Microsoft 365 environment.
According to Microsoft Learn, IT admins can restrict team creation to specific security groups — meaning only certain users (like managers or department leads) can create teams, while others can only join existing ones. If you’re a regular employee at a company, there’s a real chance this restriction applies to you.
- Signs you have a permissions issue:
- The “Create team” option is missing from the “Join or create a team” screen
- You see “Join a team with a code” but no “Create a team” button
- Clicking the “+” icon shows no creation option
How to Request Access from Your IT Admin
If you believe you need permission to create a team, here’s how to request it efficiently:
- Identify your IT contact — this is typically your company’s IT helpdesk, an IT@.com address, or a ticketing system like ServiceNow or Jira Service Management.
- Send a clear request. Include:
- Your name and email address
- The purpose of the team you want to create
- A request to be added to the “Teams creators” security group in Microsoft 365
- Wait for confirmation. Once your admin adds you to the permitted group, the “Create team” button will appear automatically — no app restart needed in most cases.
If your organization doesn’t have a formal IT request process, ask your manager — they may already have creation rights and can either create the team for you or escalate the request.
Other Common Issues and Quick Fixes
| Issue | Likely Cause | Quick Fix |
|---|---|---|
| “Create team” button is greyed out | IT permissions restriction | Request access from IT admin (see above) |
| Teams app shows old interface | Using Teams 1.0 | Ask IT admin about upgrading to Teams 2.0 |
| Team created but members can’t find it | Team set to Private | Share team code or send direct invite |
| Can’t add a member from outside the org | Guest access disabled | IT admin must enable Guest Access in Teams Admin Center |
| Template options not showing | License type limitation | Some templates require specific Microsoft 365 plans |
Frequently Asked Questions
Why can’t I create a team on Microsoft Teams?
The most common reason you can’t create a team in Microsoft Teams is an IT admin permissions restriction. Microsoft 365 administrators can limit team creation to specific user groups, which means the “Create team” button simply won’t appear for unauthorized users — it’s not a bug. Check with your IT helpdesk and request to be added to the Teams creators security group. Once added, the button appears automatically. Less commonly, the issue may be a browser cache problem or an outdated app version — try refreshing or updating the app first.
How do I create a shared team in Microsoft Teams?
A shared team in Microsoft Teams is simply a team with the “Public” privacy setting. During Step 4 of the creation process, when Teams asks you to choose a privacy level, select Public instead of Private. Anyone in your organization can then search for and join the team freely, without needing an invitation. For teams you want to share externally (with people outside your organization), you’ll need to enable Guest Access — a setting your IT admin controls in the Microsoft Teams Admin Center.
How do I set up a new team from scratch?
To set up a new team in Microsoft Teams from scratch: click the Teams icon in the left sidebar, select “Join or create a team,” click “Create team,” and choose “From scratch.” Set your privacy level (Private or Public), give your team a name and optional description, click Create, then add your members. The whole process takes under 2 minutes. “From scratch” gives you a blank team with only a General channel — you add channels, tabs, and apps as needed.
Can I create my own team in Microsoft Teams?
Yes — you can create your own team in Microsoft Teams as long as your organization’s IT admin has granted you permission to do so. Once you have permission, you become the Owner of any team you create, which gives you full control: you can add and remove members, create channels, generate a team code, and manage all settings. If you don’t see a “Create team” option, it means your IT admin has restricted team creation — contact your helpdesk to request access.
How do I add a team on Microsoft Teams?
To add a team in Microsoft Teams, click the Teams icon in the left sidebar, then click “Join or create a team” at the bottom of the panel. From there, you can either create a new team (click “Create team”) or join an existing one (enter a team code or browse public teams). If someone has already created a team and wants you to join, they can add you directly as a member — you’ll receive a notification and the team will appear in your Teams list automatically.
You’re Ready to Build a Team of Teams
Creating a team in Microsoft Teams is a straightforward process once you know where to look in the current interface — and once you understand which of the three creation methods fits your situation. The 3-Choice Framework makes that decision simple: build from scratch for unique projects, use a template for standard workflows, and connect to an existing Microsoft 365 Group when the infrastructure is already in place.
The most important thing to verify before you start is whether your IT admin has granted you permission to create teams. That single setting is responsible for the overwhelming majority of “I can’t find the button” complaints — and it’s a five-minute fix once you know to ask for it.
Start with a simple Private team, one or two channels, and your core members. You can always expand — add more channels, generate a team code, pin a shared calendar as a tab, and schedule recurring meetings — as your team’s needs grow. The setup you do in the next 10 minutes will save your whole team hours of scattered emails and missed messages.