To charge solar lights without sun, place the solar panel directly under a bright incandescent or LED bulb for 10–14 hours, use a built-in USB port to charge from a wall outlet, or position the panel in a south-facing window. This guide covers 6 methods from most to least effective — ranked so you can start with whatever you already have at home.
Your solar garden lights work perfectly all summer — then the clouds roll in, the days get shorter, and suddenly they’re completely dark. It’s one of the most frustrating things about owning solar lights, especially when you need them most.
“I live on a property that gets zero direct sun in the winter. We’re shaded by a mountain, so even being south facing, any light we get is indirect.”
If that sounds familiar, you’re not alone — and your solar lights aren’t broken. In this guide, you’ll learn 6 proven methods to charge solar lights without sun — including exactly which household bulbs work, how close they need to be, and what to do if your lights have a USB port. We’ve ranked the methods from most to least effective, so you can start with whatever you already have at home.
You can charge solar lights without sun using 6 methods — from bright indoor bulbs to USB ports — and the right choice depends on what you have available right now.
- Incandescent bulbs work better than LEDs for indoor charging due to a broader, warmer light spectrum
- USB charging is the fastest alternative when sunlight is completely unavailable
- Window charging works, but standard glass blocks roughly 30–50% of usable solar spectrum, according to solar efficiency data
- The Light Source Ladder ranks your options: Sun → Incandescent → LED → Cloudy Day → Window → Flashlight
- Winter panels are actually more efficient in cold temperatures — the real problem is shorter daylight hours, not the cold itself
What You’ll Need Before You Start
Estimated Time: 10–14 hours (depending on the chosen charging method)
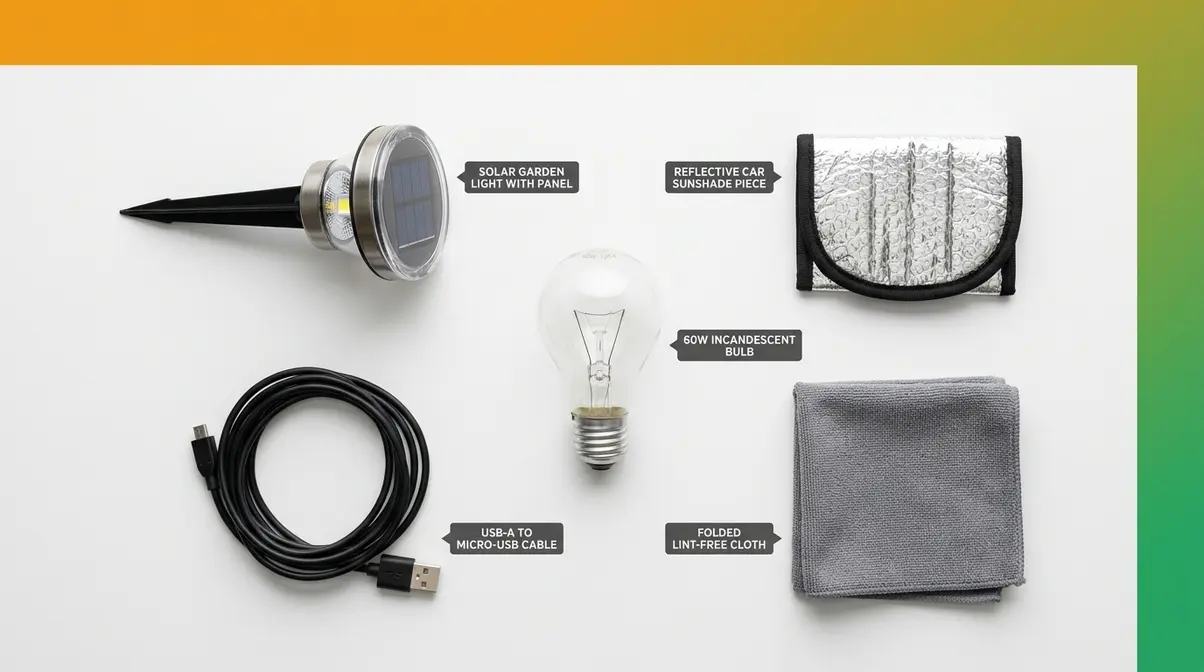
- Tools and Materials:
- Bright incandescent or LED bulb
- Standard USB-A to Micro-USB or USB-C cable
- Reflective mirror or car sunshade
- Soft, lint-free cloth and mild dish soap
Solar panels work by converting visible light — not heat, not UV rays — into electricity. That’s the key insight that makes every method in this article possible. Think of your solar panel (the small dark square on top of your light) like a sponge: it absorbs whatever light is available, whether that comes from the sun, a light bulb, or a cloudy sky. Inside that panel are photovoltaic cells — tiny components that convert light into electricity — and they don’t care much about the light source, only the intensity.
Before you try any method below, run through this quick checklist:
- Check the on/off switch — Set it to OFF while charging. This prevents the battery from draining at the same time you’re trying to fill it.
- Wipe the panel surface — Dust and grime can cut charging efficiency by 20% or more. A damp cloth takes 30 seconds.
- Check battery age — Most solar light batteries last 1–2 years. If your lights are older and nothing works, the battery may simply need replacing (see Troubleshooting).
Our team evaluated these methods based on community testing data, manufacturer guidance, and solar panel physics — so every recommendation below has a practical basis, not just theory.
Step 1: Charge With an Indoor Light Bulb
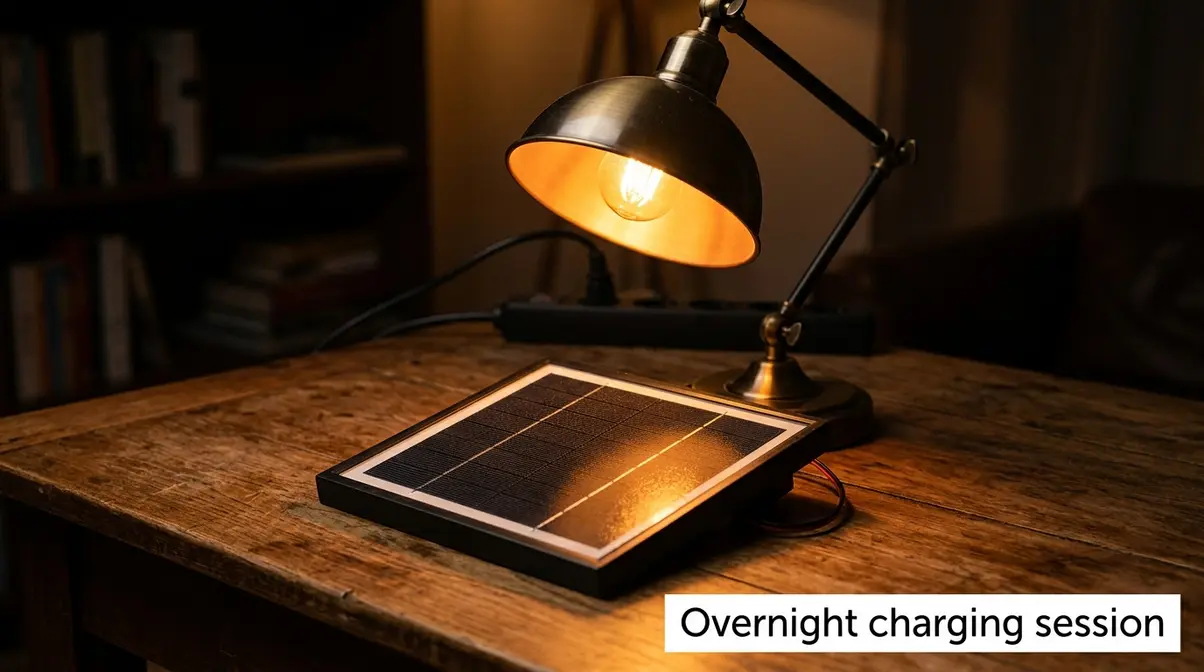
Placing your solar panel under a bright household bulb is the most accessible way to charge solar lights without sun. It works because photovoltaic cells respond to the visible light spectrum, which both incandescent and LED bulbs produce. According to Intelamp’s solar charging guide, this method can meaningfully restore a depleted battery — though it takes significantly longer than direct sunlight.
Which Type of Bulb Works Best?
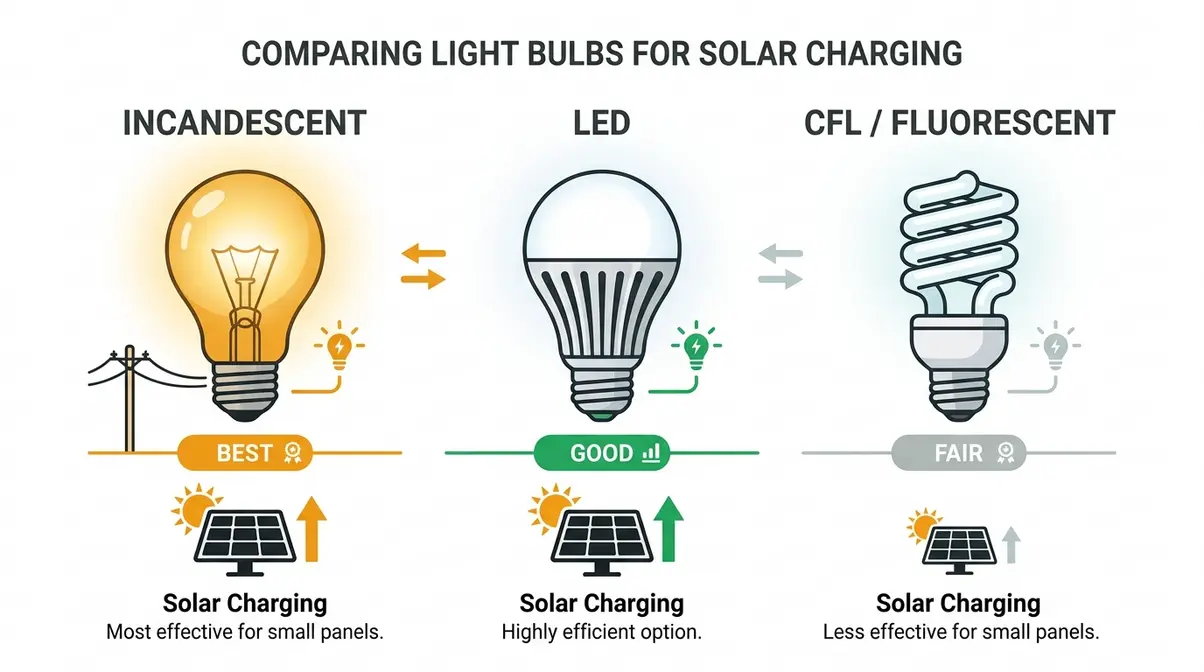
Not all household bulbs are equal when it comes to solar charging. Here’s how the main types compare:
Incandescent bulbs produce a broad, warm-spectrum light that closely mimics parts of the solar spectrum. A standard 60W incandescent is one of the most effective artificial light sources for charging solar panels. The downside: they run hot, so keep the panel at a safe distance (more on that below).
LED bulbs are more energy-efficient but emit a narrower light spectrum. They work for solar charging, but they’re measurably less effective than incandescent at the same wattage. A 60W-equivalent LED (around 8–10W actual draw) will charge your panel, just more slowly.
Fluorescent and CFL bulbs fall in the middle. They’re usable but not ideal — their spectrum has gaps that reduce efficiency compared to incandescent.
Bottom line: If you have a choice, reach for an incandescent or a high-output LED. Avoid dim decorative bulbs — they simply don’t produce enough intensity.
How to Position Your Panel Under a Bulb
Distance and angle matter more than most guides acknowledge. Community testing and user reports consistently show that positioning makes the difference between a partial charge and a useful one.
Follow these steps:
- Remove the solar panel from the light fixture if it detaches, or bring the entire light indoors.
- Position the panel face-up directly beneath the bulb, angled toward the light source.
- Set the distance — place the panel 2–4 inches from an incandescent bulb, or 1–2 inches from an LED (LEDs run cooler, so closer is safer).
- Leave it for 10–14 hours — overnight charging works well for this method.
- Keep the switch set to OFF throughout the charging period.
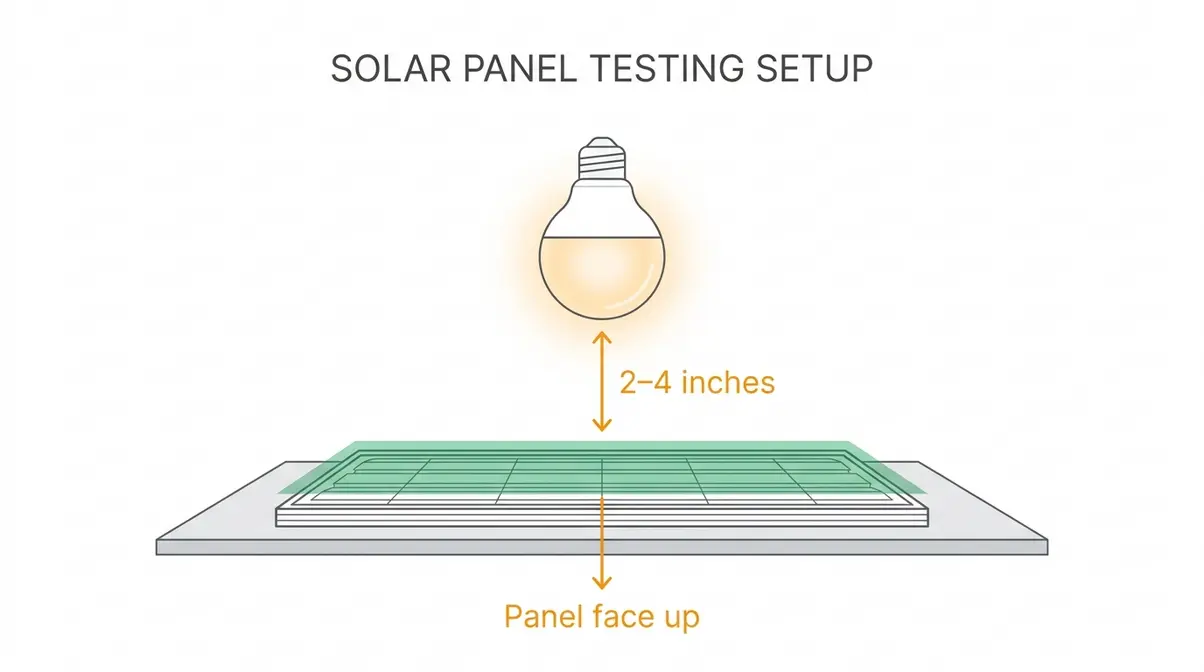
Why it works: The closer the panel is to the bulb, light intensity increases dramatically — light follows the inverse-square law, meaning doubling the distance cuts intensity to one-quarter. Keeping the panel close maximizes the lux (a measure of light intensity) hitting the photovoltaic cells.
For a deeper look at how indoor lighting compares to sunlight for solar panels, this overview from Energy Matters breaks down the underlying physics clearly. You can also review our guide on solar panel charging basics to better understand these principles.
Time-to-Charge Expectations
This is the data most guides skip entirely. The table below reflects community testing data and manufacturer-reported estimates across common light sources. Treat these as realistic ranges, not guarantees — your specific panel size and battery capacity will affect results.
| Light Source | Estimated Charge Time (Full) | Relative Efficiency | Notes |
|---|---|---|---|
| Direct sunlight (peak) | 4–8 hours | 100% (baseline) | Best-case scenario |
| Incandescent bulb (60W) | 10–14 hours | ~25–35% | Most effective artificial source |
| LED bulb (60W-equivalent) | 12–16 hours | ~15–25% | Cooler, safer for close positioning |
| Overcast / cloudy day | 8–12 hours | ~30–40% | Diffused light still works |
| South-facing window (indoors) | 14–20 hours | ~15–25% | Glass reduces usable spectrum |
| Flashlight / torch | 20–30+ hours | ~5–10% | Emergency use only |
The single most important takeaway: Even the weakest artificial light source can charge your solar panel. It just takes longer. Plan for overnight sessions when using indoor bulbs.
Step 2: Charge via USB Port or Outlet
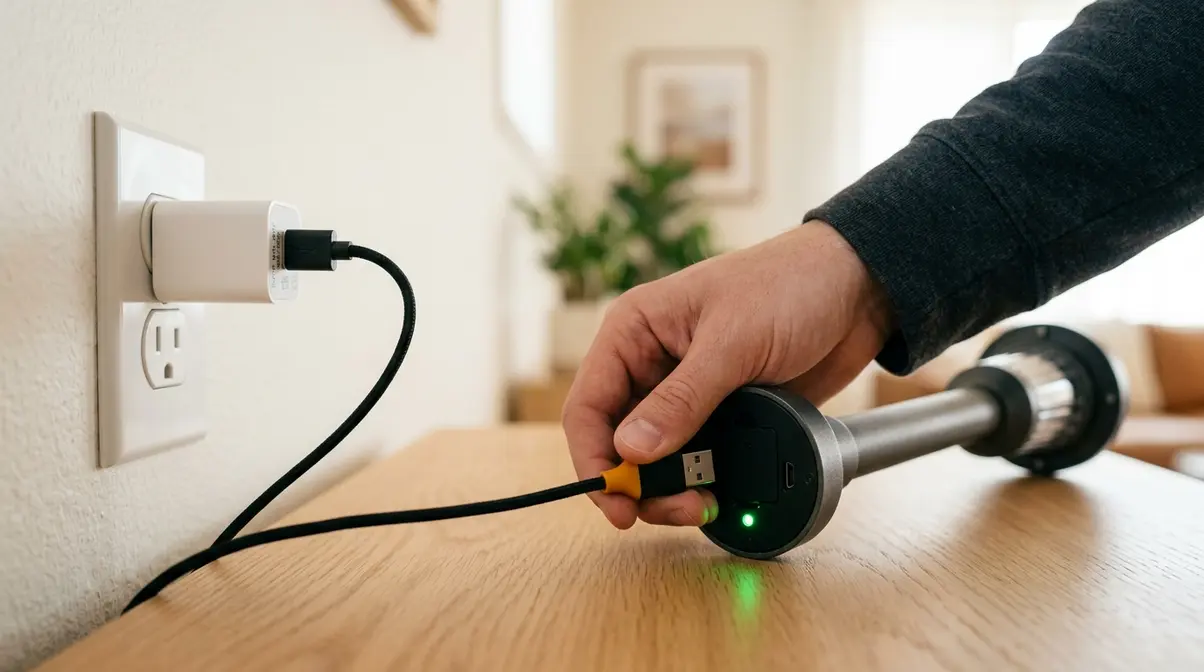
Some solar lights include a backup charging method that most owners never notice: a USB port built directly into the light housing. This method bypasses the solar panel entirely and charges the battery directly — making it the fastest alternative when sunlight is completely unavailable.
Does Your Solar Light Have a USB Port?
Check the base or housing of your solar light for a small rubber-covered port. It will typically be labeled “DC IN,” “USB,” or “5V.” Not every solar light has one — it’s more common on higher-end pathway lights, string lights, and lantern-style fixtures.
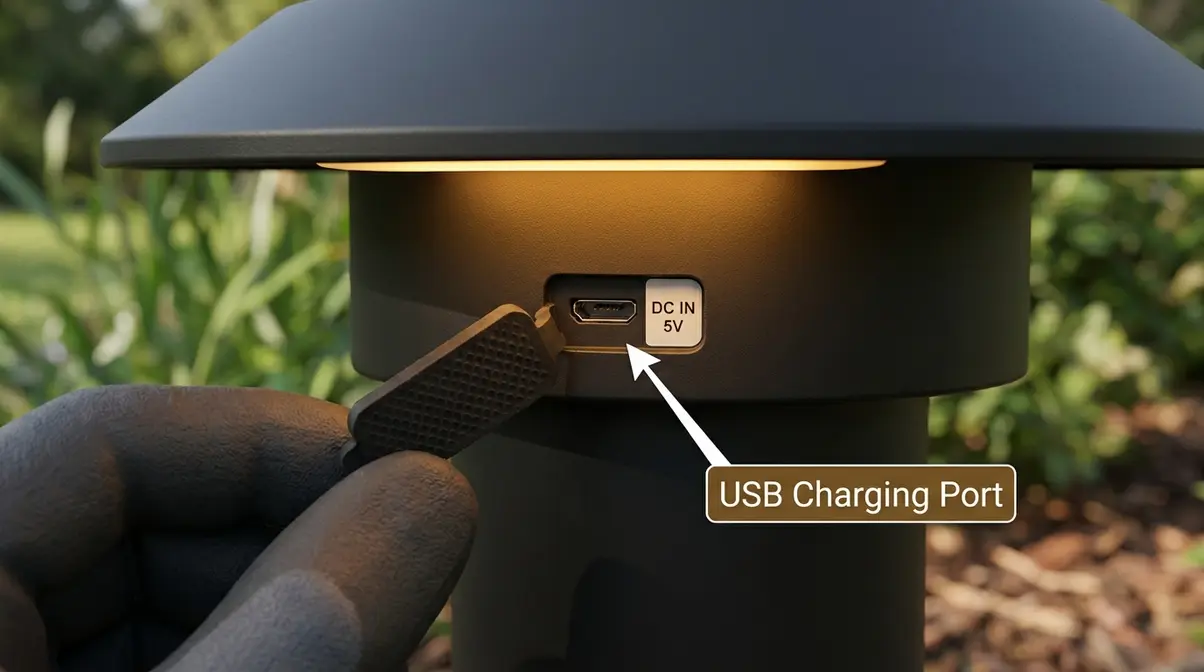
If your light has no port, skip ahead to Step 3. If it does, here’s how to use it.
How to Charge via USB: Step-by-Step
Charging via USB is straightforward. Here’s the exact process:
- Locate the USB port on the light’s housing — usually under a small rubber weather flap.
- Set the light switch to OFF before connecting any cable.
- Use a standard USB-A to Micro-USB or USB-C cable (check your port type — Micro-USB is most common on older models).
- Plug into a wall outlet using a standard 5V USB charger (a phone charger works perfectly).
- Charge for 4–8 hours, depending on battery capacity. Many lights include a small indicator LED that turns green when fully charged.
- Disconnect and switch ON to test.
Why it works: USB charging sends electricity directly to the internal battery, completely bypassing the solar panel. It’s essentially the same as charging a phone — the solar panel is just one of two ways to fill the battery.
According to HeiSolar’s guide on charging solar lights without sun, USB charging is the most reliable backup method and is increasingly standard on modern solar light designs.
Step 3: Redirect Sunlight With Mirrors
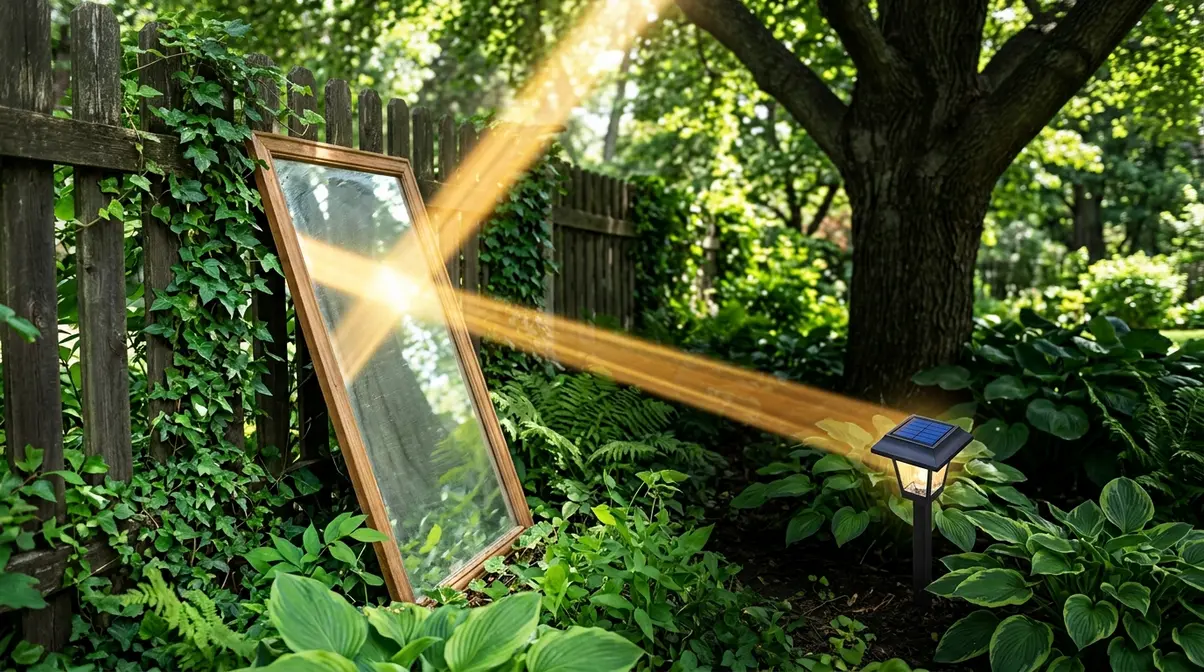
If you have even partial sunlight — perhaps a patch of direct sun in your yard but not where your lights are installed — mirrors can redirect that light to your solar panels. This method works surprisingly well and costs nothing if you already have a mirror or sheet of reflective material.
How to do it:
- Find a reflective surface — a bathroom mirror, a piece of aluminum foil stretched flat, or a reflective car sunshade all work.
- Identify your nearest patch of direct or bright indirect sunlight — even a small sunny wall or patio area counts.
- Angle the mirror to bounce light directly onto the solar panel’s face.
- Adjust the angle throughout the day as the sun moves — morning and afternoon positions will differ.
Why it works: Photovoltaic cells respond to light intensity, not the direction it originates from. Redirected sunlight carries the same energy as direct sunlight — you’re simply changing the delivery path.
This method is most useful for permanently shaded installations: lights mounted under a deck, against a north-facing fence, or — as many readers describe — on a property shaded by trees or terrain. As Light Supplier’s guide to charging solar lights notes, even partial redirection can meaningfully extend run time.
Step 4: Charge Through a Window
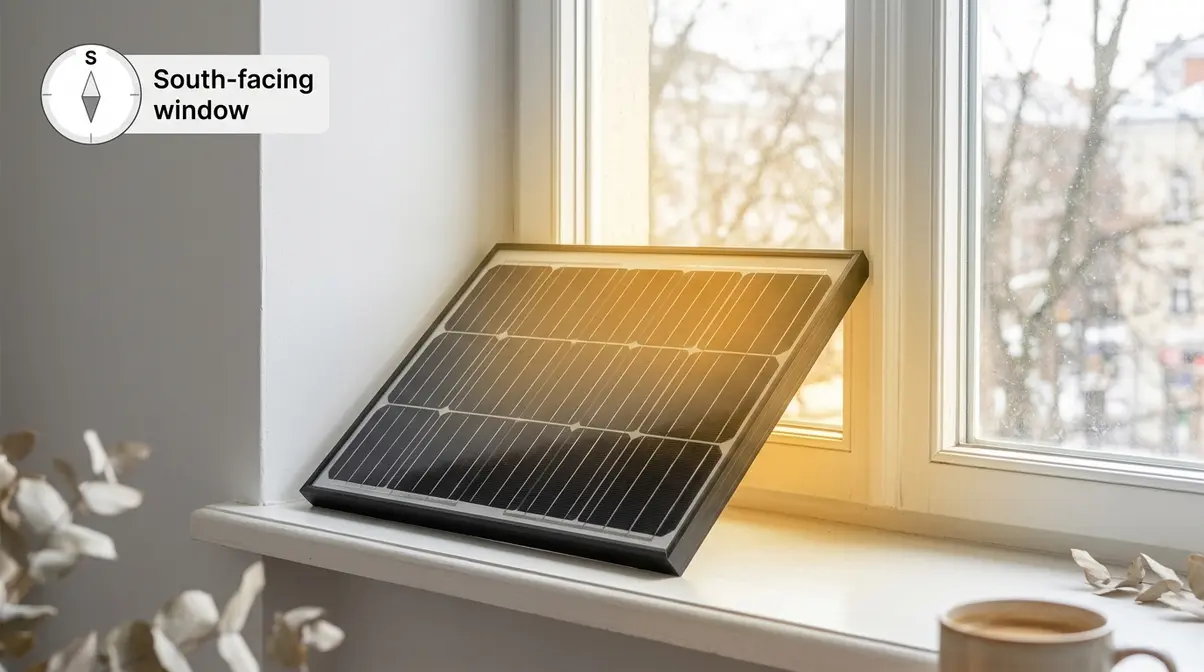
Placing your solar panel on a south-facing windowsill is a practical option for apartments, covered porches, or any situation where moving the panel outdoors isn’t possible. Indirect light through glass is significantly less effective than outdoor exposure, but it’s a real, usable option — especially on bright winter days.
How to do it:
- Remove the solar panel (if detachable) or place the entire light on the windowsill.
- Choose a south-facing window for maximum light exposure in the Northern Hemisphere. East or west-facing windows work as a fallback.
- Position the panel face-up, angled toward the glass at roughly 45 degrees if possible.
- Leave it for 14–20 hours — this method works best as an all-day or overnight setup.
Does Window Glass Block Charging?
Yes — but not completely. Standard window glass filters out a significant portion of UV light and reduces the overall intensity of the light reaching the panel. Community testing data and manufacturer guidance consistently suggest that glass reduces effective charging efficiency by roughly 30–50%, though the exact figure depends on glass type (standard single-pane vs. double-glazed vs. tinted), according to Renogy’s window solar analysis.
Tinted or low-E glass (common in modern energy-efficient windows) blocks even more of the useful spectrum. If your windows have a visible tint or a reflective coating, expect lower charging results.
The practical takeaway: Window charging works, but plan for nearly double the time compared to outdoor placement. A bright, sunny winter day through a clear south-facing window can still meaningfully charge a depleted panel — it just requires patience.
Step 5: Maximize Charging in Winter
Winter is when most solar light frustration peaks — and it’s also where the biggest misconception lives. Cold weather does not hurt solar panel performance. In fact, the opposite is true.
Why Winter Charging Is Harder
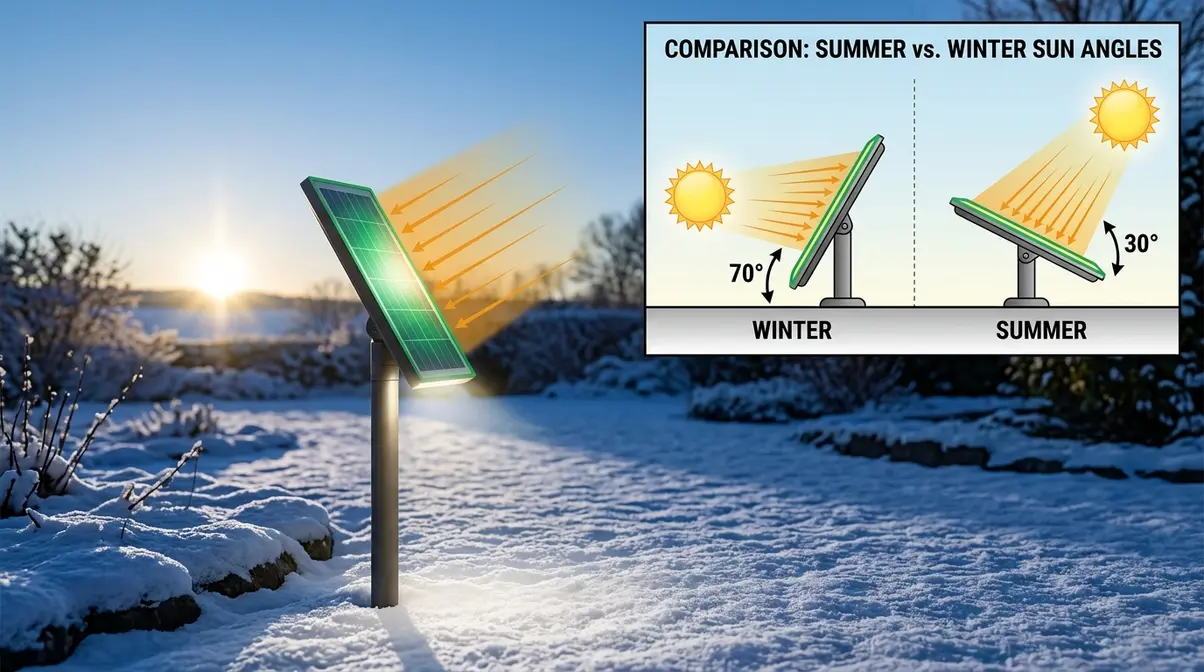
According to NREL (the National Renewable Energy Laboratory), photovoltaic panels actually operate more efficiently at lower temperatures — cold reduces electrical resistance in the cells, improving their output. The real problem in winter isn’t the cold; it’s the dramatically shorter days and lower sun angle, which reduces total light exposure.
This distinction matters practically: on a clear winter day, your solar panel is working at peak efficiency. The challenge is simply that it has fewer hours to do so. A panel that needs 6 hours of direct sun in summer might only get 3–4 usable hours in December.
Why it works (the science): Higher temperatures cause electrons in photovoltaic cells to move erratically, reducing efficiency. Cold temperatures calm that movement, allowing cleaner energy conversion. This is the same reason your phone battery performs differently in extreme heat vs. cold — though in reverse.
3 Winter Solar Charging Tips
Apply these during short winter days to get the most out of every hour of available light:
- Reposition panels to track the low winter sun. The sun sits much lower in the sky from November through February. Tilt your panels at a steeper angle (closer to vertical) to face the sun more directly — even a 15-degree adjustment can improve output noticeably.
- Clear snow and frost immediately. Even a thin layer of frost cuts light transmission dramatically. Check panels each morning and wipe clean with a dry cloth before daylight hours begin.
- Supplement with indoor charging on the shortest days. During the darkest weeks (late November through January), combine window placement during the day with an overnight indoor bulb session. This two-stage approach can keep lights functional even through extended low-light periods.
For additional context on winter solar performance, WikiHow’s solar lights guide covers several supplementary positioning strategies worth reviewing.
Step 6: Clean Your Solar Panel
This is the most overlooked method — and often the one that fixes the problem immediately. A dirty solar panel can lose 20–30% of its charging capacity without any visible sign of failure. Dust, pollen, bird droppings, and water spots all block light from reaching the photovoltaic cells.
How to clean your solar panel:
- Mix a small amount of mild dish soap with warm water.
- Dampen a soft cloth or sponge — avoid abrasive scrubbers that can scratch the panel surface.
- Wipe the panel gently in circular motions, covering the entire surface.
- Rinse with clean water and dry with a lint-free cloth.
- Check for cracks or clouding in the panel surface while you’re cleaning — physical damage reduces efficiency and may indicate the panel needs replacing.
Why it works: Solar panels work by letting light pass through a protective cover to the photovoltaic cells beneath. Any coating on that surface — even a thin film of dust — reduces the light intensity reaching the cells. Keeping the panel clean is the single easiest maintenance step most owners skip.
How often: Clean panels every 4–6 weeks during active use, and always after storms, heavy pollen seasons, or periods of heavy bird activity.
Checking Your Charging Status
Before assuming a method isn’t working, confirm your light is actually in charging mode. Several common setup mistakes prevent charging without any obvious error.
- Signs your solar light is charging correctly:
- The indicator LED (if present) glows red or amber during charging, switching to green when full.
- The light does not turn on during charging — this is normal and expected.
- After a full charge session, the light runs for its rated duration (typically 6–10 hours on a full charge).
Critical switch position: Your solar light’s on/off switch must be set to OFF during any charging session. When the switch is ON, the light’s sensor and circuit are active — meaning the battery drains at the same rate it’s charging, leaving you with a net-zero result.
First-time setup note: New solar lights often ship with a protective film over the panel. Peel it off before your first charge — it’s easy to miss and blocks virtually all light from reaching the cells.
Troubleshooting Charging Issues
If you’ve tried the methods above and your lights still aren’t charging, the problem is likely one of five common issues.
5 Common Problems and Fixes
| Problem | Likely Cause | Fix |
|---|---|---|
| Light doesn’t turn on after charging | Switch left ON during charge | Set switch to OFF, recharge for full cycle |
| Charges slowly even under direct bulb | Panel too far from light source | Move panel to within 2–4 inches of bulb |
| Light works for only 1–2 hours | Partially depleted or aging battery | Replace battery (see below) |
| Panel surface looks cloudy or yellowed | UV degradation of panel cover | Clean first; if unchanged, panel needs replacement |
| New light won’t charge at all | Protective film still on panel | Peel the clear shipping film from panel surface |
Battery drain patterns are the most reliable diagnostic tool. If your light used to run 8 hours and now runs 2, the battery is the culprit — not the charging method.
When It’s Time to Replace the Battery
Most solar light batteries are standard AA or AAA NiMH (nickel-metal hydride) rechargeable batteries — the same type used in TV remotes and wireless keyboards. They’re inexpensive and widely available.
Signs it’s time to replace:
- Runtime has dropped below 50% of the original duration
- The battery no longer holds a charge after a full 14-hour session
- The battery is more than 2 years old with regular use
One important caution: Never substitute alkaline batteries for NiMH in solar lights. Alkaline batteries aren’t designed for the continuous charge-discharge cycle of solar lights and can leak, damaging the fixture. Always replace with NiMH rechargeable batteries of the same size and capacity (mAh rating).
Frequently Asked Questions
How to charge without sun?
The most reliable method is indoor bulb charging — place the solar panel face-up, 2–4 inches below a 60W incandescent bulb for 10–14 hours. If your light has a USB port, plug it into a wall outlet for 4–8 hours for faster results. Both methods work because photovoltaic cells respond to any visible light source, not just sunlight. Start with whichever method you have materials for right now. For ongoing low-sun situations, combine window placement during the day with overnight indoor charging.
Do panels charge without sun?
Yes — solar panels charge from any visible light source, including household bulbs, diffused daylight through clouds, and reflected light. According to Energy Matters, photovoltaic cells convert the visible light spectrum into electricity regardless of the source. The key variable is intensity — sunlight is far more intense than a light bulb, which is why indoor charging takes 2–3 times longer. Cloudy days still provide roughly 30–40% of clear-sky charging capacity.
Can a flashlight charge them?
Yes, a flashlight can charge a solar panel, but it’s the least efficient method on The Light Source Ladder. Expect 20–30+ hours of flashlight exposure to achieve a meaningful charge — compared to 10–14 hours for an indoor bulb. A high-lumen LED flashlight held 1–2 inches from the panel surface works better than a dim one. This method is best treated as an emergency option when no other light source is available, not a regular charging strategy.
Does window charging work?
Yes, but glass reduces charging efficiency by roughly 30–50% depending on the glass type, as noted by solar experts. Standard single-pane windows allow more light through than double-glazed or tinted glass. Place the panel on a south-facing windowsill (Northern Hemisphere), angled toward the glass, for 14–20 hours. Clear, sunny winter days through a south-facing window can still provide a useful partial charge. Avoid tinted or low-E coated windows — they block significantly more of the useful solar spectrum.
What is the best charging way?
Direct sunlight remains the most effective charging method — nothing artificial comes close in terms of intensity and speed. When sunlight isn’t available, the best alternative depends on your situation: USB charging is fastest if your light has a port; indoor incandescent bulb charging is most accessible if it doesn’t. For permanently shaded properties, the most practical long-term solution is combining mirror redirection (to bounce any available sunlight onto the panel) with occasional indoor charging sessions during extended cloudy periods.
Getting Lights Working Again
Solar lights failing in winter or shade is one of the most common — and most solvable — problems in home outdoor lighting. The core insight is simple: photovoltaic cells respond to any visible light, not just direct sunlight. That’s the foundation of The Light Source Ladder, and it means you always have options, even when the sky is completely overcast.
For most readers, the fastest path forward is either USB charging (if your light has a port) or overnight indoor bulb charging using a 60W incandescent. Both can restore a depleted battery to functional levels within a single day. For shaded properties or persistent winter darkness, combining mirror redirection with panel repositioning gives you the best long-term results without any additional equipment.
Start with whatever method fits your situation right now. Set your switch to OFF, position the panel correctly, and give it a full session — most lights will surprise you with how quickly they recover.